Panasonic WVCU650 Operating Instructions - Page 62
Operator Registration or Change, Cont No.6 Clear OK?
 |
UPC - 791871504277
View all Panasonic WVCU650 manuals
Add to My Manuals
Save this manual to your list of manuals |
Page 62 highlights
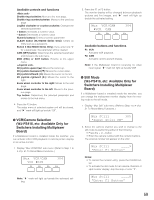
2. Press the CLEAR button. "Clear OK?" will appear on the LCD. Auto Login/out 403 Cont No.6 Clear OK? Note: To cancel deactivating auto login, press the EXIT or MON (ESC) button. 3. Press the ENTER or CAM (SET) button. Auto login or auto logout will be deactivated. "Erased" will appear on the LCD for a few seconds, and the LCD display will return to Step 1. Auto Login/out 403 Cont No.6 Erased ● Operator Registration or Change You can register new operators or change the parameter settings. Up to 16 operators are registrable in the system. Notes: • Refer to p. 29 Operation Start (Login) for the factory default. • To return to the previous step, press the EXIT or MON (ESC) button. 1. Display "Operator Setup" sub menu. (Refer to Step 1 to 4 of p. 51 To Recall Menu Functions.) Operator Setup 404 Operator01 2. Select an operator to register or change the settings by performing either of the following. • Rotate the JogDial clockwise or counterclockwise. • Press the + or - button. Operator Setup 404 Operator02 Note: When registering a new operator, select an operator number beside which "No Assign" is displayed. Operator Setup 404 Operator07 No Assign 3. Press the ENTER or CAM (SET) button. "User ID" setting menu will appear on the LCD. Operator07 404 User ID= 1 62 4. Enter a user ID by pressing the numeric buttons. "1" to "99999" are available for the user ID number. Operator07 404 User ID= 777 Note: If you have entered a wrong user ID, press the CLEAR button. 5. Press the ENTER or CAM (SET) button. The password entry form will appear on the LCD. Operator07 Password= 404 12345 6. Enter a password by pressing the numeric buttons. "1" to "99999" are available for the password. Operator07 404 Password= 333 Note: If you have entered a wrong password, press the CLEAR button. 7. Press the ENTER or CAM (SET) button. "Function Level" setting menu will appear on the LCD. Operator07 404 Function Level = 1 8. Set the function level by performing either of the following. • Rotate the JogDial clockwise or counterclockwise. • Press the + or - button. Operator07 404 Function Level = 2 Notes: • Refer to p. 63 Function Level Setting for details on function level. • You cannot change the function level of Operator 1. If you try to change, "Level 1 Fixed" will appear on the LCD. Operator01 404 Level1 Fixed 9. Press the ENTER or CAM (SET) button. "Camera Level" setting menu will appear on the LCD. Operator07 404 Camera Level = 1
-
 1
1 -
2
-
3
-
4
-
5
-
6
-
7
-
8
-
9
-
10
-
11
-
12
-
13
-
14
-
15
-
16
-
17
-
18
-
19
-
20
-
21
-
22
-
23
-
24
-
25
-
26
-
27
-
28
-
29
-
30
-
31
-
32
-
33
-
34
-
35
-
36
-
37
-
38
-
39
-
40
-
41
-
42
-
43
-
44
-
45
-
46
-
47
-
48
-
49
-
50
-
51
-
52
-
53
-
54
-
55
-
56
-
 57
57 -
 58
58 -
 59
59 -
 60
60 -
 61
61 -
 62
62 -
 63
63 -
 64
64 -
 65
65 -
 66
66 -
 67
67 -
68
-
69
-
70
-
71
-
72
-
73
-
74
-
75
-
76
-
77
-
78
 |
 |
