Panasonic WVCU650 Operating Instructions - Page 61
Auto Login/Logout Setup, Cont No.6 Set OK?
 |
UPC - 791871504277
View all Panasonic WVCU650 manuals
Add to My Manuals
Save this manual to your list of manuals |
Page 61 highlights
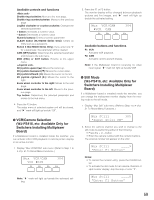
Display pattern Display Example DD/MM/YYYY HH:MM 24 21/08/2001 22:55 24 *2 MM/DD/YYYY HH:MM 24 08/21/2001 22:55 24 DD/Mmm/YYYY HH:MM 24 21/Aug/2001 22:55 24 YYYY/MM/DD HH:MM 24 2001/08/21 22:55 24 Mmm/DD/YYYY HH:MM 24 Aug/21/2001 22:55 24 DD/MM/YYYY HH:MM 12 21/08/2001 10:55 12 MM/DD/YYYY HH:MM 12 08/21/2001 10:55 12 DD/Mmm/YYYY HH:MM 12 21/Aug/2001 10:55 12 YYYY/MM/DD HH:MM 12 2001/08/21 10:55 12 Mmm/DD/YYYY HH:MM 12 Aug/21/2001 10:55 12 *1 *1 Factory default for U.S. models *2 Factory default for Europe models Note: In this diagram, "12" means 12 hour display and "24" means 24 hour display. 3. Press the ENTER or CAM (SET) button. "Set OK?" will appear on the LCD. Time&Date Type 402 Type0 Set OK? Note: To cancel the setting, press the EXIT or MON (ESC) button. 4. Press the ENTER or CAM (SET) button again. The display pattern will be set. "Memory" will appear on the LCD for a few seconds, and the LCD display will return to Step 1. Time&Date Type 402 Type0 Memory ● Auto Login/Logout Setup If auto login or auto logout is activated, operators can log into or log out of the system automatically. Note: You cannot set both Auto Login and Auto Logout to ON for the same system controller. 1. Display "Auto Login" sub menu. (Refer to Step 1 to 4 of p. 51 To Recall Menu Functions.) Auto Login/out 403 Cont No.1 Off 2. Select a system controller to activate auto login or auto logout by performing either of the following. • Rotate the JogDial clockwise or counterclockwise. • Press the + or - button. Auto Login/out 403 Cont No.6 Off Note: The factory default is "Cont No. 1". 3. Rotate the shuttle ring clockwise or move the 3D joystick to the right. 4. To activate auto login, select an operator (Operator 1 to 16) by performing the following. • Rotate the JogDial clockwise or counterclockwise. • Press the + or - button. Auto Login/out 403 Cont No.6 Operator16 To activate auto logout, select the duration until auto logout (Logout 5 to 120)* by performing the following. * The numbers mean minutes. • Rotate the JogDial clockwise or counterclockwise. • Press the + or - button. Auto Login/out 403 Cont No.6 Logout 30 Notes: • Parameters can be changed as follows. Operator 1 → Operator 2 ...→ Operator 16 → Logout 5 → Logout 10 ...→ Logout 120 → Operator 1 ... • To return the cursor to Cont No. n, rotate the shuttle ring counterclockwise or move the 3D joystick to the left. • Auto Logout setting will be activated after you log into the system again. 5. Press the ENTER or CAM (SET) button. "Set OK?" will appear on the LCD. Auto Login/out 403 Cont No.6 Set OK? Note: To cancel the setting, press the EXIT or MON (ESC) button. 6. Press the ENTER or CAM (SET) button again. Auto login will be set. "Memory" will appear on the LCD for a few seconds, and the LCD display will return to Step 1. Auto Login/out 403 Cont No.6 Memory To deactivate auto login or auto logout 1. Select a system controller to deactivate auto login or auto logout by performing either of the following. • Rotate the JogDial clockwise or counterclockwise. • Press the + or - button. Auto Login/out 403 Cont No.6 Operator16 Auto Login/out 403 Cont No.6 Logout 30 61
-
 1
1 -
2
-
3
-
4
-
5
-
6
-
7
-
8
-
9
-
10
-
11
-
12
-
13
-
14
-
15
-
16
-
17
-
18
-
19
-
20
-
21
-
22
-
23
-
24
-
25
-
26
-
27
-
28
-
29
-
30
-
31
-
32
-
33
-
34
-
35
-
36
-
37
-
38
-
39
-
40
-
41
-
42
-
43
-
44
-
45
-
46
-
47
-
48
-
49
-
50
-
51
-
52
-
53
-
54
-
55
-
 56
56 -
 57
57 -
 58
58 -
 59
59 -
 60
60 -
 61
61 -
 62
62 -
 63
63 -
 64
64 -
 65
65 -
 66
66 -
67
-
68
-
69
-
70
-
71
-
72
-
73
-
74
-
75
-
76
-
77
-
78
 |
 |
