Pioneer AVH-X5600BHS Owner's Manual - Page 10
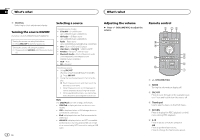
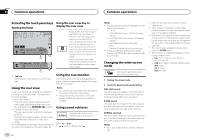
Activating the touch panel keys, Using the rear view, Using sound retriever, Changing the wide-screen
 |
View all Pioneer AVH-X5600BHS manuals
Add to My Manuals
Save this manual to your list of manuals |
Page 10 highlights
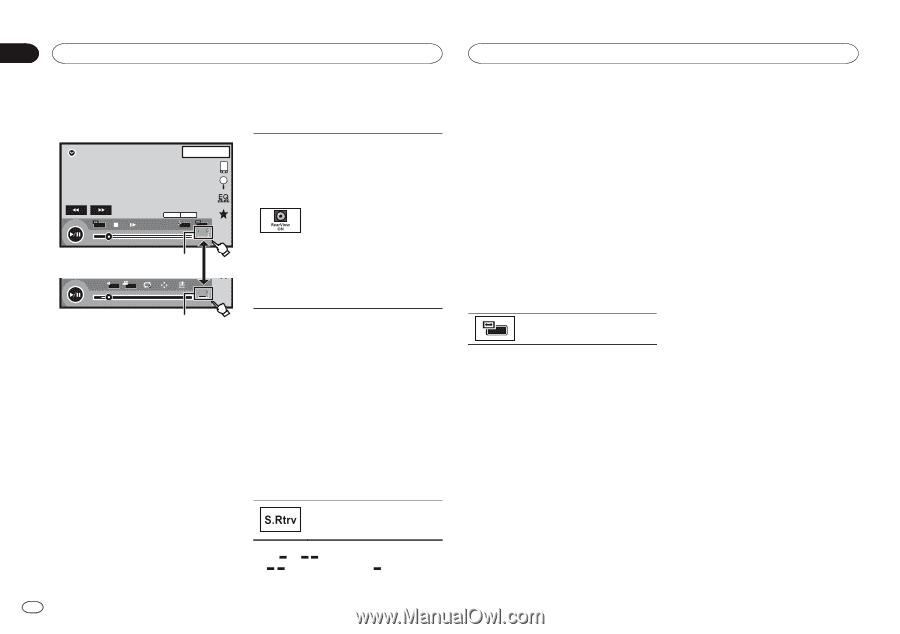
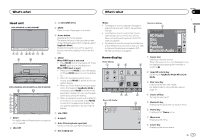
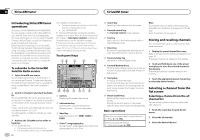
Section 04 Common operations Common operations Activating the touch panel keys Touch panel keys DVD-V 1 JAPNM12:43 01 01 FULL 00'20'' MENU DMoullbtiycDh 48DkoHlzby16Dbit TOP MENU 1 1 1/2 -119'51'' 1 L+R 1 07'24'' Return 2/2 -112'47'' 1 1 Tab key Switching the touch panel keys on the display. Using the rear view A rear view camera sold separately is required for using the rear view mode. The below functions are available. ! Rear view camera This unit can be setup to display the rear view image automatically when you move the shift lever to the REVERSE (R) position. ! Camera for rear view mode The rear view can be turned on to display at all times. The rear view camera needs to be set to a setting other than Off to turn on rear view mode. For details about the settings, refer to Setting the rear view camera (back up camera) on page 43. Using the rear view key to display the rear view Displaying the rear view image by turning the rear view image on. When the rear view image is displayed, you can switch to the source display by touching the display. You can operate from the source display temporarily at this time. If you do not perform any operations within a few seconds, the display will return to the rear view image. To turn off the rear view image, press the home button to return to the home display and then press this key again. Using the rear monitor Connecting a rear monitor, sold separately, to this unit allows images and videos to be viewed from the rear seats. Notes ! You cannot use touch panel keys and opera- tion screens from the rear monitor. ! Images and video will continue to be dis- played whether the vehicle is in motion or stopped. Using sound retriever Automatically enhances compressed audio and restores rich sound. Off - - ! is more effective than . 10 En Notes ! This function is enabled for playback on the sources listed below. - CD-DA - MP3/WMA/AAC files on USB MTP storage devices - MP3/WMA/AAC/WAV files on USB storage devices - MP3/WMA/AAC files on CD media - iPod - Pandora (iPod with 30-pin connector only) ! The sound retriever setting is turned off when the MIXTRAX function is used in USB source mode. Changing the wide-screen mode Selecting the appropriate screen ratio for the playback video. ! Different settings can be stored for each video source. ! When a video is viewed in a wide screen mode that does not match its original aspect ratio, it may appear different. ! Remember that using the wide mode feature of this system for commercial or public viewing purposes may constitute an infringement on the author's rights protected by the Copyright Law. ! The video image will appear coarser when viewed in ZOOM mode. ! This function is enabled for playback on the sources listed below. - Disc: DVD-V, Video-CD, DivX, MPEG-1, MPEG-2, MPEG-4 - USB: DivX, MPEG-1, MPEG-2, MPEG-4, JPEG - iPod: Video - AV: A/V data - AUX: A/V data 1 Display the screen mode. 2 Touch the desired wide mode setting. FULL (full screen) The 4:3 picture is enlarged in the horizontal direction only, granting viewers a 4:3 TV picture (normal picture) without any omissions. ZOOM (zoom) The 4:3 picture is enlarged in the same proportion both vertically and horizontally; ideal for a cinema sized picture (wide screen picture). NORMAL (normal) The 4:3 picture is displayed as is, granting viewers no sense of disparity as the proportions are the same as that of the normal picture. Notes ! You cannot operate this function while driv- ing.
-
 1
1 -
2
-
3
-
4
-
 5
5 -
 6
6 -
 7
7 -
 8
8 -
 9
9 -
 10
10 -
 11
11 -
 12
12 -
 13
13 -
 14
14 -
 15
15 -
16
-
17
-
18
-
19
-
20
-
21
-
22
-
23
-
24
-
25
-
26
-
27
-
28
-
29
-
30
-
31
-
32
-
33
-
34
-
35
-
36
-
37
-
38
-
39
-
40
-
41
-
42
-
43
-
44
-
45
-
46
-
47
-
48
-
49
-
50
-
51
-
52
-
53
-
54
-
55
-
56
-
57
-
58
-
59
-
60
-
61
-
62
-
63
-
64
-
65
-
66
-
67
-
68
-
69
-
70
-
71
-
72
-
73
-
74
-
75
-
76
-
77
-
78
-
79
-
80
-
81
-
82
-
83
-
84
-
85
-
86
-
87
-
88
-
89
-
90
-
91
-
92
-
93
-
94
-
95
-
96
-
97
-
98
-
99
-
100
-
101
-
102
-
103
-
104
-
105
-
106
-
107
-
108
-
109
-
110
-
111
-
112
-
113
-
114
-
115
-
116
-
117
-
118
-
119
-
120
-
121
-
122
-
123
-
124
-
125
-
126
-
127
-
128
-
129
-
130
-
131
-
132
-
133
-
134
-
135
-
136
-
137
-
138
-
139
-
140
-
141
-
142
-
143
-
144
-
145
-
146
-
147
-
148
-
149
-
150
-
151
-
152
-
153
-
154
-
155
-
156
-
157
-
158
-
159
-
160
-
161
-
162
-
163
-
164
-
165
-
166
-
167
-
168
-
169
-
170
-
171
-
172
-
173
-
174
-
175
-
176
-
177
-
178
-
179
-
180
-
181
-
182
-
183
-
184
-
185
-
186
-
187
-
188
-
189
-
190
-
191
-
192
-
193
-
194
-
195
-
196
-
197
-
198
-
199
-
200
-
201
-
202
-
203
-
204
-
205
-
206
-
207
-
208
-
209
-
210
-
211
-
212
-
213
-
214
-
215
-
216
-
217
-
218
-
219
-
220
 |
 |