Pioneer AVH-X5600BHS Owner's Manual - Page 40
Selecting MirrorLink Mode, Setting AV input - with navigation
 |
View all Pioneer AVH-X5600BHS manuals
Add to My Manuals
Save this manual to your list of manuals |
Page 40 highlights
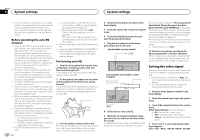
Section 21 System settings System settings Switching the auxiliary setting Activate this setting when using an auxiliary device connected to this unit. 1 Press the home button to switch to the home display. 2 Touch the system key to open the system menu. 3 Touch AUX Input on the system menu to turn AUX Input on or off. Setting AV input Activate this setting when using an external video component connected to this unit. 1 Press the home button to switch to the home display. 3 Touch the system key to open the system menu. 4 Touch Device connection on the system menu. 5 Touch NAVI to select. NAVI - Navigation system Setting the Pandora connect mode Refer to Setting the Pandora connect mode on page 30. Selecting MirrorLink Mode You can select the MirrorLink Mode setting whether you use third party applications in your smartphone or not. 2 Touch the system key to open the system 1 Press the home button to switch to the menu. home display. 3 Touch AV Input on the system menu to turn AV Input on or off. 2 Touch the system key to open the system menu. Setting the navigation system Activate this setting when connecting a Pioneer Add-on Navigation system (sold separately). Device connection can be set when all of the following conditions are met. - The iPhone is not connected. - No Bluetooth connection. - The source is turned off. 1 Turn the source off. Refer to Source off key on page 7. 2 Press the home button to switch to the home display. 3 Touch the desired setting next to CD-ML100 Setting. ! Car Mode - You can use the launcher applications in your smartphone on the unit's screen. ! App List Mode - You can use the third party applications in your smartphone on the unit's screen. Updating the firmware for the smartphone link adaptor This function is used to update the smartphone link adaptor firmware with the latest firmware. 40 En For about smartphone link adaptor firmware and updating, refer to our website. You can update only when smartphone link adaptor is available. 8 Touch Continue to display the update mode. Follow the on-screen instructions to finish updating the smartphone link adaptor. Important ! The USB storage device for updating must contain only the correct update file. If the USB storage device contains multiple files, the update will fail. ! Never turn the unit off and never disconnect the USB storage device while the firmware is being updated. ! You can only start the firmware update when the vehicle is stopped and the parking brake is engaged. 1 Downloading the firmware update files. 2 Connect a blank (formatted) USB storage device to your computer, and then locate and copy the correct update file onto the USB storage device. 3 Turn the source off. Refer to Turning the source ON/OFF on page 8. 4 Press the home button to switch to the home display. 5 Touch the system key to open the system menu. 6 Touch CD-ML100 Update on the system menu. 7 Connect the USB storage device to the smartphone link adaptor. Refer to Connection for updating Smartphone link adaptor firmware on page 53. 9 Remove the USB storage device from the smartphone link adaptor. 10 Turn the ignition switch OFF and then to ACC or ON. Notes ! If update failed, please consult your dealer or the nearest authorized PIONEER Service Station. ! You cannot update while connected to Bluetooth. Displaying the smartphone link adaptor firmware version If smartphone link adaptor fails to operate properly, you may need to consult your dealer for repair. In such cases, you may be asked to specify the firmware version. Perform the following procedure to check the version on smartphone link adaptor. 1 Turn the source off. Refer to Turning the source ON/OFF on page 8. 2 Press the home button to switch to the home display. 3 Touch the system key to open the system menu. 4 Touch CD-ML100 Firmware Info to display to the version of the firmware of smartphone link adaptor.
-
 1
1 -
2
-
3
-
4
-
5
-
6
-
7
-
8
-
9
-
10
-
11
-
12
-
13
-
14
-
15
-
16
-
17
-
18
-
19
-
20
-
21
-
22
-
23
-
24
-
25
-
26
-
27
-
28
-
29
-
30
-
31
-
32
-
33
-
34
-
 35
35 -
 36
36 -
 37
37 -
 38
38 -
 39
39 -
 40
40 -
 41
41 -
 42
42 -
 43
43 -
 44
44 -
 45
45 -
46
-
47
-
48
-
49
-
50
-
51
-
52
-
53
-
54
-
55
-
56
-
57
-
58
-
59
-
60
-
61
-
62
-
63
-
64
-
65
-
66
-
67
-
68
-
69
-
70
-
71
-
72
-
73
-
74
-
75
-
76
-
77
-
78
-
79
-
80
-
81
-
82
-
83
-
84
-
85
-
86
-
87
-
88
-
89
-
90
-
91
-
92
-
93
-
94
-
95
-
96
-
97
-
98
-
99
-
100
-
101
-
102
-
103
-
104
-
105
-
106
-
107
-
108
-
109
-
110
-
111
-
112
-
113
-
114
-
115
-
116
-
117
-
118
-
119
-
120
-
121
-
122
-
123
-
124
-
125
-
126
-
127
-
128
-
129
-
130
-
131
-
132
-
133
-
134
-
135
-
136
-
137
-
138
-
139
-
140
-
141
-
142
-
143
-
144
-
145
-
146
-
147
-
148
-
149
-
150
-
151
-
152
-
153
-
154
-
155
-
156
-
157
-
158
-
159
-
160
-
161
-
162
-
163
-
164
-
165
-
166
-
167
-
168
-
169
-
170
-
171
-
172
-
173
-
174
-
175
-
176
-
177
-
178
-
179
-
180
-
181
-
182
-
183
-
184
-
185
-
186
-
187
-
188
-
189
-
190
-
191
-
192
-
193
-
194
-
195
-
196
-
197
-
198
-
199
-
200
-
201
-
202
-
203
-
204
-
205
-
206
-
207
-
208
-
209
-
210
-
211
-
212
-
213
-
214
-
215
-
216
-
217
-
218
-
219
-
220
 |
 |