Pioneer AVH-X5600BHS Owner's Manual - Page 51
When connecting to separately sold power amp
 |
View all Pioneer AVH-X5600BHS manuals
Add to My Manuals
Save this manual to your list of manuals |
Page 51 highlights
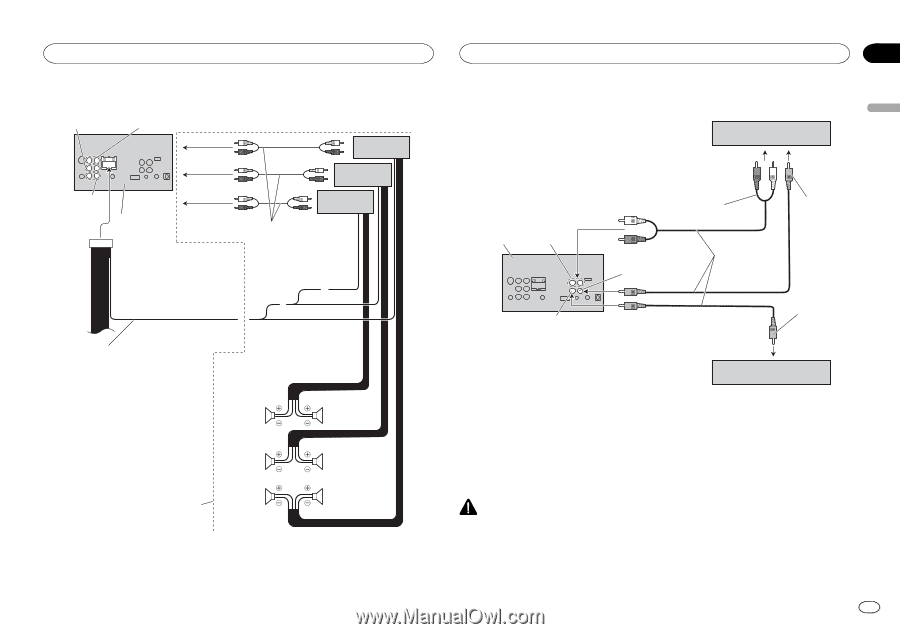
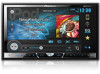
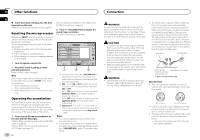
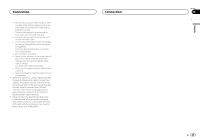
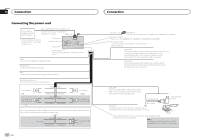
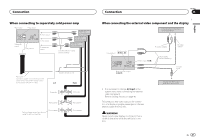
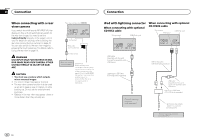
English Connection When connecting to separately sold power amp Rear output Front output Subwoofer output This product To front output To rear output To subwoofer output Power amp (sold separately) Power amp (sold separately) Power amp (sold separately) Connect with RCA cables (sold separately) Blue/white Connect to system control terminal of the power amp or auto-antenna relay control terminal (max. 300 mA 12 V DC). System remote control Left Right Subwoofer Subwoofer Rear speaker Perform these connections when using the optional amplifier. Front speaker Rear speaker Front speaker Connection Section 26 When connecting the external video component and the display External video component (sold separately) Audio inputs This product (R IN, L IN) Rear monitor output (V OUT) To audio outputs To video output Video input (V IN) RCA cables (sold separately) To video input ! It is necessary to change AV Input in the system menu when connecting the external video component. Refer to Setting AV input on page 40. This product's rear video output is for connection of a display to enable passengers in the rear seats to watch the DVD, etc. WARNING Never install a rear display in a location that is visible to the driver while the vehicle is in motion. Display with RCA input jacks (sold separately) En 51
-
 1
1 -
2
-
3
-
4
-
5
-
6
-
7
-
8
-
9
-
10
-
11
-
12
-
13
-
14
-
15
-
16
-
17
-
18
-
19
-
20
-
21
-
22
-
23
-
24
-
25
-
26
-
27
-
28
-
29
-
30
-
31
-
32
-
33
-
34
-
35
-
36
-
37
-
38
-
39
-
40
-
41
-
42
-
43
-
44
-
45
-
 46
46 -
 47
47 -
 48
48 -
 49
49 -
 50
50 -
 51
51 -
 52
52 -
 53
53 -
 54
54 -
 55
55 -
 56
56 -
57
-
58
-
59
-
60
-
61
-
62
-
63
-
64
-
65
-
66
-
67
-
68
-
69
-
70
-
71
-
72
-
73
-
74
-
75
-
76
-
77
-
78
-
79
-
80
-
81
-
82
-
83
-
84
-
85
-
86
-
87
-
88
-
89
-
90
-
91
-
92
-
93
-
94
-
95
-
96
-
97
-
98
-
99
-
100
-
101
-
102
-
103
-
104
-
105
-
106
-
107
-
108
-
109
-
110
-
111
-
112
-
113
-
114
-
115
-
116
-
117
-
118
-
119
-
120
-
121
-
122
-
123
-
124
-
125
-
126
-
127
-
128
-
129
-
130
-
131
-
132
-
133
-
134
-
135
-
136
-
137
-
138
-
139
-
140
-
141
-
142
-
143
-
144
-
145
-
146
-
147
-
148
-
149
-
150
-
151
-
152
-
153
-
154
-
155
-
156
-
157
-
158
-
159
-
160
-
161
-
162
-
163
-
164
-
165
-
166
-
167
-
168
-
169
-
170
-
171
-
172
-
173
-
174
-
175
-
176
-
177
-
178
-
179
-
180
-
181
-
182
-
183
-
184
-
185
-
186
-
187
-
188
-
189
-
190
-
191
-
192
-
193
-
194
-
195
-
196
-
197
-
198
-
199
-
200
-
201
-
202
-
203
-
204
-
205
-
206
-
207
-
208
-
209
-
210
-
211
-
212
-
213
-
214
-
215
-
216
-
217
-
218
-
219
-
220
 |
 |