Pioneer DVR-660H-S Operating Instructions - Page 104
Copying files from a PC Connect PC, Copying WMA/MP3 files
 |
UPC - 012562888897
View all Pioneer DVR-660H-S manuals
Add to My Manuals
Save this manual to your list of manuals |
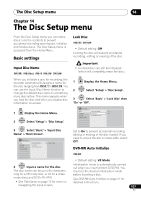
Page 104 highlights
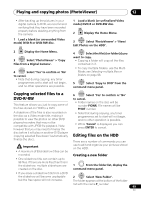
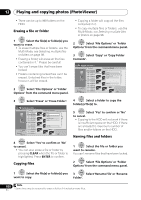
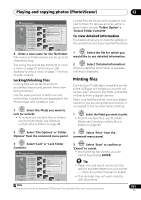
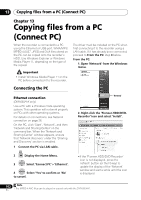
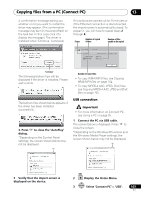
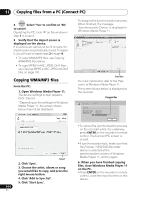
13 Copying files from a PC (Connect PC) 4 ENTER Select 'Yes' to confirm or 'No' to cancel. Operating the PC, click '' on the window in step 1 to close it. 5 Verify that the import screen is displayed on the device. If no actions are carried out for 20 minutes, the import screen is automatically closed. To reopen it, you will have to repeat steps 2 through 4. • To copy WMA/MP3 files, see Copying WMA/MP3 files below. • To copy MPEG-4 AAC, JPEG, DivX files, see Copying MPEG-4 AAC, JPEG and DivX files on page 105. Copying WMA/MP3 files From the PC: 1. Open Windows Media Player 11. The device settings screen appears. Click 'Cancel'. *Depending on the settings for Windows Media Player 11, the screen shown below may not be displayed. 'Cancel' 2. Click 'Sync'. 3. Choose the artist, album or song you would like to copy, and press the right mouse button. 4. Click 'Add to Sync list'. 5. Click 'Start Sync'. 104 En This begins the synchronization process. When finished, the message 'Synchronized to Device' is displayed in Windows Media Player 11. 'Start Sync' For more information refer to the Help menu of Windows Media Player 11. The screen shown below is displayed on the recorder. Progress Bar Connect PC Copying 00001 Folders 000003 Files ( 000 error ) ( 000 error ) Exit •To cancel the synchronization process on the recorder while it is underway, press ENTER on the recorder's remote control. The Connect PC screen is closed. •If synchronization fails, make sure that the Pioneer. HDD/DVD-Recorder device is selected at the synchronization screen of Windows Media Player 11, and try again. 6. When you have finished copying files, close Windows Media Player 11 on the PC. •Press ENTER on the recorder's remote control, close the import screen on this device.
-
 1
1 -
2
-
3
-
4
-
5
-
6
-
7
-
8
-
9
-
10
-
11
-
12
-
13
-
14
-
15
-
16
-
17
-
18
-
19
-
20
-
21
-
22
-
23
-
24
-
25
-
26
-
27
-
28
-
29
-
30
-
31
-
32
-
33
-
34
-
35
-
36
-
37
-
38
-
39
-
40
-
41
-
42
-
43
-
44
-
45
-
46
-
47
-
48
-
49
-
50
-
51
-
52
-
53
-
54
-
55
-
56
-
57
-
58
-
59
-
60
-
61
-
62
-
63
-
64
-
65
-
66
-
67
-
68
-
69
-
70
-
71
-
72
-
73
-
74
-
75
-
76
-
77
-
78
-
79
-
80
-
81
-
82
-
83
-
84
-
85
-
86
-
87
-
88
-
89
-
90
-
91
-
92
-
93
-
94
-
95
-
96
-
97
-
98
-
 99
99 -
 100
100 -
 101
101 -
 102
102 -
 103
103 -
 104
104 -
 105
105 -
 106
106 -
 107
107 -
 108
108 -
 109
109 -
110
-
111
-
112
-
113
-
114
-
115
-
116
-
117
-
118
-
119
-
120
-
121
-
122
-
123
-
124
-
125
-
126
-
127
-
128
-
129
-
130
-
131
-
132
-
133
-
134
-
135
-
136
-
137
-
138
-
139
-
140
-
141
-
142
-
143
-
144
-
145
 |
 |
