Pioneer DVR-660H-S Operating Instructions - Page 111
The Video Adjust menu, Setting the picture quality, for disc playback
 |
UPC - 012562888897
View all Pioneer DVR-660H-S manuals
Add to My Manuals
Save this manual to your list of manuals |
Page 111 highlights
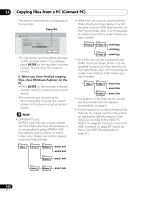
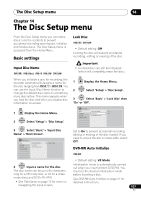
The Video Adjust menu 15 • YNR - Adjusts the amount of noise reduction (NR) applied to the Y (brightness) component. • CNR - Adjusts the amount of noise reduction (NR) applied to the C (colour) component. • Detail - Adjusts how sharp edges appear. • White AGC - Turn on for automatic white level adjustment. • White Level - Adjusts the intensity of white. • Black Level - Adjusts the intensity of black. • Black Setup - Corrects the standard reference black level. • Hue - Adjusts overall balance between red and green. • Chroma Level - Adjusts how rich the colours appear. 4 ENTER Adjust the currently selected setting. HOME MENU 5 Press to exit. You can now use the preset for any other input or the built-in TV tuner. Tip • To see more of the picture as you adjust different settings, press ENTER after selecting the setting you want to adjust. Setting the picture quality for disc playback This setting determines how the picture will look when playing discs. Choosing a preset HOME MENU 1 With a disc playing (or paused), press to display the Home Menu. 2 ENTER Select 'Setup' > 'Video Adjust'. 3 ENTER Select a preset. TV Detailed Settings There are six presets available: • TV - suitable for LCD and cathode-ray tube TVs • PDP - suitable for Flat Panel TV • Professional - suitable for professional monitors • Memory1 - user preset 1 • Memory2 - user preset 2 • Memory3 - user preset 3 You can press DISPLAY to see the individual settings for the current preset (TV, PDP or Professional). Creating your own set There are three user presets in which you can save your own set of picture quality settings for disc playback. 1 Follow Choosing a preset above and select one of the user presets (Memory 1, 2 or 3). 2 ENTER Select 'Detailed Settings'. Memory1 Detailed Settings 111 En
-
 1
1 -
2
-
3
-
4
-
5
-
6
-
7
-
8
-
9
-
10
-
11
-
12
-
13
-
14
-
15
-
16
-
17
-
18
-
19
-
20
-
21
-
22
-
23
-
24
-
25
-
26
-
27
-
28
-
29
-
30
-
31
-
32
-
33
-
34
-
35
-
36
-
37
-
38
-
39
-
40
-
41
-
42
-
43
-
44
-
45
-
46
-
47
-
48
-
49
-
50
-
51
-
52
-
53
-
54
-
55
-
56
-
57
-
58
-
59
-
60
-
61
-
62
-
63
-
64
-
65
-
66
-
67
-
68
-
69
-
70
-
71
-
72
-
73
-
74
-
75
-
76
-
77
-
78
-
79
-
80
-
81
-
82
-
83
-
84
-
85
-
86
-
87
-
88
-
89
-
90
-
91
-
92
-
93
-
94
-
95
-
96
-
97
-
98
-
99
-
100
-
101
-
102
-
103
-
104
-
105
-
 106
106 -
 107
107 -
 108
108 -
 109
109 -
 110
110 -
 111
111 -
 112
112 -
 113
113 -
 114
114 -
 115
115 -
 116
116 -
117
-
118
-
119
-
120
-
121
-
122
-
123
-
124
-
125
-
126
-
127
-
128
-
129
-
130
-
131
-
132
-
133
-
134
-
135
-
136
-
137
-
138
-
139
-
140
-
141
-
142
-
143
-
144
-
145
 |
 |
