Pioneer DVR-660H-S Operating Instructions - Page 65
Playing and recording from a DV/HDD camcorder, About DV
 |
UPC - 012562888897
View all Pioneer DVR-660H-S manuals
Add to My Manuals
Save this manual to your list of manuals |
Page 65 highlights
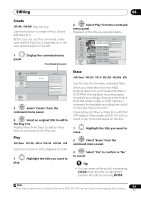
Playing and recording from a DV/HDD camcorder 07 3 From the Initial Setup menu, check that the DV audio input is setup as you require. See DV Input on page 115 for more on this. • If a timer recording is scheduled to start, and in some other instances, the disc will not be finalized. • Check also that the Audio In settings for External Audio and Dual Mono Recording are as you want them (see Audio In on page 114). HOME MENU 4 Display the Home Menu. Frequently Asked Questions • I can't get my DV camcorder to work with the recorder! Check that the DV cable is properly connected. Also make sure that what you're trying to record is not copyprotected. 5 ENTER Select 'DV/HDD-Cam' > 'DV Auto Copy'. • DV recording only works when the DV camcorder is in VTR mode with a tape loaded. If it still doesn't work, try switching off the camcorder then switch back on. • There's a picture, but no sound! Try switching the DV Input setting (see DV Input on page 115) between Stereo 1 and Stereo 2.1 6 ENTER Select 'Record to Hard Disk Drive' or 'Record to DVD'. The DV tape is rewound to the beginning. Once it is rewound, the DV tape is played from the beginning and copied to either the HDD or a DVD. • If there is a gap of two minutes or more between recorded contents, the copying process is automatically stopped. • Once copying is finished, the DV tape is automatically rewound. • To cancel the copying process, press F STOP REC for more than three seconds. About DV Using DV, also known as i.LINK or IEEE 13941995, you can connect a DV camcorder to this recorder using a DV cable for input of audio, video, data and control signals. "i.LINK" and the "i.LINK" logo are trademarks. • This recorder is only compatible with DVformat (DVC-SD) camcorders. Digital satellite receivers and Digital VHS video recorders are not compatible. • You cannot connect more than one DV camcorder at a time to this recorder. About automatic finalization If you use a DVD-R/-RW (Video mode) or DVD+R/+RW disc for copying, it will automatically be finalized after copying is complete. • You can't customize the background for DVD-R/-RW or DVD+R/+RW disc finalization. • No title names are assigned. • If you want to give the disc a name, please do so before you start the copy (see Input Disc Name on page 107). • You cannot control this recorder from external equipment connected via the DV IN jack. • It may not always be possible to control the connected camcorder via the DV IN jack. • DV camcorders can usually record audio as stereo 16-bit/48 kHz, or twin stereo tracks of 12-bit/32 kHz. This recorder can only record one stereo audio track. Set the DV Input setting as required (see DV Input on page 115). Note 1 If the audio subcode on the DV tape cannot be read correctly, the audio type will not switch automatically. You can switch the audio manually from the External Audio setting (page 114). 65 En
-
 1
1 -
2
-
3
-
4
-
5
-
6
-
7
-
8
-
9
-
10
-
11
-
12
-
13
-
14
-
15
-
16
-
17
-
18
-
19
-
20
-
21
-
22
-
23
-
24
-
25
-
26
-
27
-
28
-
29
-
30
-
31
-
32
-
33
-
34
-
35
-
36
-
37
-
38
-
39
-
40
-
41
-
42
-
43
-
44
-
45
-
46
-
47
-
48
-
49
-
50
-
51
-
52
-
53
-
54
-
55
-
56
-
57
-
58
-
59
-
 60
60 -
 61
61 -
 62
62 -
 63
63 -
 64
64 -
 65
65 -
 66
66 -
 67
67 -
 68
68 -
 69
69 -
 70
70 -
71
-
72
-
73
-
74
-
75
-
76
-
77
-
78
-
79
-
80
-
81
-
82
-
83
-
84
-
85
-
86
-
87
-
88
-
89
-
90
-
91
-
92
-
93
-
94
-
95
-
96
-
97
-
98
-
99
-
100
-
101
-
102
-
103
-
104
-
105
-
106
-
107
-
108
-
109
-
110
-
111
-
112
-
113
-
114
-
115
-
116
-
117
-
118
-
119
-
120
-
121
-
122
-
123
-
124
-
125
-
126
-
127
-
128
-
129
-
130
-
131
-
132
-
133
-
134
-
135
-
136
-
137
-
138
-
139
-
140
-
141
-
142
-
143
-
144
-
145
 |
 |
