Pioneer DVR-660H-S Operating Instructions - Page 97
Playing and copying photos PhotoViewer, Creating photo movies, Importing files to the HDD
 |
UPC - 012562888897
View all Pioneer DVR-660H-S manuals
Add to My Manuals
Save this manual to your list of manuals |
Page 97 highlights
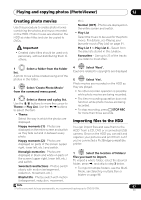
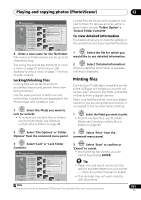
Playing and copying photos (PhotoViewer) 12 Creating photo movies Use this procedure to create photo movies combining the photos and music recorded on the HDD. Photo movies are stored on the HDD as video titles and can be copied to DVDs. Important • Created video titles should be used only personally, without distributing them to others. etc.). Normal (OFF) - Photos are displayed on the entire screen and switch. • Play List Select the music to be used for the photo movie. For details, see Playing your favourite music (Play List) on page 91. Play List 1 to Play List 4 - Select from the play lists stored in the Jukebox. Favourites - Use up to 25 of the tracks you listen to most often. 1 Select a folder from the folder list. A photo movie will be created using all of the photos in the folder. 2 ENTER Select 'Create Photo Movie' from the command menu panel. 3 Select a theme and a play list. Use the / buttons to move the cursor to Theme or Play List. Use the / buttons to select the item. • Theme Select the way in which the photos are displayed. Happy moments (1) - Photos are displayed on the entire screen and switch as they fade out and in between every photo. Happy moments (2) - Photos are displayed on parts of the screen (upper right, lower left, etc.) and switch. Nostalgic memories - Photos are displayed in black and white on parts of the screen (upper right, lower left, etc.) and switch. Sweetest recollections - Photos switch slowly with motion (enlargement, reduction, movement, etc.). Blissful life - Photos switch with motion (enlargement, reduction, movement, 4 ENTER Select 'Next'. Cautions related to copyrights are displayed. 5 ENTER Select 'Yes'. Photo movies are recorded on the HDD as they are played. • No other recorder operation is possible while photo movies are being recorded. • The timer recording operation does not function while photo movies are being recorded. • To stop recording, press F STOP REC for more than three seconds. Importing files to the HDD You can import files and save them to the HDD1 from a CD, DVD or a connected USB camera. Once on the HDD you can edit and organize your pictures and print them out if you've connected a PictBridge-compatible printer. 1 ENTER Select the location of folders/ files you want to import. To import a whole folder, select the desired folder, press , and skip to step 3 below. • To import multiple folders, use the MultiMode; see Selecting multiple files or folders on page 98. Note 1 For files you want to keep permanently, we recommend backing up to DVD-R/-RW. 97 En
-
 1
1 -
2
-
3
-
4
-
5
-
6
-
7
-
8
-
9
-
10
-
11
-
12
-
13
-
14
-
15
-
16
-
17
-
18
-
19
-
20
-
21
-
22
-
23
-
24
-
25
-
26
-
27
-
28
-
29
-
30
-
31
-
32
-
33
-
34
-
35
-
36
-
37
-
38
-
39
-
40
-
41
-
42
-
43
-
44
-
45
-
46
-
47
-
48
-
49
-
50
-
51
-
52
-
53
-
54
-
55
-
56
-
57
-
58
-
59
-
60
-
61
-
62
-
63
-
64
-
65
-
66
-
67
-
68
-
69
-
70
-
71
-
72
-
73
-
74
-
75
-
76
-
77
-
78
-
79
-
80
-
81
-
82
-
83
-
84
-
85
-
86
-
87
-
88
-
89
-
90
-
91
-
 92
92 -
 93
93 -
 94
94 -
 95
95 -
 96
96 -
 97
97 -
 98
98 -
 99
99 -
 100
100 -
 101
101 -
 102
102 -
103
-
104
-
105
-
106
-
107
-
108
-
109
-
110
-
111
-
112
-
113
-
114
-
115
-
116
-
117
-
118
-
119
-
120
-
121
-
122
-
123
-
124
-
125
-
126
-
127
-
128
-
129
-
130
-
131
-
132
-
133
-
134
-
135
-
136
-
137
-
138
-
139
-
140
-
141
-
142
-
143
-
144
-
145
 |
 |
