Samsung SPH-M910 User Manual (user Manual) (ver.f9) (English) - Page 116
Assign participants by either entering the name, location field.
 |
View all Samsung SPH-M910 manuals
Add to My Manuals
Save this manual to your list of manuals |
Page 116 highlights
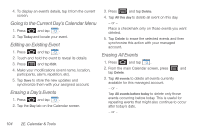
Ⅲ Corporate calendar entries are synchronized between your device and either an Exchange Server or available from within Microsoft® Outlook®. Ⅲ default calendar calendar entries are synchronized between your device and your default email account. Ⅲ Must Attend calendar entries are synchronized between your device and assigned to a must attend cattegory. Ⅲ Tap OK when finished. 8. Enter a location for the event in the Location field. Ⅲ Tap Map to choose a location based on Google maps. Search by city or zip. Ⅲ Double tap the location to add it your new event location field. 9. Assign participants by either entering the name directly into the participants field or selecting from one of the three available sources: Ⅲ Contact allows you to choose participants from your current pool of available contacts (local and managed accounts). Ⅲ Group allows you to choose participants by selecting the main group categories. Participants assigned to those groups are then automatically added and notified of your new event. Ⅲ Recently allows you to select from recent email recipients. 10. Select an alarm time by tapping the Alarm field. Ⅲ Select None, On time, 5 mins before, 15 mins before, 1 hour before, 1 day before, 2 days before, 1 week before, or Customize. Ⅲ Customize allows you to manually enter a desired number. Tap Done to complete the custom assignment. 11. Select an alarm tone by tapping the Alarm tone field: Ⅲ Select Sounds or Go to my files. Ⅲ Select a sound file and tap OK to complete the assignment. 102 2E. Calendar & Tools
-
 1
1 -
2
-
3
-
4
-
5
-
6
-
7
-
8
-
9
-
10
-
11
-
12
-
13
-
14
-
15
-
16
-
17
-
18
-
19
-
20
-
21
-
22
-
23
-
24
-
25
-
26
-
27
-
28
-
29
-
30
-
31
-
32
-
33
-
34
-
35
-
36
-
37
-
38
-
39
-
40
-
41
-
42
-
43
-
44
-
45
-
46
-
47
-
48
-
49
-
50
-
51
-
52
-
53
-
54
-
55
-
56
-
57
-
58
-
59
-
60
-
61
-
62
-
63
-
64
-
65
-
66
-
67
-
68
-
69
-
70
-
71
-
72
-
73
-
74
-
75
-
76
-
77
-
78
-
79
-
80
-
81
-
82
-
83
-
84
-
85
-
86
-
87
-
88
-
89
-
90
-
91
-
92
-
93
-
94
-
95
-
96
-
97
-
98
-
99
-
100
-
101
-
102
-
103
-
104
-
105
-
106
-
107
-
108
-
109
-
110
-
 111
111 -
 112
112 -
 113
113 -
 114
114 -
 115
115 -
 116
116 -
 117
117 -
 118
118 -
 119
119 -
 120
120 -
 121
121 -
122
-
123
-
124
-
125
-
126
-
127
-
128
-
129
-
130
-
131
-
132
-
133
-
134
-
135
-
136
-
137
-
138
-
139
-
140
-
141
-
142
-
143
-
144
-
145
-
146
-
147
-
148
-
149
-
150
-
151
-
152
-
153
-
154
-
155
-
156
-
157
-
158
-
159
-
160
-
161
-
162
-
163
-
164
-
165
-
166
-
167
-
168
-
169
-
170
-
171
-
172
-
173
-
174
-
175
-
176
-
177
-
178
-
179
-
180
-
181
-
182
-
183
-
184
-
185
-
186
-
187
-
188
-
189
-
190
-
191
-
192
-
193
-
194
-
195
-
196
-
197
-
198
-
199
-
200
-
201
-
202
-
203
-
204
-
205
-
206
-
207
-
208
-
209
-
210
-
211
-
212
-
213
-
214
-
215
-
216
-
217
-
218
-
219
-
220
-
221
-
222
-
223
-
224
-
225
-
226
-
227
-
228
-
229
-
230
-
231
-
232
-
233
 |
 |
