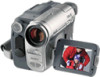
Sony DCR-TRV460 Camera Operations Guide - Page 27
Using the built-in light
 |
UPC - 027242643116
View all Sony DCR-TRV460 manuals
Add to My Manuals
Save this manual to your list of manuals |
Page 27 highlights
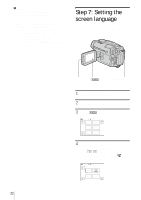
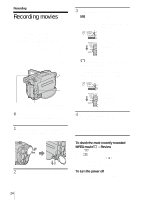
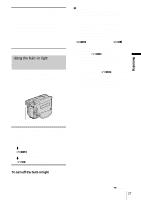
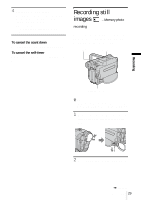
Move the power zoom lever slightly for a slower zoom. Move it further for a faster zoom. To record wider range of view Move the power zoom lever towards W. The subject appears farther away (Wide angle). To record closer view Move the power zoom lever towards T. The subject appears closer (Telephoto). Using the built-in light You can use the built-in light to suit your shooting situation. The recommended distance between the subject and camcorder is about 1.5 m (5 feet). Built-in light b Notes • The built-in video light emits very bright light, which is perfectly safe in normal use. However, avoid directly aiming the light at a subject's eyes from very close range. • The battery pack discharges quickly while the built- in light is turned on. • When you do not use your camcorder, turn the built- in light off and remove the battery pack to avoid turning on the built-in light accidentally. • When flickering occurs while shooting in the mode, press LIGHT until appears. • The built-in light may turn on/off when you use the [PROGRAM AE] or backlight function while shooting in the mode. • The built-in light is turned off in the following cases: - While the END SEARCH function is working. - Interval time of Interval recording. - When you leave it on for more than 5 minutes with the POWER switch set to CAMERA-MEMORY. - When it stays on in the mode for more than 5 minutes. - When you leave it on for more than 5 minutes with no cassette inserted or after the tape has run out. • When you use the conversion lens (optional), light from the built-in light is blocked and may not illuminate the subject properly. Recording LIGHT Press LIGHT repeatedly to select a setting. The settings are displayed cyclically in the following order. No indicator displayed: Always records without using the built-in light. m : Automatically turns on and off according to the ambient brightness. m : Always turns on. To turn off the built-in light Press LIGHT repeatedly until no indicator appears on the screen. ,continued Recording 27
-
 1
1 -
2
-
3
-
4
-
5
-
6
-
7
-
8
-
9
-
10
-
11
-
12
-
13
-
14
-
15
-
16
-
17
-
18
-
19
-
20
-
21
-
 22
22 -
 23
23 -
 24
24 -
 25
25 -
 26
26 -
 27
27 -
 28
28 -
 29
29 -
 30
30 -
 31
31 -
 32
32 -
33
-
34
-
35
-
36
-
37
-
38
-
39
-
40
-
41
-
42
-
43
-
44
-
45
-
46
-
47
-
48
-
49
-
50
-
51
-
52
-
53
-
54
-
55
-
56
-
57
-
58
-
59
-
60
-
61
-
62
-
63
-
64
-
65
-
66
-
67
-
68
-
69
-
70
-
71
-
72
-
73
-
74
-
75
-
76
-
77
-
78
-
79
-
80
-
81
-
82
-
83
-
84
-
85
-
86
-
87
-
88
-
89
-
90
-
91
-
92
-
93
-
94
-
95
-
96
-
97
-
98
-
99
-
100
-
101
-
102
-
103
-
104
-
105
-
106
-
107
-
108
-
109
-
110
-
111
-
112
-
113
-
114
-
115
-
116
-
117
-
118
-
119
-
120
-
121
-
122
-
123
-
124
-
125
-
126
-
127
-
128
-
129
-
130
-
131
-
132
-
133
-
134
-
135
-
136
 |
 |
