Sony HDR-UX20 Operating Guide - Page 58
Deleting the still images, Deleting images Continued
 |
UPC - 027242727731
View all Sony HDR-UX20 manuals
Add to My Manuals
Save this manual to your list of manuals |
Page 58 highlights
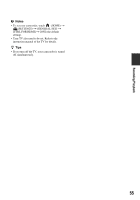
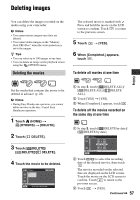
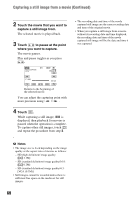
Deleting images (Continued) 4 When [Completed.] appears, touch . To delete the most recently recorded movie 1 In step 3, touch [ LAST SCENE DEL]. 2 Touch t [YES]. 3 When [Completed.] appears, touch . b Notes • You cannot delete the most recently recorded movie on a disc when performing the following operations after recording: - Eject the disc - Turn off the camcorder To delete SD (standard definition) image quality movies • You can delete movies on DVD-RW (VR mode) discs without any restrictions. • You can perform only [ LAST SCENE DEL] on DVD-RW (VIDEO mode) and DVD+RW discs. b Notes • Do not remove the battery pack or the AC Adaptor from your camcorder while deleting movies. • Do not eject the "Memory Stick PRO Duo" from your camcorder while deleting the images on the "Memory Stick PRO Duo." • If the deleted movie is included in the Playlist (p. 65), the movie is deleted also from the Playlist. • Even if you delete unnecessary movies from the disc, the remaining disc capacity may not increase as much as you can make additional recording. z Tips • To delete all images recorded on the media, format the media (p. 78). Deleting the still images Set the media that contains the still image to be deleted in advance (p. 29). 1 Touch (HOME) t (OTHERS) t [DELETE]. 2 Touch [ DELETE]. 3 Touch [ DELETE]. 4 Touch the still image to be deleted. The selected still image is marked with . Press and hold the still image on the LCD screen to confirm. Touch to return to the previous screen. 5 Touch t [YES]. 6 When [Completed.] appears, touch . 58
-
 1
1 -
2
-
3
-
4
-
5
-
6
-
7
-
8
-
9
-
10
-
11
-
12
-
13
-
14
-
15
-
16
-
17
-
18
-
19
-
20
-
21
-
22
-
23
-
24
-
25
-
26
-
27
-
28
-
29
-
30
-
31
-
32
-
33
-
34
-
35
-
36
-
37
-
38
-
39
-
40
-
41
-
42
-
43
-
44
-
45
-
46
-
47
-
48
-
49
-
50
-
51
-
52
-
 53
53 -
 54
54 -
 55
55 -
 56
56 -
 57
57 -
 58
58 -
 59
59 -
 60
60 -
 61
61 -
 62
62 -
 63
63 -
64
-
65
-
66
-
67
-
68
-
69
-
70
-
71
-
72
-
73
-
74
-
75
-
76
-
77
-
78
-
79
-
80
-
81
-
82
-
83
-
84
-
85
-
86
-
87
-
88
-
89
-
90
-
91
-
92
-
93
-
94
-
95
-
96
-
97
-
98
-
99
-
100
-
101
-
102
-
103
-
104
-
105
-
106
-
107
-
108
-
109
-
110
-
111
-
112
-
113
-
114
-
115
-
116
-
117
-
118
-
119
-
120
-
121
-
122
-
123
-
124
-
125
-
126
-
127
-
128
-
129
-
130
-
131
-
132
-
133
-
134
-
135
-
136
-
137
-
138
-
139
-
140
-
141
-
142
-
143
-
144
-
145
-
146
-
147
-
148
-
149
-
150
-
151
-
152
-
153
-
154
-
155
-
156
-
157
-
158
-
159
-
160
-
161
-
162
-
163
-
164
-
165
-
166
-
167
-
168
-
169
-
170
-
171
-
172
 |
 |