Sony HDR-UX20 Operating Guide - Page 80
Recording additional movies after finalizing - high definition dvd handycam
 |
UPC - 027242727731
View all Sony HDR-UX20 manuals
Add to My Manuals
Save this manual to your list of manuals |
Page 80 highlights
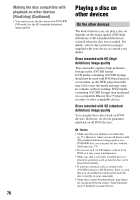
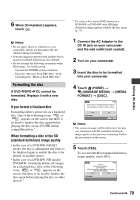
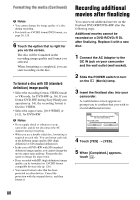
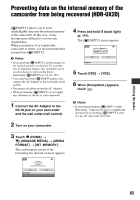
Formatting the media (Continued) b Notes • You cannot change the image quality of a disc during recording. • For details on AVCHD format/DVD format, see page 16, 128. 6 Touch the option that is right for you on the screen. The disc will be formatted in the recording image quality and format you selected. When formatting is completed, you can start recording on the disc. To format a disc with SD (standard definition) image quality • Select the recording format, VIDEO mode or VR mode, for DVD-RW (p. 16). If you format DVD-RW during Easy Handycam operation (p. 34), the recording format is fixed to VIDEO. • Select the aspect ratio, [16:9 WIDE] or [4:3], for DVD+RW. b Notes • Do not apply shock or vibration to your camcorder, and do not disconnect the AC Adaptor during formatting. • When you use a double-sided disc, formatting is required on each side. You can format each side in the different image quality (HD (high definition) or SD (standard definition)). • In the case of DVD+RW with SD (standard definition) image quality, you cannot change the movie aspect ratio midway. Format the disc again to change the aspect ratio. • Discs recorded with HD (high definition) image quality can be formatted on AVCHD format compatible devices only (p. 128). • You cannot format a disc that has been protected on other devices. Cancel the protection with the original device, and then format it. Recording additional movies after finalizing You can record additional movies on the finalized DVD-RW/DVD+RW after the following steps. Additional movies cannot be recorded on a DVD-R/DVD+R DL after finalizing. Replace it with a new disc. 1 Connect the AC Adaptor to the DC IN jack on your camcorder and the wall outlet (wall socket). 2 Slide the POWER switch to turn on the (Movie) lamp. 3 Insert the finalized disc into your camcorder. A confirmation screen appears to prompt you to confirm that you wish to record additional movies. 4 Touch [YES] t [YES]. 5 When [Completed.] appears, touch . 80
-
 1
1 -
2
-
3
-
4
-
5
-
6
-
7
-
8
-
9
-
10
-
11
-
12
-
13
-
14
-
15
-
16
-
17
-
18
-
19
-
20
-
21
-
22
-
23
-
24
-
25
-
26
-
27
-
28
-
29
-
30
-
31
-
32
-
33
-
34
-
35
-
36
-
37
-
38
-
39
-
40
-
41
-
42
-
43
-
44
-
45
-
46
-
47
-
48
-
49
-
50
-
51
-
52
-
53
-
54
-
55
-
56
-
57
-
58
-
59
-
60
-
61
-
62
-
63
-
64
-
65
-
66
-
67
-
68
-
69
-
70
-
71
-
72
-
73
-
74
-
 75
75 -
 76
76 -
 77
77 -
 78
78 -
 79
79 -
 80
80 -
 81
81 -
 82
82 -
 83
83 -
 84
84 -
 85
85 -
86
-
87
-
88
-
89
-
90
-
91
-
92
-
93
-
94
-
95
-
96
-
97
-
98
-
99
-
100
-
101
-
102
-
103
-
104
-
105
-
106
-
107
-
108
-
109
-
110
-
111
-
112
-
113
-
114
-
115
-
116
-
117
-
118
-
119
-
120
-
121
-
122
-
123
-
124
-
125
-
126
-
127
-
128
-
129
-
130
-
131
-
132
-
133
-
134
-
135
-
136
-
137
-
138
-
139
-
140
-
141
-
142
-
143
-
144
-
145
-
146
-
147
-
148
-
149
-
150
-
151
-
152
-
153
-
154
-
155
-
156
-
157
-
158
-
159
-
160
-
161
-
162
-
163
-
164
-
165
-
166
-
167
-
168
-
169
-
170
-
171
-
172
 |
 |