Sony HDR-UX20 Operating Guide - Page 59
Capturing a still image from a movie, To delete all still images at one time
 |
UPC - 027242727731
View all Sony HDR-UX20 manuals
Add to My Manuals
Save this manual to your list of manuals |
Page 59 highlights
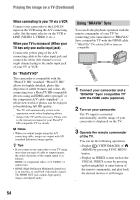
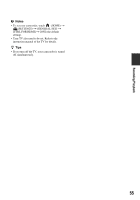
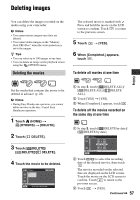
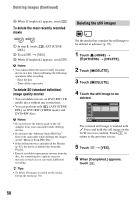
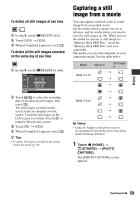
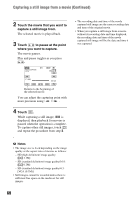
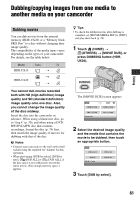
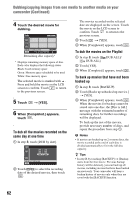
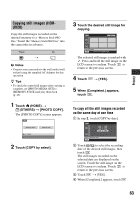
Editing To delete all still images at one time 1 In step 3, touch [ DELETE ALL]. 2 Touch [YES] t [YES]. 3 When [Completed.] appears, touch . To delete all the still images recorded on the same day at one time 1 In step 3, touch [ DELETE by date]. 2 Touch / to select the recording date of the desired still images, then touch . The still images recorded on the selected date are displayed on the screen. Touch the still image on the LCD screen to confirm. Touch to return to the previous screen. 3 Touch t [YES]. 4 When [Completed.] appears, touch . z Tips • To delete all images recorded on the media, format the media (p. 78). Capturing a still image from a movie You can capture a desired scene as a still image from a recorded movie. Set the media which contains movies in advance, and the media where you want to save the still images (p. 28). When you set the media for movies or still images to "Memory Stick PRO Duo," insert the "Memory Stick PRO Duo" into your camcorder. The media you can select depends on your camcorder model. See the table below. Model Movies in Still images in t HDR-UX10 t t t t HDR-UX20 t t t b Notes • Using AC Adaptor as the power source is recommended to prevent the power from being turned off during operation. 1 Touch (HOME) t (OTHERS) t [PHOTO CAPTURE]. The [PHOTO CAPTURE] screen appears. Continued , 59
-
 1
1 -
2
-
3
-
4
-
5
-
6
-
7
-
8
-
9
-
10
-
11
-
12
-
13
-
14
-
15
-
16
-
17
-
18
-
19
-
20
-
21
-
22
-
23
-
24
-
25
-
26
-
27
-
28
-
29
-
30
-
31
-
32
-
33
-
34
-
35
-
36
-
37
-
38
-
39
-
40
-
41
-
42
-
43
-
44
-
45
-
46
-
47
-
48
-
49
-
50
-
51
-
52
-
53
-
 54
54 -
 55
55 -
 56
56 -
 57
57 -
 58
58 -
 59
59 -
 60
60 -
 61
61 -
 62
62 -
 63
63 -
 64
64 -
65
-
66
-
67
-
68
-
69
-
70
-
71
-
72
-
73
-
74
-
75
-
76
-
77
-
78
-
79
-
80
-
81
-
82
-
83
-
84
-
85
-
86
-
87
-
88
-
89
-
90
-
91
-
92
-
93
-
94
-
95
-
96
-
97
-
98
-
99
-
100
-
101
-
102
-
103
-
104
-
105
-
106
-
107
-
108
-
109
-
110
-
111
-
112
-
113
-
114
-
115
-
116
-
117
-
118
-
119
-
120
-
121
-
122
-
123
-
124
-
125
-
126
-
127
-
128
-
129
-
130
-
131
-
132
-
133
-
134
-
135
-
136
-
137
-
138
-
139
-
140
-
141
-
142
-
143
-
144
-
145
-
146
-
147
-
148
-
149
-
150
-
151
-
152
-
153
-
154
-
155
-
156
-
157
-
158
-
159
-
160
-
161
-
162
-
163
-
164
-
165
-
166
-
167
-
168
-
169
-
170
-
171
-
172
 |
 |