Sony MZ-N1 Operating Instructions - Page 19
Press, MENU/ENTER
 |
View all Sony MZ-N1 manuals
Add to My Manuals
Save this manual to your list of manuals |
Page 19 highlights
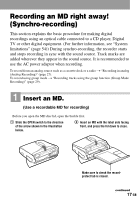
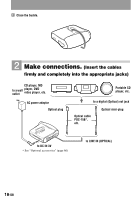
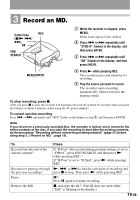
3 Record an MD. Control key REC (x/N/./ >) X END SEARCH 1 While the recorder is stopped, press MENU. Menu items appear in the display. 2 Press . or > repeatedly until "SYNC-R" flashes in the display, and then press ENTER. 3 Press . or > repeatedly until "ON" flashes in the display, and then press ENTER. MENU/ENTER 4 Press N while pressing REC. The recorder pauses and stands by for recording. 5 Play the source you want to record. The recorder starts recording automatically when it receives the playing sound. To stop recording, press x. After you press x to stop, the recorder will automatically turn off in about 10 seconds (when using the dry battery) or about 3 minutes (when using the AC power adaptor). To cancel synchro-recording Press . or > repeatedly until "OFF" flashes in the display in step 3, and then press ENTER. Note If you record on a previously recorded disc, the recorder is factory set to overwrite the entire contents of the disc. If you want the recording to start after the existing contents, do the procedure "Recording without overwriting existing material" (page 31) before doing step 3, ("Record an MD.", page 19). To Record from the end of the current contents1) Record over partway through the previous recording1) Pause Remove the MD Press If "R-Posi" (the record-starting position setting) is set to "FrHere", press END SEARCH, and then press N while pressing REC.1) If "R-Posi" is set to "Fr End", press N while pressing REC. N, ., or > to find the start point of recording and press x to stop. Then press N while pressing REC. X2). Press X again to resume recording. x, and open the lid.3) (The lid does not open while "Edit" is flashing in the display.) 19-GB
-
 1
1 -
2
-
3
-
4
-
5
-
6
-
7
-
8
-
9
-
10
-
11
-
12
-
13
-
 14
14 -
 15
15 -
 16
16 -
 17
17 -
 18
18 -
 19
19 -
 20
20 -
 21
21 -
 22
22 -
 23
23 -
 24
24 -
25
-
26
-
27
-
28
-
29
-
30
-
31
-
32
-
33
-
34
-
35
-
36
-
37
-
38
-
39
-
40
-
41
-
42
-
43
-
44
-
45
-
46
-
47
-
48
-
49
-
50
-
51
-
52
-
53
-
54
-
55
-
56
-
57
-
58
-
59
-
60
-
61
-
62
-
63
-
64
-
65
-
66
-
67
-
68
-
69
-
70
-
71
-
72
-
73
-
74
-
75
-
76
-
77
-
78
-
79
-
80
-
81
-
82
-
83
-
84
-
85
-
86
-
87
-
88
-
89
-
90
-
91
-
92
-
93
-
94
-
95
-
96
-
97
-
98
-
99
-
100
-
101
-
102
-
103
-
104
-
105
-
106
-
107
-
108
-
109
-
110
-
111
-
112
-
113
-
114
-
115
-
116
-
117
-
118
-
119
-
120
-
121
-
122
-
123
-
124
-
125
-
126
-
127
-
128
-
129
-
130
-
131
-
132
-
133
-
134
-
135
-
136
-
137
-
138
-
139
-
140
-
141
-
142
-
143
-
144
-
145
-
146
-
147
-
148
-
149
-
150
-
151
-
152
-
153
-
154
-
155
-
156
-
157
-
158
-
159
-
160
-
161
-
162
-
163
-
164
-
165
-
166
-
167
-
168
-
169
-
170
-
171
-
172
-
173
-
174
-
175
-
176
-
177
-
178
-
179
-
180
-
181
-
182
-
183
-
184
-
185
-
186
-
187
-
188
-
189
-
190
-
191
-
192
-
193
-
194
-
195
-
196
-
197
-
198
-
199
-
200
-
201
-
202
-
203
-
204
-
205
-
206
-
207
-
208
 |
 |
