Sony MZ-N1 Operating Instructions - Page 32
Adding track marks automatically (Auto Time Stamp), Time Stamp
 |
View all Sony MZ-N1 manuals
Add to My Manuals
Save this manual to your list of manuals |
Page 32 highlights
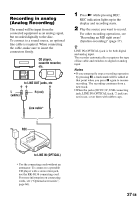
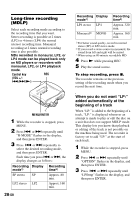
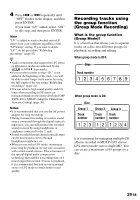
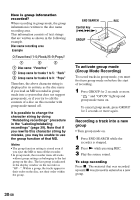
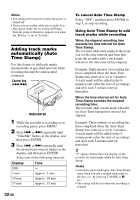
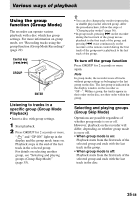
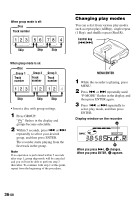
Notes • The setting will remain even after the power is turned off. • If you start recording while the recorder is in play-pause mode, the recording will begin from the point at which it is paused even when the "R-Posi" is set to "Fr End". Adding track marks automatically (Auto Time Stamp) Use this feature to add track marks automatically at specified intervals when recording through the analog input connector. Control key (./>) MENU/ENTER 1 While the recorder is recording or in recording pause, press MENU. 2 Press . or > repeatedly until "TimeMk" flashes in the display, and then press ENTER. 3 Press . or > repeatedly until the desired time interval flashes in the display, and then press ENTER. Select one of the following intervals: Display Time OFF - 5 min Approx. 5 min. 10 min Approx. 10 min. 15 min Approx. 15 min. 32-GB To cancel Auto Time Stamp Select "OFF", and then press ENTER in step 3, or stop recording. Using Auto Time Stamp to add track marks while recording When the elapsed recording time exceeds the time interval for Auto Time Stamp: The recorder adds track marks at the point you set the time interval and from that point the recorder adds a track mark whenever the time interval has elapsed. Example: Eight minutes of recording has been completed when the Auto Time Stamp time interval is set to 5 minutes. A track mark will be added at the 8minute point (after the start of recording) and after each 5-minute interval thereafter. When the time interval set for Auto Time Stamp exceeds the elapsed recording time: The recorder adds a track mark when the set Auto Time Stamp time interval has elapsed. Example: Three minutes of recording has been completed when the Auto Time Stamp time interval is set to 5 minutes. A track mark will be added at the 5minute point (after the start of recording) and after each 5-minute interval thereafter. z "T" appears before the track display on the recorder for track marks added by Auto Time Stamp. Notes • Automatic track marking by Auto Time Stamp starts when you add a normal track mark to the disc (i.e., by pressing T MARK or X, etc.). • The setting will be lost when the recording is stopped.
-
 1
1 -
2
-
3
-
4
-
5
-
6
-
7
-
8
-
9
-
10
-
11
-
12
-
13
-
14
-
15
-
16
-
17
-
18
-
19
-
20
-
21
-
22
-
23
-
24
-
25
-
26
-
 27
27 -
 28
28 -
 29
29 -
 30
30 -
 31
31 -
 32
32 -
 33
33 -
 34
34 -
 35
35 -
 36
36 -
 37
37 -
38
-
39
-
40
-
41
-
42
-
43
-
44
-
45
-
46
-
47
-
48
-
49
-
50
-
51
-
52
-
53
-
54
-
55
-
56
-
57
-
58
-
59
-
60
-
61
-
62
-
63
-
64
-
65
-
66
-
67
-
68
-
69
-
70
-
71
-
72
-
73
-
74
-
75
-
76
-
77
-
78
-
79
-
80
-
81
-
82
-
83
-
84
-
85
-
86
-
87
-
88
-
89
-
90
-
91
-
92
-
93
-
94
-
95
-
96
-
97
-
98
-
99
-
100
-
101
-
102
-
103
-
104
-
105
-
106
-
107
-
108
-
109
-
110
-
111
-
112
-
113
-
114
-
115
-
116
-
117
-
118
-
119
-
120
-
121
-
122
-
123
-
124
-
125
-
126
-
127
-
128
-
129
-
130
-
131
-
132
-
133
-
134
-
135
-
136
-
137
-
138
-
139
-
140
-
141
-
142
-
143
-
144
-
145
-
146
-
147
-
148
-
149
-
150
-
151
-
152
-
153
-
154
-
155
-
156
-
157
-
158
-
159
-
160
-
161
-
162
-
163
-
164
-
165
-
166
-
167
-
168
-
169
-
170
-
171
-
172
-
173
-
174
-
175
-
176
-
177
-
178
-
179
-
180
-
181
-
182
-
183
-
184
-
185
-
186
-
187
-
188
-
189
-
190
-
191
-
192
-
193
-
194
-
195
-
196
-
197
-
198
-
199
-
200
-
201
-
202
-
203
-
204
-
205
-
206
-
207
-
208
 |
 |
