Sony MZ-N1 Operating Instructions - Page 47
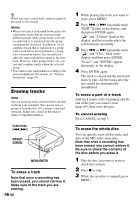
To erase a group, Note that once a recording has, been erased, you cannot retrieve it.
 |
View all Sony MZ-N1 manuals
Add to My Manuals
Save this manual to your list of manuals |
Page 47 highlights
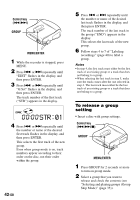
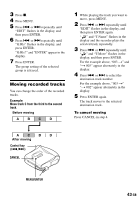
4 Press . or > repeatedly until "EDIT" flashes in the display, and then press ENTER. " " and "D:Name" flash in the display. 5 Press . or > repeatedly until " " and "D:Ers" flash in the display, and then press ENTER. "Erase?" and "ENTER" appear alternately in the display. 6 Press ENTER again. "Edit" flashes in the display, and all the tracks will be erased. When erasing is complete, "BLANK" appears in the display. To cancel erasing Press CANCEL in step 5. 6 Press . or > repeatedly until "G:Ers" flash in the display, and then press ENTER. "Erase?" and "ENTER" appear alternately in the display. 7 Press ENTER again. The group is erased. To cancel erasing Press CANCEL in step 6. To erase a group You can erase tracks in a selected group. Note that once a recording has been erased, you cannot retrieve it. Be sure to check the contents of the group before you erase it. • Insert a disc with group settings. 1 Press GROUP for 2 seconds or more. " " lights up in the display and group mode turns on. 2 Select a group you want to erase ("Selecting and playing groups (Group Skip Mode)", page 35) to check the contents. 3 Press x to stop. 4 While the recorder is stopped, press MENU. 5 Press . or > repeatedly until "EDIT" flashes in the display, and then press ENTER. 47-GB
-
 1
1 -
2
-
3
-
4
-
5
-
6
-
7
-
8
-
9
-
10
-
11
-
12
-
13
-
14
-
15
-
16
-
17
-
18
-
19
-
20
-
21
-
22
-
23
-
24
-
25
-
26
-
27
-
28
-
29
-
30
-
31
-
32
-
33
-
34
-
35
-
36
-
37
-
38
-
39
-
40
-
41
-
 42
42 -
 43
43 -
 44
44 -
 45
45 -
 46
46 -
 47
47 -
 48
48 -
 49
49 -
 50
50 -
 51
51 -
 52
52 -
53
-
54
-
55
-
56
-
57
-
58
-
59
-
60
-
61
-
62
-
63
-
64
-
65
-
66
-
67
-
68
-
69
-
70
-
71
-
72
-
73
-
74
-
75
-
76
-
77
-
78
-
79
-
80
-
81
-
82
-
83
-
84
-
85
-
86
-
87
-
88
-
89
-
90
-
91
-
92
-
93
-
94
-
95
-
96
-
97
-
98
-
99
-
100
-
101
-
102
-
103
-
104
-
105
-
106
-
107
-
108
-
109
-
110
-
111
-
112
-
113
-
114
-
115
-
116
-
117
-
118
-
119
-
120
-
121
-
122
-
123
-
124
-
125
-
126
-
127
-
128
-
129
-
130
-
131
-
132
-
133
-
134
-
135
-
136
-
137
-
138
-
139
-
140
-
141
-
142
-
143
-
144
-
145
-
146
-
147
-
148
-
149
-
150
-
151
-
152
-
153
-
154
-
155
-
156
-
157
-
158
-
159
-
160
-
161
-
162
-
163
-
164
-
165
-
166
-
167
-
168
-
169
-
170
-
171
-
172
-
173
-
174
-
175
-
176
-
177
-
178
-
179
-
180
-
181
-
182
-
183
-
184
-
185
-
186
-
187
-
188
-
189
-
190
-
191
-
192
-
193
-
194
-
195
-
196
-
197
-
198
-
199
-
200
-
201
-
202
-
203
-
204
-
205
-
206
-
207
-
208
 |
 |