Sony PEG-N710C Operating Instructions (primary manual) - Page 14
Entering data in your Sony CLIE Handheld, Writing Graffiti letters
 |
View all Sony PEG-N710C manuals
Add to My Manuals
Save this manual to your list of manuals |
Page 14 highlights
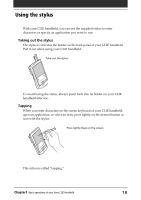
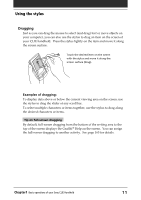
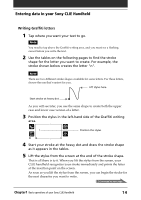
Entering data in your Sony CLIE Handheld Writing Graffiti letters 1 Tap where you want your text to go. Note You need to tap above the Graffiti writing area, and you must see a flashing cursor before you write the text. 2 Use the tables on the following pages to find the stroke shape for the letter you want to create. For example, the stroke shown below creates the letter "n". Note There are two different stroke shapes available for some letters. For these letters, choose the one that's easiest for you. Lift stylus here Start stroke at heavy dot As you will see later, you use the same shape to create both the upper case and lower case version of a letter. 3 Position the stylus in the left-hand side of the Graffiti writing area. Position the stylus 4 Start your stroke at the heavy dot and draw the stroke shape as it appears in the tables. 5 Lift the stylus from the screen at the end of the stroke shape. That is all there is to it. When you lift the stylus from the screen, your CLIE handheld recognizes your stroke immediately and prints the letter at the insertion point on the screen. As soon as you lift the stylus from the screen, you can begin the stroke for the next character you want to write. Continued on next page Chapter1 Basic operations of your Sony CLIE Handheld 14
-
 1
1 -
2
-
3
-
4
-
5
-
6
-
7
-
8
-
 9
9 -
 10
10 -
 11
11 -
 12
12 -
 13
13 -
 14
14 -
 15
15 -
 16
16 -
 17
17 -
 18
18 -
 19
19 -
20
-
21
-
22
-
23
-
24
-
25
-
26
-
27
-
28
-
29
-
30
-
31
-
32
-
33
-
34
-
35
-
36
-
37
-
38
-
39
-
40
-
41
-
42
-
43
-
44
-
45
-
46
-
47
-
48
-
49
-
50
-
51
-
52
-
53
-
54
-
55
-
56
-
57
-
58
-
59
-
60
-
61
-
62
-
63
-
64
-
65
-
66
-
67
-
68
-
69
-
70
-
71
-
72
-
73
-
74
-
75
-
76
-
77
-
78
-
79
-
80
-
81
-
82
-
83
-
84
-
85
-
86
-
87
-
88
-
89
-
90
-
91
-
92
-
93
-
94
-
95
-
96
-
97
-
98
-
99
-
100
-
101
-
102
-
103
-
104
-
105
-
106
-
107
-
108
-
109
-
110
-
111
-
112
-
113
-
114
-
115
-
116
-
117
-
118
-
119
-
120
-
121
-
122
-
123
-
124
-
125
-
126
-
127
-
128
-
129
-
130
-
131
-
132
-
133
-
134
-
135
-
136
-
137
-
138
-
139
-
140
-
141
-
142
-
143
-
144
-
145
-
146
-
147
-
148
-
149
-
150
-
151
-
152
-
153
-
154
-
155
-
156
-
157
-
158
-
159
-
160
-
161
-
162
-
163
-
164
-
165
-
166
-
167
-
168
-
169
-
170
-
171
-
172
-
173
-
174
-
175
-
176
-
177
-
178
-
179
-
180
-
181
-
182
-
183
-
184
-
185
-
186
-
187
-
188
-
189
-
190
-
191
-
192
-
193
-
194
-
195
-
196
-
197
-
198
-
199
-
200
-
201
-
202
-
203
-
204
-
205
-
206
-
207
-
208
-
209
-
210
-
211
-
212
-
213
-
214
-
215
-
216
-
217
-
218
 |
 |