Sony PEG-N710C Operating Instructions (primary manual) - Page 83
Entering receipt details for an Expense item, Category, Payment, Currency, Vendor
 |
View all Sony PEG-N710C manuals
Add to My Manuals
Save this manual to your list of manuals |
Page 83 highlights
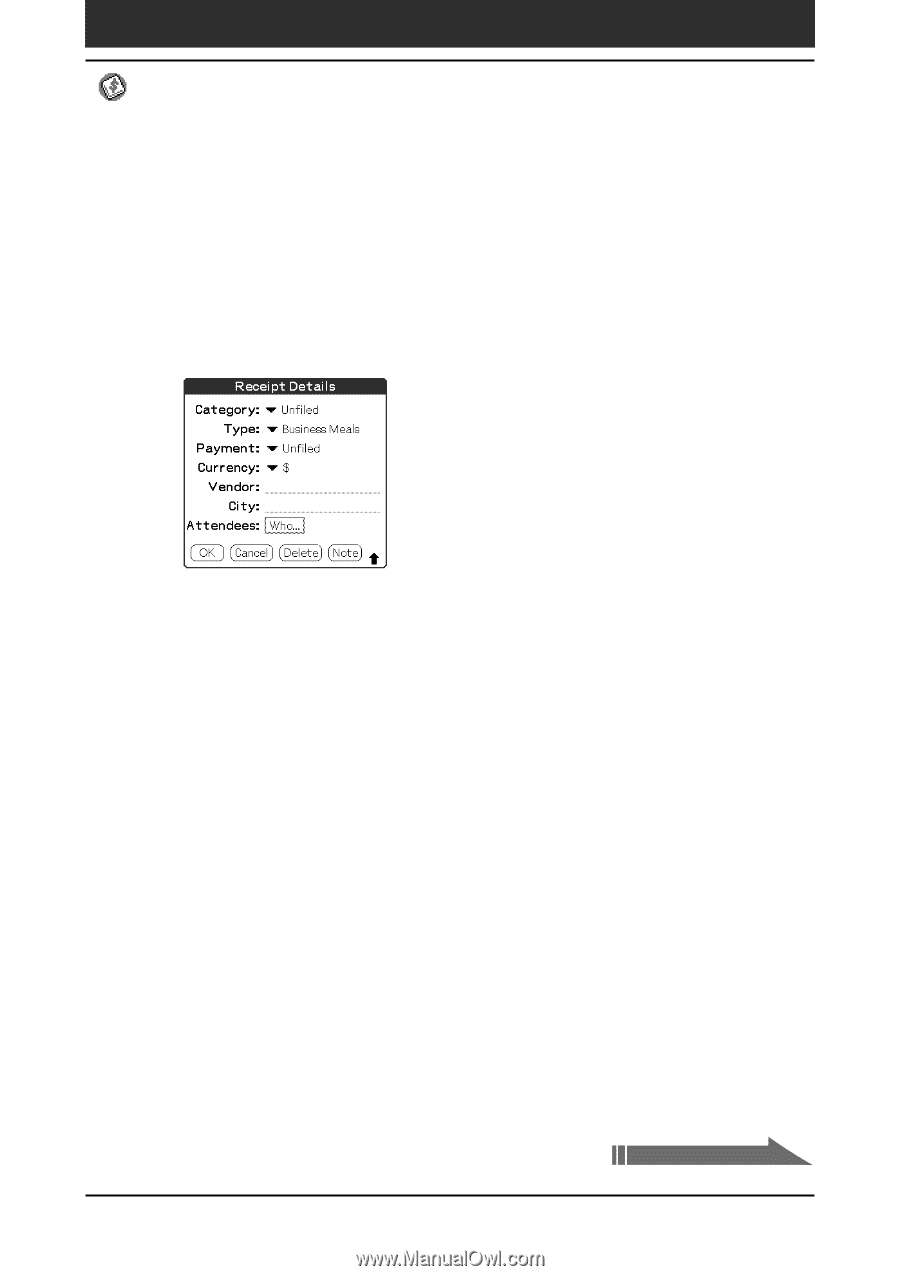
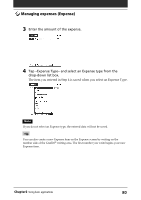
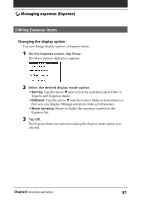
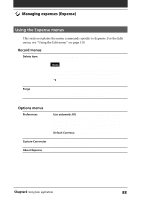
Managing expenses (Expense) Entering receipt details for an Expense item You can add details to an Expense item in the Receipt Details screen. 1 On the Expense screen, tap the Expense item to which you want to assign details. 2 Tap Details. The Receipt Details dialog box appears. 3 Change the Receipt Details settings You can choose any of the following options: • Category: Specify the category of the Expense item. The Expense has two sample categories named "New York" and "Paris" which may be used to sort Expense items by the destination of the business trip. To rename an existing category or add a new category, tap the arrow V and choose a category from the Edit Categories drop-down list box. • Type: Tap the arrow V and select an Expense type from the dropdown list box. • Payment: Tap the arrow V and select a payment method from the drop-down list box. • Currency: Tap the arrow V and select the currency in which you made the payment. Expense can show a maximum of four currencies. You can also change the currencies to be displayed. • Vendor: Enter the name of the vendor associated with Expense. • City: Enter the name of the payee (normally a company name) and the name of the city where the company is located. For example, you may specify "Rose Cafe" as the payee of a business lunch charge and "Tokyo" as the location. Continued on next page Chapter2 Using basic applications 83
-
 1
1 -
2
-
3
-
4
-
5
-
6
-
7
-
8
-
9
-
10
-
11
-
12
-
13
-
14
-
15
-
16
-
17
-
18
-
19
-
20
-
21
-
22
-
23
-
24
-
25
-
26
-
27
-
28
-
29
-
30
-
31
-
32
-
33
-
34
-
35
-
36
-
37
-
38
-
39
-
40
-
41
-
42
-
43
-
44
-
45
-
46
-
47
-
48
-
49
-
50
-
51
-
52
-
53
-
54
-
55
-
56
-
57
-
58
-
59
-
60
-
61
-
62
-
63
-
64
-
65
-
66
-
67
-
68
-
69
-
70
-
71
-
72
-
73
-
74
-
75
-
76
-
77
-
 78
78 -
 79
79 -
 80
80 -
 81
81 -
 82
82 -
 83
83 -
 84
84 -
 85
85 -
 86
86 -
 87
87 -
 88
88 -
89
-
90
-
91
-
92
-
93
-
94
-
95
-
96
-
97
-
98
-
99
-
100
-
101
-
102
-
103
-
104
-
105
-
106
-
107
-
108
-
109
-
110
-
111
-
112
-
113
-
114
-
115
-
116
-
117
-
118
-
119
-
120
-
121
-
122
-
123
-
124
-
125
-
126
-
127
-
128
-
129
-
130
-
131
-
132
-
133
-
134
-
135
-
136
-
137
-
138
-
139
-
140
-
141
-
142
-
143
-
144
-
145
-
146
-
147
-
148
-
149
-
150
-
151
-
152
-
153
-
154
-
155
-
156
-
157
-
158
-
159
-
160
-
161
-
162
-
163
-
164
-
165
-
166
-
167
-
168
-
169
-
170
-
171
-
172
-
173
-
174
-
175
-
176
-
177
-
178
-
179
-
180
-
181
-
182
-
183
-
184
-
185
-
186
-
187
-
188
-
189
-
190
-
191
-
192
-
193
-
194
-
195
-
196
-
197
-
198
-
199
-
200
-
201
-
202
-
203
-
204
-
205
-
206
-
207
-
208
-
209
-
210
-
211
-
212
-
213
-
214
-
215
-
216
-
217
-
218
 |
 |