Sony STR-DN1010 Operating Instructions - Page 33
Connecting components with analog video and audio jack
 |
UPC - 027242779945
View all Sony STR-DN1010 manuals
Add to My Manuals
Save this manual to your list of manuals |
Page 33 highlights
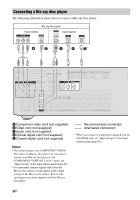
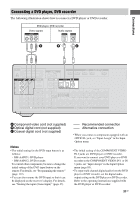
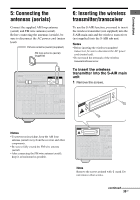
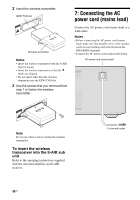
Connections Connecting components with analog video and audio jack The following illustration shows how to connect a component which has analog jacks such as a DVD recorder, VCR, etc. DVD recorder, VCR Audio signals Video signals A B (On the front panel) Camcorder, video game C A Audio cord (not supplied) B Video cord (not supplied) C Audio/video cord (not supplied) Notes • Be sure to change the initial setting of the VIDEO 1 input button on the remote so that you can use the button to control your DVD recorder. For details, see "Programming the remote" (page 112). • You can also rename the VIDEO 1 input so that it can be displayed on the TV screen and display. For details, see "Naming the input (Name Input)" (page 47). continued 33GB
-
 1
1 -
2
-
3
-
4
-
5
-
6
-
7
-
8
-
9
-
10
-
11
-
12
-
13
-
14
-
15
-
16
-
17
-
18
-
19
-
20
-
21
-
22
-
23
-
24
-
25
-
26
-
27
-
 28
28 -
 29
29 -
 30
30 -
 31
31 -
 32
32 -
 33
33 -
 34
34 -
 35
35 -
 36
36 -
 37
37 -
 38
38 -
39
-
40
-
41
-
42
-
43
-
44
-
45
-
46
-
47
-
48
-
49
-
50
-
51
-
52
-
53
-
54
-
55
-
56
-
57
-
58
-
59
-
60
-
61
-
62
-
63
-
64
-
65
-
66
-
67
-
68
-
69
-
70
-
71
-
72
-
73
-
74
-
75
-
76
-
77
-
78
-
79
-
80
-
81
-
82
-
83
-
84
-
85
-
86
-
87
-
88
-
89
-
90
-
91
-
92
-
93
-
94
-
95
-
96
-
97
-
98
-
99
-
100
-
101
-
102
-
103
-
104
-
105
-
106
-
107
-
108
-
109
-
110
-
111
-
112
-
113
-
114
-
115
-
116
-
117
-
118
-
119
-
120
-
121
-
122
-
123
-
124
-
125
-
126
-
127
-
128
-
129
-
130
-
131
-
132
-
133
-
134
-
135
-
136
 |
 |

33
GB
Connections
The following illustration shows how to connect a component which has analog jacks such as a
DVD recorder, VCR, etc.
A
Audio cord (not supplied)
B
Video cord (not supplied)
C
Audio/video cord (not supplied)
Notes
• Be sure to change the initial setting of the VIDEO
1 input button on the remote so that you can use the
button to control your DVD recorder. For details,
see “Programming the remote” (page 112).
• You can also rename the VIDEO 1 input so that it
can be displayed on the TV screen and display. For
details, see “Naming the input (Name Input)”
(page 47).
Connecting components with analog video and audio jack
DVD recorder, VCR
A
Camcorder,
video game
C
Audio signals
Video signals
B
(On the front panel)
continued