Toshiba 52LX177 Owner's Manual - English - Page 48
Setting the HDMI, audio mode
 |
UPC - 022265000700
View all Toshiba 52LX177 manuals
Add to My Manuals
Save this manual to your list of manuals |
Page 48 highlights
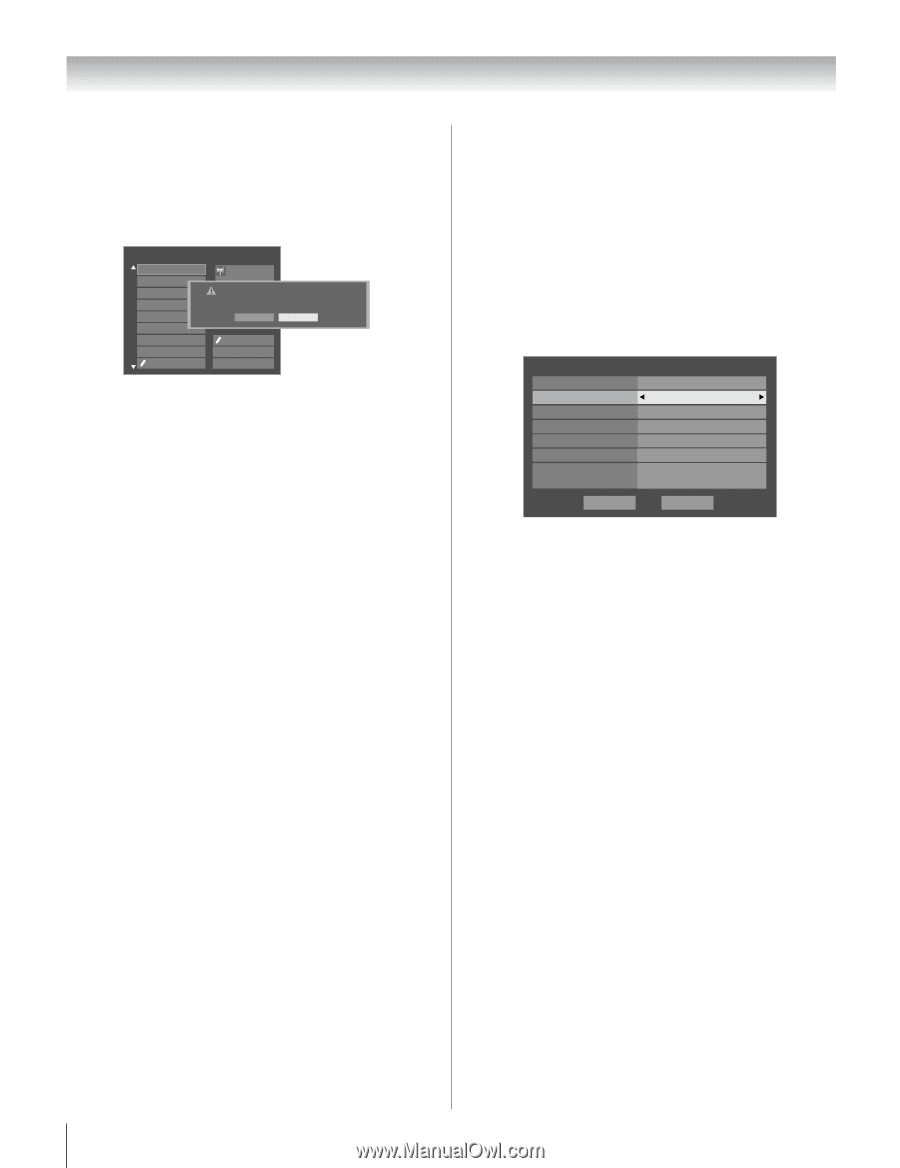
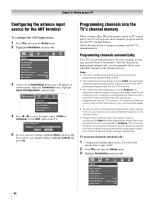
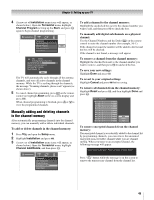
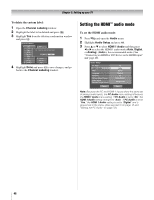
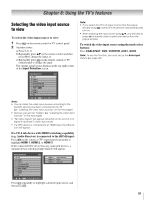
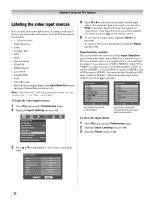
Chapter 5: Setting up your TV To delete the custom label: 1 Open the Channel Labeling window. 2 Highlight the label to be deleted and press =. 3 Highlight Yes from the deletion confirmation window and press T. Channel Labeling TIMES TLC TMC TMCX TMCXw TMCw TNT TNTHD TOCDEFG ANT 24 A&DEelete the selected custom label? Press CH UP/DOWN to change channels. No Yes Custom Clear All Done 4 Highlight Done and press T to save changes, and go back to the Channel Labeling window. Setting the HDMI™ audio mode To set the HDMI audio mode: 1 Press Y and open the Audio menu. 2 Highlight Audio Setup and press T. 3 Press B or b to select HDMI 1 Audio and then press C or c to select the HDMI 1 audio mode (Auto, Digital, or Analog). (Auto is the recommended mode.) See "Connecting an HDMI or DVI device to the HDMI input" (- page 20). Audio Setup PC Audio HDMI 1 Audio MTS Language Speakers Optical Output Format Dolby Digital Dynamic Range Control Reset No Auto Stereo English On Dolby Digital Compressed Done Note: Because the PC and HDMI-1 inputs share the same set of analog audio inputs, the PC Audio menu setting influences the HDMI 1 Audio menu setting. If PC Audio is set to "No," the HDMI 1 Audio setting changes to "Auto." If PC Audio is set to "Yes," the HDMI 1 Audio setting is set to "Digital" and is grayed out in the menu. (Also see item 5 on page 12 and "Setting the PC Audio" on page 72.) 48
-
 1
1 -
2
-
3
-
4
-
5
-
6
-
7
-
8
-
9
-
10
-
11
-
12
-
13
-
14
-
15
-
16
-
17
-
18
-
19
-
20
-
21
-
22
-
23
-
24
-
25
-
26
-
27
-
28
-
29
-
30
-
31
-
32
-
33
-
34
-
35
-
36
-
37
-
38
-
39
-
40
-
41
-
42
-
 43
43 -
 44
44 -
 45
45 -
 46
46 -
 47
47 -
 48
48 -
 49
49 -
 50
50 -
 51
51 -
 52
52 -
 53
53 -
54
-
55
-
56
-
57
-
58
-
59
-
60
-
61
-
62
-
63
-
64
-
65
-
66
-
67
-
68
-
69
-
70
-
71
-
72
-
73
-
74
-
75
-
76
-
77
-
78
-
79
-
80
-
81
-
82
-
83
-
84
-
85
-
86
-
87
-
88
-
89
-
90
-
91
-
92
-
93
-
94
-
95
-
96
-
97
-
98
-
99
-
100
-
101
-
102
-
103
-
104
-
105
-
106
-
107
-
108
-
109
-
110
-
111
-
112
-
113
-
114
-
115
-
116
-
117
-
118
 |
 |