Toshiba 52LX177 Owner's Manual - English - Page 90
C. Setting up file sharing on your PC
 |
UPC - 022265000700
View all Toshiba 52LX177 manuals
Add to My Manuals
Save this manual to your list of manuals |
Page 90 highlights
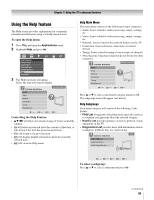
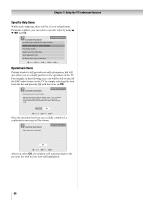
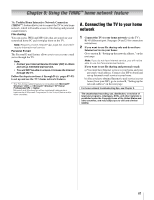
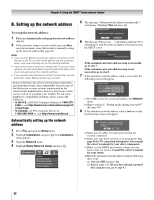
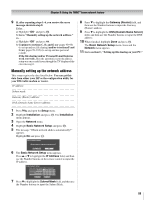
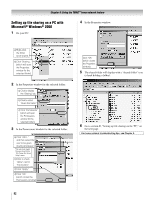
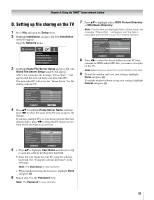
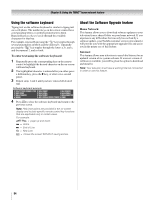
Chapter 8: Using the THINC™ home network feature Resetting the network address 1 Press Y and open the Setup menu. 2 Highlight Installation and press T. The Installation menu appears. 3 Open the Network menu. 4 Highlight Basic Network Setup and press T. 5 The message "Your Basic Network Setup is complete. Would you like to start over?" will appear. To continue, highlight Yes and press T. To return to the Network menu, highlight No and press T. Basic Network Setup Your Basic Network Setup is complete. Would you like to start over? Yes No 6 If you selected Yes in step 5, the message "Obtain network address automatically?" will appear. Basic Network Setup Obtain network address automatically? Yes No To obtain the network address automatically, go to step 5 under "Automatically setting up the network address" (- page 88). To manually enter the network address, go to "Manually setting up the network address." For home network troubleshooting tips, see Chapter 9. C. Setting up file sharing on your PC Compatible operating systems The following operating systems or higher are compatible for file sharing with the TV: • Microsoft® Windows® XP Service Pack 2 or higher (Home Edition and Professional) [See setup details below] • Microsoft® Windows® 2000 [See setup details on page 92] No other operating systems are compatible with the TV. Note: • The name of any directory/folder on your PC that you are setting up for file sharing with the TV cannot be longer than 12 characters and cannot contain any special characters. • See "Media specifications" (- page 95) for details on compatible JPEG and MP3 files. • The network (NETBIOS) name of your PC that you are setting up for file sharing must be 15 characters or less. To determine which operating system and service pack (if applicable) are on your PC: 1 On your PC, click the "Start" button. 2 Click "Settings | Control Panel." 3 In the Control Panel, double-click "System." 4 Select the "General" tab, which will display your PC's current operating system and service pack. Setting up file sharing on a PC with Microsoft® Windows® XP Service Pack 2 or higher 1 On your PC: a) Right-click the folder to be shared. b) Click "Sharing and Security..." (which will open the Properties window for the selected folder.) * Microsoft product screen shot(s) reprinted with permission from Microsoft Corporation. 90
-
 1
1 -
2
-
3
-
4
-
5
-
6
-
7
-
8
-
9
-
10
-
11
-
12
-
13
-
14
-
15
-
16
-
17
-
18
-
19
-
20
-
21
-
22
-
23
-
24
-
25
-
26
-
27
-
28
-
29
-
30
-
31
-
32
-
33
-
34
-
35
-
36
-
37
-
38
-
39
-
40
-
41
-
42
-
43
-
44
-
45
-
46
-
47
-
48
-
49
-
50
-
51
-
52
-
53
-
54
-
55
-
56
-
57
-
58
-
59
-
60
-
61
-
62
-
63
-
64
-
65
-
66
-
67
-
68
-
69
-
70
-
71
-
72
-
73
-
74
-
75
-
76
-
77
-
78
-
79
-
80
-
81
-
82
-
83
-
84
-
 85
85 -
 86
86 -
 87
87 -
 88
88 -
 89
89 -
 90
90 -
 91
91 -
 92
92 -
 93
93 -
 94
94 -
 95
95 -
96
-
97
-
98
-
99
-
100
-
101
-
102
-
103
-
104
-
105
-
106
-
107
-
108
-
109
-
110
-
111
-
112
-
113
-
114
-
115
-
116
-
117
-
118
 |
 |
