Toshiba 52LX177 Owner's Manual - English - Page 89
Manually setting up the network address
 |
UPC - 022265000700
View all Toshiba 52LX177 manuals
Add to My Manuals
Save this manual to your list of manuals |
Page 89 highlights
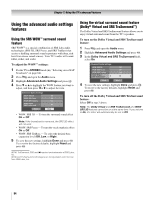
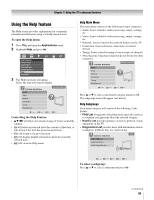
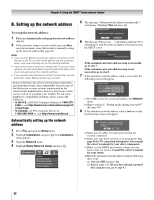
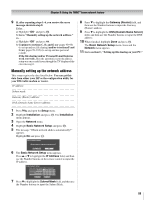
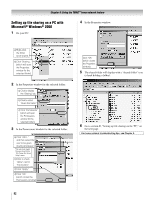
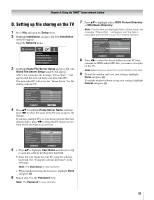
Chapter 8: Using the THINC™ home network feature 9 If, after repeating steps 1-6, you receive the error message shown in step 8: Either... a) Highlight "OK" and press T. b) Go to "Manually setting up the network address." Or... a) Highlight "OK" and press T. b) Continue to sections C, D, and E (- pages 90-95) (to set up and use file sharing) and/or to sections F and G (- pages 99-102) (to set up and use personal e-mail). If the file sharing and/or Personal E-mail features work correctly, then the automatic network address setup was successful (even though the TV displayed the error message). Manually setting up the network address This setup requires the data listed below. You can get this data from either your ISP or the configuration utility for your DSL/cable modem or router. IP address Subnet mask Gateway (Router) address DNS (Domain Name Server) address 1 Press Y and open the Setup menu. 2 Highlight Installation and press T. The Installation menu appears. 3 Open the Network menu. 4 Highlight Basic Network Setup and press T. 5 The message "Obtain network address automatically?" appears. Highlight No and press T. Basic Network Setup Obtain network address automatically? Yes No 6 The Basic Network Setup menu appears. Press B or b to highlight the IP Address field, and then use the Number buttons on the remote control to input the IP address. Basic Network Setup Please enter your Network Address Information IP Address 0 0 0 0 Subnet Mask 255 255 255 0 Gateway (Router) 0 0 0 0 DNS (Domain Name Server) 0 0 0 0 Cancel Done 7 Press b to highlight the Subnet Mask field, and then use the Number buttons to input the Subnet Mask. 8 Press b to highlight the Gateway (Router) field, and then use the Number buttons to input the Gateway (Router) address. 9 Press b to highlight the DNS (Domain Name Server) field, and then use the Number buttons to input the DNS address. 10 When finished, highlight Done and press T. The Basic Network Setup menu closes and the Network menu appears. 11 Go to section C, "Setting up file sharing on your PC." 89
-
 1
1 -
2
-
3
-
4
-
5
-
6
-
7
-
8
-
9
-
10
-
11
-
12
-
13
-
14
-
15
-
16
-
17
-
18
-
19
-
20
-
21
-
22
-
23
-
24
-
25
-
26
-
27
-
28
-
29
-
30
-
31
-
32
-
33
-
34
-
35
-
36
-
37
-
38
-
39
-
40
-
41
-
42
-
43
-
44
-
45
-
46
-
47
-
48
-
49
-
50
-
51
-
52
-
53
-
54
-
55
-
56
-
57
-
58
-
59
-
60
-
61
-
62
-
63
-
64
-
65
-
66
-
67
-
68
-
69
-
70
-
71
-
72
-
73
-
74
-
75
-
76
-
77
-
78
-
79
-
80
-
81
-
82
-
83
-
 84
84 -
 85
85 -
 86
86 -
 87
87 -
 88
88 -
 89
89 -
 90
90 -
 91
91 -
 92
92 -
 93
93 -
 94
94 -
95
-
96
-
97
-
98
-
99
-
100
-
101
-
102
-
103
-
104
-
105
-
106
-
107
-
108
-
109
-
110
-
111
-
112
-
113
-
114
-
115
-
116
-
117
-
118
 |
 |