Toshiba 52LX177 Owner's Manual - English - Page 51
Using the TV's features
 |
UPC - 022265000700
View all Toshiba 52LX177 manuals
Add to My Manuals
Save this manual to your list of manuals |
Page 51 highlights
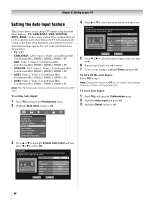
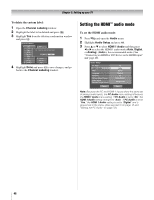
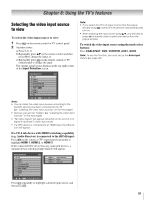
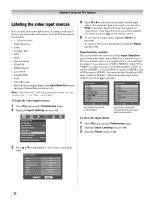
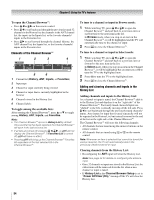
Chapter 6: Using the TV's features Selecting the video input source to view To select the video input source to view: 1 Press + on the remote control or TV control panel. 2 And then either: a) Press 0-8; or b) Repeatedly press Bb on the remote control and then press T to change the input; or c) Repeatedly press + on the remote control or TV control panel to change the input. The current signal source displays in the top right corner of the Input Selection screen. Input Selection 0 ANT 1 Video 1 2 Video 2 3 ColorStream HD1 4 ColorStream HD2 5 HDMI 1 CE-Link 6 HDMI 2 7 HDMI 3 8 PC ANT 0 - 8 / INPUT to Select Navigate Note: • You can label the video input sources according to the specific devices you have connected to the TV (- "Labeling the video input sources" on the next page). • Sources can also be "hidden" (- "Labeling the video input sources" on the next page). • "No Video Signal" will appear randomly on the screen if no signal is received in video input mode. • If a CEC device is connected to an HDMI input, the CE-Link icon will appear. If a CE-Link device with HDMI switching capability (e.g. Audio Receiver) is connected to the HDMI input: Press + on the remote or TV control panel repeatedly to highlight HDMI 1, HDMI 2. or HDMI 3. If the connected CEC device has any connected devices, a separate device selection popup window will appear. Input Selection 0 ANT 1 Video 1 2 Video 2 3 ColorStream HD1 4 ColorStream HD2 5 HDMI 1 CE-Link 6 HDMI 2 7 HDMI 3 8 PC ANT HDMI 1-1 HDMI 1-2 HDMI 1-3 Audio Receiver Player Recorder 0 - 8 / INPUT to Select Navigate Press + repeatedly to highlight a desired input source, and then press O. Note: • If you select the CE-Link input source from the popup window using +, some CE-Link devices may automatically turn on. • When selecting the input source using B b, you will have to press T to actually select a particular device from the popup window. To switch the video input source using the mode select buttons: Press CABLE/SAT, DVD, VCR/PVR, AUX1, AUX2. Note: To use this function, you must set up the Auto Input feature (- page 46). 51
-
 1
1 -
2
-
3
-
4
-
5
-
6
-
7
-
8
-
9
-
10
-
11
-
12
-
13
-
14
-
15
-
16
-
17
-
18
-
19
-
20
-
21
-
22
-
23
-
24
-
25
-
26
-
27
-
28
-
29
-
30
-
31
-
32
-
33
-
34
-
35
-
36
-
37
-
38
-
39
-
40
-
41
-
42
-
43
-
44
-
45
-
 46
46 -
 47
47 -
 48
48 -
 49
49 -
 50
50 -
 51
51 -
 52
52 -
 53
53 -
 54
54 -
 55
55 -
 56
56 -
57
-
58
-
59
-
60
-
61
-
62
-
63
-
64
-
65
-
66
-
67
-
68
-
69
-
70
-
71
-
72
-
73
-
74
-
75
-
76
-
77
-
78
-
79
-
80
-
81
-
82
-
83
-
84
-
85
-
86
-
87
-
88
-
89
-
90
-
91
-
92
-
93
-
94
-
95
-
96
-
97
-
98
-
99
-
100
-
101
-
102
-
103
-
104
-
105
-
106
-
107
-
108
-
109
-
110
-
111
-
112
-
113
-
114
-
115
-
116
-
117
-
118
 |
 |
