Xerox M118i OmniPage SE User Guide - Page 42
Manual processing, Click the Get button. This either brings up the Load Image File
 |
UPC - 095205219265
View all Xerox M118i manuals
Add to My Manuals
Save this manual to your list of manuals |
Page 42 highlights
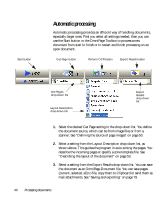
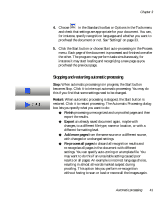
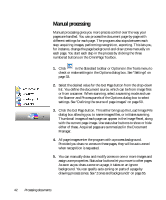
Manual processing Manual processing gives you more precise control over the way your pages are handled. You can process the document page-by-page with different settings for each page. The program also stops between each step: acquiring images, performing recognition, exporting. This lets you, for instance, change the page background and draw zones manually on each page. You start each step in the process by clicking the three numbered buttons on the OmniPage Toolbox. 1. Click in the Standard toolbar or Options in the Tools menu to check or make settings in the Options dialog box. See "Settings" on page 33. 2. Select the desired value for the Get Page button from the drop-down list. You define the document source, which can be from image files or from a scanner. When scanning, select a scanning mode and use the Scanner and Process panels of the Options dialog box to select settings. See "Defining the source of page images" on page 50. 3. Click the Get Page button. This either brings up the Load Image File dialog box allowing you to name images files, or initiates scanning. Thumbnail images of each page can appear in the Image Panel, along with the current page image. Use status bar buttons to show or hide either of these. Acquired pages are summarized in the Document Manager. 4. All page images enter the program with a process background. Provided you draw no zones on these pages, they will be auto-zoned when recognition is requested. 5. You can manually draw and modify zones on one or more images and assign zone properties. Status bar buttons let you move to other pages. As soon as you draw a zone on a page, it takes on an ignore background. You can specify auto-zoning on parts of a page by drawing process zones. See "Zones and backgrounds" on page 55. 42 Processing documents
-
 1
1 -
2
-
3
-
4
-
5
-
6
-
7
-
8
-
9
-
10
-
11
-
12
-
13
-
14
-
15
-
16
-
17
-
18
-
19
-
20
-
21
-
22
-
23
-
24
-
25
-
26
-
27
-
28
-
29
-
30
-
31
-
32
-
33
-
34
-
35
-
36
-
 37
37 -
 38
38 -
 39
39 -
 40
40 -
 41
41 -
 42
42 -
 43
43 -
 44
44 -
 45
45 -
 46
46 -
 47
47 -
48
-
49
-
50
-
51
-
52
-
53
-
54
-
55
-
56
-
57
-
58
-
59
-
60
-
61
-
62
-
63
-
64
-
65
-
66
-
67
-
68
-
69
-
70
-
71
-
72
-
73
-
74
-
75
-
76
-
77
-
78
-
79
-
80
-
81
-
82
-
83
-
84
-
85
-
86
-
87
-
88
-
89
-
90
-
91
-
92
-
93
-
94
-
95
-
96
-
97
-
98
-
99
-
100
-
101
-
102
 |
 |
