Xerox M118i OmniPage SE User Guide - Page 57
Zone types and properties, Process zone olive
 |
UPC - 095205219265
View all Xerox M118i manuals
Add to My Manuals
Save this manual to your list of manuals |
Page 57 highlights
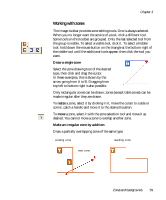
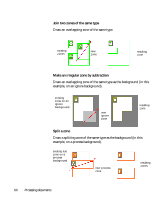
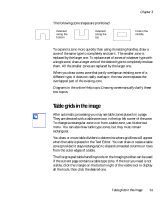
Chapter 3 No. Type What happens: 1 Text zone OCR runs and generates text. 2 Table zone OCR runs, text is placed in a table grid. 3 Graphic zone Image is embedded in recognized page. 4 Process zone Auto-zoning creates one or more zones, decides their types and processes their 5 Process background contents. 6 Ignore zone Nothing 7 Ignore background Automatically drawn zones and template zones have solid borders: Manually drawn or modified zones have dotted borders: Zones do not have a reading order. Reordering of recognized elements can be done in the Text Editor. See "Text and image editing" on page 74. On-the-fly zoning is described in chapter 4. See "On-the-fly editing" on page 76. Zone types and properties Each zone has a zone type. Zones containing text can also have a zone contents setting: alphanumeric or numeric. The zone type and zone contents together constitute the zone properties. Right-click in a zone for a shortcut menu allowing you to change the zone's properties. Select multiple zones with Shift+clicks to change their properties in one move. The Image toolbar provides five zone drawing tools, one for each type. A zone's type is shown by an icon in its top left corner, and by the icon and zone border color. Here are the tools and the colors: Process zone (olive) Use this to draw a process zone, to define a page area where auto-zoning will run. After recognition, this zone will be replaced by one or more zones with automatically determined zone types. You normally draw Zones and backgrounds 57
-
 1
1 -
2
-
3
-
4
-
5
-
6
-
7
-
8
-
9
-
10
-
11
-
12
-
13
-
14
-
15
-
16
-
17
-
18
-
19
-
20
-
21
-
22
-
23
-
24
-
25
-
26
-
27
-
28
-
29
-
30
-
31
-
32
-
33
-
34
-
35
-
36
-
37
-
38
-
39
-
40
-
41
-
42
-
43
-
44
-
45
-
46
-
47
-
48
-
49
-
50
-
51
-
 52
52 -
 53
53 -
 54
54 -
 55
55 -
 56
56 -
 57
57 -
 58
58 -
 59
59 -
 60
60 -
 61
61 -
 62
62 -
63
-
64
-
65
-
66
-
67
-
68
-
69
-
70
-
71
-
72
-
73
-
74
-
75
-
76
-
77
-
78
-
79
-
80
-
81
-
82
-
83
-
84
-
85
-
86
-
87
-
88
-
89
-
90
-
91
-
92
-
93
-
94
-
95
-
96
-
97
-
98
-
99
-
100
-
101
-
102
 |
 |
