Xerox M118i OmniPage SE User Guide - Page 50
Defining the source of images, Input from image files
 |
UPC - 095205219265
View all Xerox M118i manuals
Add to My Manuals
Save this manual to your list of manuals |
Page 50 highlights
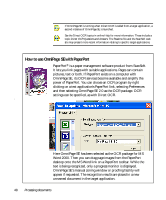
This is the current folder. Use Shift+ clicks or Ctrl+clicks to place more than one file in the File name text box. Specify the file type(s) you want listed. This can be used for multipage TIFF, DCX, and MAX files. This is a blank image file for the saving option: "New file for each blank page". Defining the source of page images There are two possible image sources: from image files and from a scanner. There are two main types of scanners: flatbed or sheetfed. A scanner may have a built-in or added Automatic Document Feeder (ADF), which makes it easier to scan multi-page documents. The images from scanned documents can be input directly into OmniPage SE or may be saved with the scanner's own software to an image file, which OmniPage SE can later open. Input from image files You can create image files from your own scanner, or receive them by e-mail or as fax files. OmniPage SE can open a wide range of image file types. See "File types for opening and saving images" on page 96. Select Load Image File in the Get Pages drop-down list. Files are specified in the Load Image File dialog box. This appears when you start automatic processing. In manual processing, click the Get Page button or use the Process menu. The lower part of the dialog box provides advanced settings, and can be shown or hidden. Here, it is displayed. Select this to see a thumbnail of the selected file. Not available when multiple files are selected. Click Advanced to open the lower panel and Basic to close it. Use this to add files from different folders and to control file order precisely. Use these arrows to change the file order. 50 Processing documents
-
 1
1 -
2
-
3
-
4
-
5
-
6
-
7
-
8
-
9
-
10
-
11
-
12
-
13
-
14
-
15
-
16
-
17
-
18
-
19
-
20
-
21
-
22
-
23
-
24
-
25
-
26
-
27
-
28
-
29
-
30
-
31
-
32
-
33
-
34
-
35
-
36
-
37
-
38
-
39
-
40
-
41
-
42
-
43
-
44
-
 45
45 -
 46
46 -
 47
47 -
 48
48 -
 49
49 -
 50
50 -
 51
51 -
 52
52 -
 53
53 -
 54
54 -
 55
55 -
56
-
57
-
58
-
59
-
60
-
61
-
62
-
63
-
64
-
65
-
66
-
67
-
68
-
69
-
70
-
71
-
72
-
73
-
74
-
75
-
76
-
77
-
78
-
79
-
80
-
81
-
82
-
83
-
84
-
85
-
86
-
87
-
88
-
89
-
90
-
91
-
92
-
93
-
94
-
95
-
96
-
97
-
98
-
99
-
100
-
101
-
102
 |
 |
