Yamaha PSR-S650 Owner's Manual - Page 42
Assigning the Style Part, Assigning the Melody Part MAIN, DUAL and LEFT
 |
View all Yamaha PSR-S650 manuals
Add to My Manuals
Save this manual to your list of manuals |
Page 42 highlights
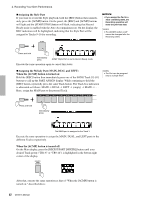
4. Recording Your Own Performance Assigning the Style Part If you want to record the Style playback, hold the [REC] button then immediately press the [ACMP] button. On the panel, the [REC] and [ACMP] buttons will light and the [START/STOP] button will flash, indicating that Record Ready mode is enabled with the Auto Accompaniment on. On the display, the REC indication will be highlighted, indicating that the Style Part will be assigned to Tracks 9-16 for recording. NOTICE • If you assign the Part to a Track containing data, the Recording operation will erase the previous data. NOTE • The [ACMP] button on/off cannot be changed after the Recording starts. Press and hold Immediately press ACMP (Style Part) is set to Record Ready mode. Execute the same operation again to cancel this status. Assigning the Melody Part (MAIN, DUAL and LEFT) When the [ACMP] button is turned on: Hold the [REC] button then immediately press one of the SONG Track [1]-[8] buttons to call up the PART ASSIGN display. While continuing to hold the [REC] button, repeatedly press the same Track button. The Track box indication is alternated as follows: MAIN DUAL LEFT (empty) MAIN ... . Here, assign the MAIN part to the pressed Track. NOTE • The Part can be assigned only to a single Track. Press and hold Immediately press The MAIN part is assigned to the Track 1. Execute the same operation to assign the MAIN, DUAL, and LEFT parts to the different Tracks respectively. When the [ACMP] button is turned off: On the Main display, press the [REGIST/PART [MIXER]] button until your desired Track group ("TR1-8" or "TR9-16") is highlighted in the bottom right corner of the display. After that, execute the same operation as that of "When the [ACMP] button is turned on:" described above. 42 Owner's Manual
-
 1
1 -
2
-
3
-
4
-
5
-
6
-
7
-
8
-
9
-
10
-
11
-
12
-
13
-
14
-
15
-
16
-
17
-
18
-
19
-
20
-
21
-
22
-
23
-
24
-
25
-
26
-
27
-
28
-
29
-
30
-
31
-
32
-
33
-
34
-
35
-
36
-
 37
37 -
 38
38 -
 39
39 -
 40
40 -
 41
41 -
 42
42 -
 43
43 -
 44
44 -
 45
45 -
 46
46 -
 47
47 -
48
-
49
-
50
-
51
-
52
-
53
-
54
-
55
-
56
-
57
-
58
-
59
-
60
-
61
-
62
-
63
-
64
-
65
-
66
-
67
-
68
-
69
-
70
-
71
-
72
-
73
-
74
-
75
 |
 |
