Yamaha PSR-S650 Owner's Manual - Page 48
Repeat steps 4-6 to set other tracks if necessary., Save the settings here as Style data or Song data. - style creator
 |
View all Yamaha PSR-S650 manuals
Add to My Manuals
Save this manual to your list of manuals |
Page 48 highlights
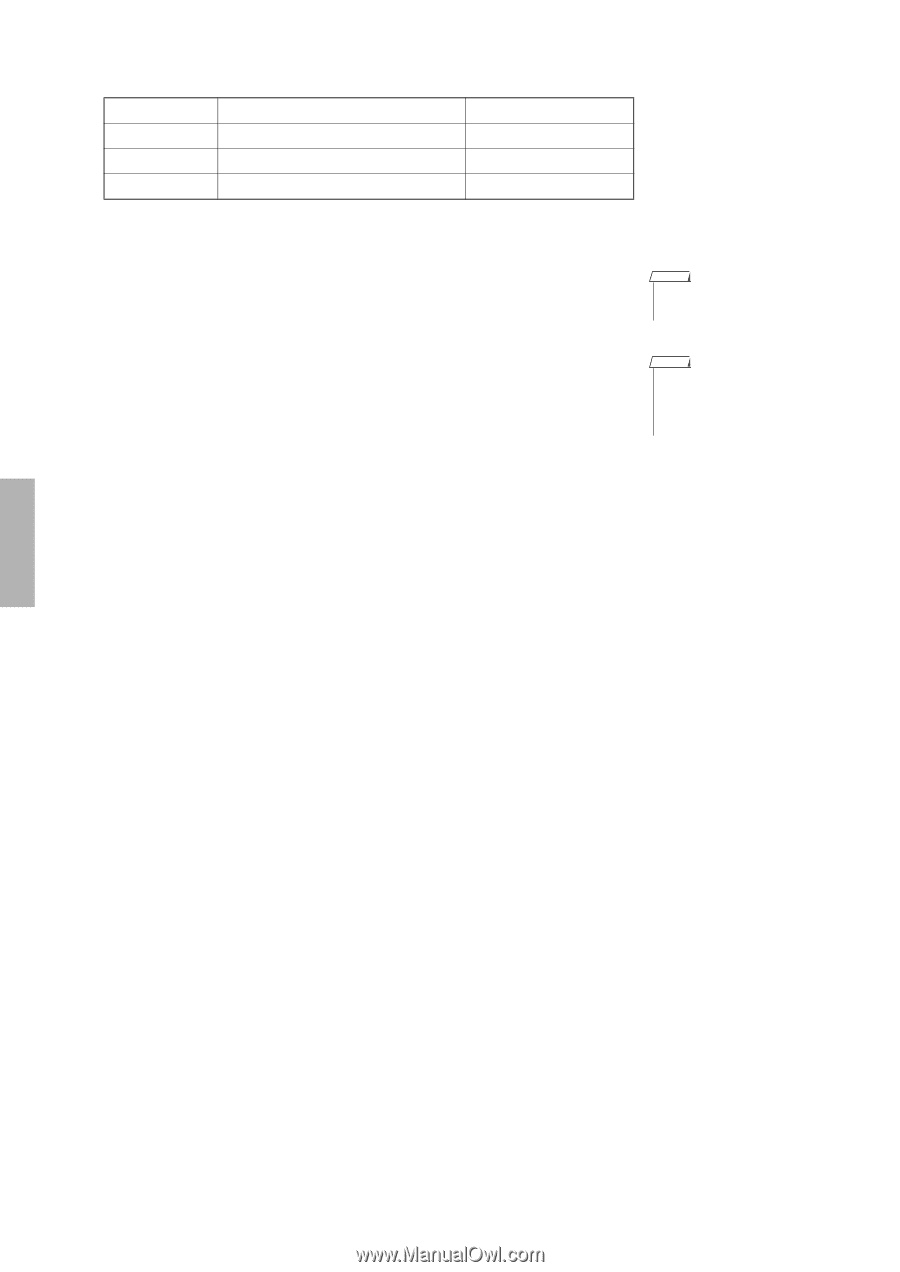
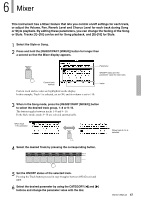
6. Mixer Volume Pan Reverb Level Chorus Level Determines the Part volume. Determines the Pan position. Determines the Reverb depth. Determines the Chorus depth. Range: 0-127 Range: 0-64-127 Range: 0-127 Range: 0-127 7 Repeat steps 4-6 to set other tracks if necessary. 8 Save the settings here as Style data or Song data. You can select either USB flash memory or internal memory as the save destination. If you want to save to the USB flash memory, connect the USB flash memory to the USB TO DEVICE terminal. 1 Press the [EXECUTE] button to call up the STYLE CREATOR display or the SONG EDIT display for saving the data. 2 Select the save destination. Pressing the [USB] button alternates the save destination between USB flash memory and internal memory. If you want to save to USB flash memory, select "Save To USB"; if you want to save to internal memory, select "Save To USER" in the display. A default file name will automatically be created. 3 Press the [EXECUTE] button. NOTE • The settings in the Preset Song cannot be saved. NOTE • For details, refer to the "Style Creator" chapter or "Song Edit" chapter in the Reference Manual. 4 (Only in the SONG EDIT display) Change the file name as necessary, then press the [EXECUTE] button again. For instructions on naming, refer to step 4 on page 57. 5 Press the [+/YES] button to execute the save operation. 9 Press the [EXIT] button to return to the Main display. 48 Owner's Manual
-
 1
1 -
2
-
3
-
4
-
5
-
6
-
7
-
8
-
9
-
10
-
11
-
12
-
13
-
14
-
15
-
16
-
17
-
18
-
19
-
20
-
21
-
22
-
23
-
24
-
25
-
26
-
27
-
28
-
29
-
30
-
31
-
32
-
33
-
34
-
35
-
36
-
37
-
38
-
39
-
40
-
41
-
42
-
 43
43 -
 44
44 -
 45
45 -
 46
46 -
 47
47 -
 48
48 -
 49
49 -
 50
50 -
 51
51 -
 52
52 -
 53
53 -
54
-
55
-
56
-
57
-
58
-
59
-
60
-
61
-
62
-
63
-
64
-
65
-
66
-
67
-
68
-
69
-
70
-
71
-
72
-
73
-
74
-
75
 |
 |