Yamaha RX V661 MCXSP10 Manual - Page 10
Step 1: Set up your speakers, corresponding speaker terminal of this unit. - receiver
 |
UPC - 027108927411
View all Yamaha RX V661 manuals
Add to My Manuals
Save this manual to your list of manuals |
Page 10 highlights
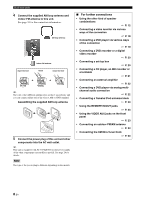
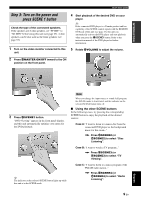
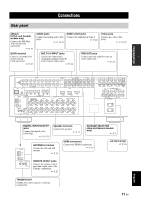
Quick start guide Step 1: Set up your speakers Place your speakers in the room and connect them to this unit. AUDIO L GND R DOCK PHONO XM IN MD/ OUT CD (PLAY) CD-R (REC) DVD DTV/CBL IN OUT DVR MULTI CH INPUT L ZONE 2 CENTER OUT PRE OUT SINGLE CENTER VIDEO VIDEO IN OUT VCR R FRONT(6CH) SB(8CH) SURROUND HDMI SUB WOOFER S VIDEO SUB FRONT SURROUND SUR. BACK WOOFER DVD DTV/CBL IN OUT DVR IN OUT VCR MONITOR OUT COMPONENT VIDEO PR A DVD PB Y PR B DTV/CBL PB Y ANTENNA AM GND MD/CD-R 1 DIGITAL OUTPUT MD/CD-R 2 DVD DTV/CBL CD 3 4 5 OPTICAL COAXIAL DIGITAL INPUT DVD 6 FRONT B/ZONE2/ R EXTRA SP L FRONT A R L FM 75 UNBAL REMOTE TRIGGER OUT DVD IN1 DTV/CBL IN2 OUT SPEAKERS CENTER SURROUND R L SURROUND BACK/BI-AMP R L MONITOR OUT AC OUTLETS C DVR +12V IN OUT 15mA MAX. PRESENCE SINGLE Be sure to connect the left channel (L), right channel (R), "+" (red) and "-" (black) properly. Front speakers and center speaker Loosen Insert Tighten 1 Place your speakers and subwoofer in the room. 2 Connect speaker cables to each speaker. Center speaker Be sure to connect the "+" (red) and "-" (black) properly. Cables are colored or shaped differently, perhaps with a stripe, groove or ridge. Connect the striped (grooved, etc.) cable to the "+" (red) terminals of this unit and your speaker. Connect the plain cable to the "-" (black) terminals. To the front right speaker To the front left speaker Surround and surround back speakers 3 Connect each speaker cable to the corresponding speaker terminal of this unit. 1 2 3 4 To the surround right speaker To the surround left speaker To the surround back left speaker To the surround back right speaker 1 Make sure that this unit and the subwoofer are unplugged from the AC wall outlets. 2 Twist the exposed wires of the speaker cables together to prevent short circuits. 3 Do not let the bare speaker wires touch each other. 4 Do not let the bare speaker wires touch any metal part of this unit. 5 Connect the subwoofer cable to the SUBWOOFER PRE OUT jack of this unit and the input jack of the subwoofer. Subwoofer AV receiver 6 En Input jack Subwoofer cable SUBWOOFER PRE OUT jack
-
 1
1 -
2
-
3
-
4
-
 5
5 -
 6
6 -
 7
7 -
 8
8 -
 9
9 -
 10
10 -
 11
11 -
 12
12 -
 13
13 -
 14
14 -
 15
15 -
16
-
17
-
18
-
19
-
20
-
21
-
22
-
23
-
24
-
25
-
26
-
27
-
28
-
29
-
30
-
31
-
32
-
33
-
34
-
35
-
36
-
37
-
38
-
39
-
40
-
41
-
42
-
43
-
44
-
45
-
46
-
47
-
48
-
49
-
50
-
51
-
52
-
53
-
54
-
55
-
56
-
57
-
58
-
59
-
60
-
61
-
62
-
63
-
64
-
65
-
66
-
67
-
68
-
69
-
70
-
71
-
72
-
73
-
74
-
75
-
76
-
77
-
78
-
79
-
80
-
81
-
82
-
83
-
84
-
85
-
86
-
87
-
88
-
89
-
90
-
91
-
92
-
93
-
94
-
95
-
96
-
97
-
98
-
99
-
100
-
101
-
102
-
103
-
104
-
105
-
106
-
107
-
108
-
109
-
110
-
111
-
112
-
113
-
114
-
115
-
116
-
117
-
118
-
119
-
120
-
121
-
122
-
123
-
124
-
125
-
126
-
127
-
128
-
129
-
130
 |
 |
