Yamaha RX V661 MCXSP10 Manual - Page 12
For further connections, Using the REMOTE IN/OUT jacks - amplifier
 |
UPC - 027108927411
View all Yamaha RX V661 manuals
Add to My Manuals
Save this manual to your list of manuals |
Page 12 highlights
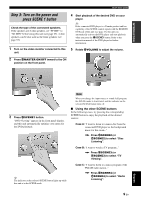
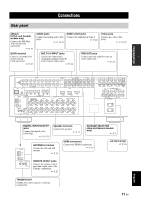
Quick start guide 4 Connect the supplied AM loop antenna and indoor FM antenna to this unit. See page 24 for the connection information. AM loop antenna Open the lever Indoor FM antenna Insert Close the lever y The wire of the AM loop antenna does not have any polarity and you can connect either end of the wire to AM or GND terminal Assembling the supplied AM loop antenna 5 Connect the power plug of this unit and other components into the AC wall outlet. y This unit is equipped with AC OUTLET(S) for the power supply of the other components (except Korea model). See page 24 for details. Note The type of the power plug is different depending on the models. ■ For further connections • Using the other kind of speaker combinations ☞ P. 12 • Connecting a video monitor via various ways of the connection ☞ P. 18 • Connecting a DVD player via various ways of the connection ☞ P. 19 • Connecting a DVD recorder or a digital video recorder ☞ P. 20 • Connecting a set-top box ☞ P. 20 • Connecting a CD player, an MD recorder or a turntable ☞ P. 21 • Connecting an external amplifier ☞ P. 22 • Connecting a DVD player via analog multichannel audio connection ☞ P. 22 • Connecting a Yamaha iPod universal dock ☞ P. 23 • Using the REMOTE IN/OUT jacks ☞ P. 23 • Using the VIDEO AUX jacks on the front panel ☞ P. 23 • Connecting an outdoor FM/AM antenna ☞ P. 24 • Connecting the XM Mini-Tuner Dock ☞ P. 53 8 En
-
 1
1 -
2
-
3
-
4
-
5
-
6
-
 7
7 -
 8
8 -
 9
9 -
 10
10 -
 11
11 -
 12
12 -
 13
13 -
 14
14 -
 15
15 -
 16
16 -
 17
17 -
18
-
19
-
20
-
21
-
22
-
23
-
24
-
25
-
26
-
27
-
28
-
29
-
30
-
31
-
32
-
33
-
34
-
35
-
36
-
37
-
38
-
39
-
40
-
41
-
42
-
43
-
44
-
45
-
46
-
47
-
48
-
49
-
50
-
51
-
52
-
53
-
54
-
55
-
56
-
57
-
58
-
59
-
60
-
61
-
62
-
63
-
64
-
65
-
66
-
67
-
68
-
69
-
70
-
71
-
72
-
73
-
74
-
75
-
76
-
77
-
78
-
79
-
80
-
81
-
82
-
83
-
84
-
85
-
86
-
87
-
88
-
89
-
90
-
91
-
92
-
93
-
94
-
95
-
96
-
97
-
98
-
99
-
100
-
101
-
102
-
103
-
104
-
105
-
106
-
107
-
108
-
109
-
110
-
111
-
112
-
113
-
114
-
115
-
116
-
117
-
118
-
119
-
120
-
121
-
122
-
123
-
124
-
125
-
126
-
127
-
128
-
129
-
130
 |
 |
