Yamaha RX V661 MCXSP10 Manual - Page 43
Selecting audio input jacks (AUDIO SELECT) - on screen display
 |
UPC - 027108927411
View all Yamaha RX V661 manuals
Add to My Manuals
Save this manual to your list of manuals |
Page 43 highlights
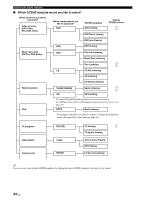
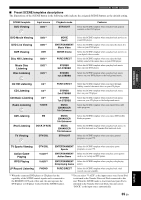
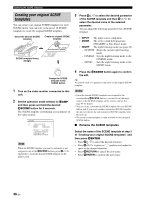
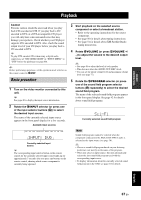
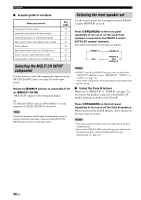
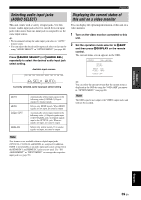
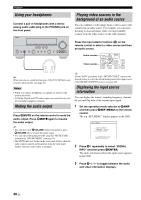
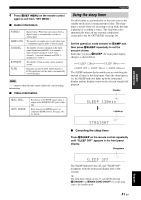
BASIC OPERATION Playback Selecting audio input jacks (AUDIO SELECT) This unit comes with a variety of input jacks. Use this feature (audio input jack select) to switch between input jacks when more than one input jack is assigned to as the same input source. y • We recommend setting the audio input jack select to "AUTO" in most cases. • You can adjust the default audio input jack select of this unit by using "AUDIO SELECT" in "OPTION MENU" (see page 82). Press HAUDIO SELECT (or IAUDIO SEL) repeatedly to select the desired audio input jack select setting. Available input sources VCR DVR V-AUX DTV/CBL DVD MD/CD-R TUNER CD XM PHONO A.SEL: AUTO Currently selected audio input jack select setting AUTO HDMI COAX/OPT ANALOG Automatically selects input signals in the following order:(1) HDMI (2) Digital signals (3) Analog signals Selects only HDMI signals. When HDMI signals are not input, no sound is output. Automatically selects input signals in the following order: (1) Digital signals input at the COAXIAL jack. (2) Digital signals input at the OPTICAL jack. When no signals are input, no sound is output. Selects only analog signals. If no analog signals are input, no sound is output. Displaying the current status of this unit on a video monitor You can display the operating information of this unit on a video monitor. 1 Turn on the video monitor connected to this unit. 2 Set the operation mode selector to KAMP and then press ODISPLAY on the remote control. The current status screen appears in the OSD. STATUS VOL:-40.0dB MOVIE Sci-Fi INPUT: DVD A.SEL: HDMI NIGHT: OFF y You can select the amount of time that the current status is displayed in the OSD by using the "OSD-AMP" parameter in "OPTION MENU" (see page 81). Note The OSD signal is not output at the VIDEO output jacks and will not be recorded. Note This feature is not available when no digital input jacks (OPTICAL, COAXIAL and HDMI) are assigned. In addition, HDMI is not available as an audio input jack select setting when the HDMI IN 1 and HDMI IN 2 jacks are not used. Use "I/O ASSIGNMENT" in "INPUT MENU" to reassign the respective input jack (see page 78). English 39 En
-
 1
1 -
2
-
3
-
4
-
5
-
6
-
7
-
8
-
9
-
10
-
11
-
12
-
13
-
14
-
15
-
16
-
17
-
18
-
19
-
20
-
21
-
22
-
23
-
24
-
25
-
26
-
27
-
28
-
29
-
30
-
31
-
32
-
33
-
34
-
35
-
36
-
37
-
 38
38 -
 39
39 -
 40
40 -
 41
41 -
 42
42 -
 43
43 -
 44
44 -
 45
45 -
 46
46 -
 47
47 -
 48
48 -
49
-
50
-
51
-
52
-
53
-
54
-
55
-
56
-
57
-
58
-
59
-
60
-
61
-
62
-
63
-
64
-
65
-
66
-
67
-
68
-
69
-
70
-
71
-
72
-
73
-
74
-
75
-
76
-
77
-
78
-
79
-
80
-
81
-
82
-
83
-
84
-
85
-
86
-
87
-
88
-
89
-
90
-
91
-
92
-
93
-
94
-
95
-
96
-
97
-
98
-
99
-
100
-
101
-
102
-
103
-
104
-
105
-
106
-
107
-
108
-
109
-
110
-
111
-
112
-
113
-
114
-
115
-
116
-
117
-
118
-
119
-
120
-
121
-
122
-
123
-
124
-
125
-
126
-
127
-
128
-
129
-
130
 |
 |
