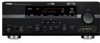
Yamaha RX V661 MCXSP10 Manual - Page 94
Controlling Zone 2, Using the internal amplifier of this unit, Controlling Zone 2 with the front panel - owner s manual
 |
UPC - 027108927411
View all Yamaha RX V661 manuals
Add to My Manuals
Save this manual to your list of manuals |
Page 94 highlights
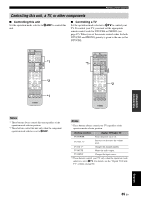
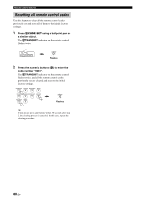
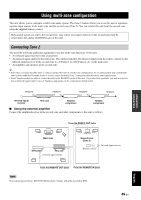
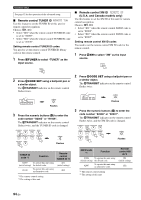
Using multi-zone configuration ■ Using the internal amplifier of this unit Important safety notice The EXTRA SP speaker terminals of this Receiver should not be connected to a Passive Loudspeaker Selector Box or more than one loudspeaker per channel. Connection to a Passive Loudspeaker Selector Box or multiple speakers per channel could create an abnormally low impedance load resulting in amplifier damage. See this owner's manual for correct usage. Compliance with minimum speaker impedance information for all channels must be maintained at all times. This information is found on the back panel of your Receiver. Connect the speakers in the second zone to the EXTRA SP speaker terminals and then set the "EXTRA SP ASSIGN" to "ZONE2" (see page 72). FRONT B/ZONE2/ PRESENCE R EXTRA SP L Second zone (Zone 2) This unit Main zone y • You can use the FRONT B speakers as the front speaker system of another zone. Set "EXTRA SP ASSIGN" to "FRONT B" and then "FRONT B" to "ZONE B" (see page 72). • When you use the internal amplifiers for the Zone 2 speakers, you can adjust the volume level and set the initial volume level and maximum volume level of the Zone 2 speakers (see page 82). Controlling Zone 2 You can select and control Zone 2 by using the control buttons on the front panel or on the remote control. The available operations are as follows: • Selecting the input source of Zone 2 • Tuning into FM or AM when "TUNER" is selected as the input source of Zone 2 (see page 50) • Tuning into XM Satellite Radio when "XM" is selected as the input source of Zone 2 (see page 53) (U.S.A. and Canada models only) • Enjoying music stored on your iPod stationed in a Yamaha iPod universal dock (such as YDS-10 sold separately) connected to the DOCK terminal of this unit when "V-AUX" is selected as the input source (see page 58) Note You must complete each step while the ZONE2 indicator is flashing in the front panel display. Otherwise, the Zone 2 mode is automatically canceled and this unit returns to the normal operation mode. In this case, repeat the Zone 2 selection procedure. ■ Controlling Zone 2 with the front panel Turning on Zone 2 Press 8ZONE 2 ON/OFF to turn on Zone 2. y 8ZONE 2 ON/OFF is operational only when BMASTER ON/OFF on the front panel is pressed inward to the ON position. Once BMASTER ON/OFF on the front panel is pressed inward to the ON position, you can also press HPOWER or GSTANDBY on the remote control to turn on the main zone and Zone 2 or set them to the standby mode. Activating the Zone 2 operation mode Press 9ZONE CONTROL to control Zone 2. The ZONE2 indicator flashes in the front panel display for approximately 10 seconds. ZONE2 Flashes 90 En
-
 1
1 -
2
-
3
-
4
-
5
-
6
-
7
-
8
-
9
-
10
-
11
-
12
-
13
-
14
-
15
-
16
-
17
-
18
-
19
-
20
-
21
-
22
-
23
-
24
-
25
-
26
-
27
-
28
-
29
-
30
-
31
-
32
-
33
-
34
-
35
-
36
-
37
-
38
-
39
-
40
-
41
-
42
-
43
-
44
-
45
-
46
-
47
-
48
-
49
-
50
-
51
-
52
-
53
-
54
-
55
-
56
-
57
-
58
-
59
-
60
-
61
-
62
-
63
-
64
-
65
-
66
-
67
-
68
-
69
-
70
-
71
-
72
-
73
-
74
-
75
-
76
-
77
-
78
-
79
-
80
-
81
-
82
-
83
-
84
-
85
-
86
-
87
-
88
-
 89
89 -
 90
90 -
 91
91 -
 92
92 -
 93
93 -
 94
94 -
 95
95 -
 96
96 -
 97
97 -
 98
98 -
 99
99 -
100
-
101
-
102
-
103
-
104
-
105
-
106
-
107
-
108
-
109
-
110
-
111
-
112
-
113
-
114
-
115
-
116
-
117
-
118
-
119
-
120
-
121
-
122
-
123
-
124
-
125
-
126
-
127
-
128
-
129
-
130
 |
 |
