Yamaha RX V661 MCXSP10 Manual - Page 99
SCENE IR code setting, Bi-amplifier setting, Tuner frequency step, Asia and General models only
 |
UPC - 027108927411
View all Yamaha RX V661 manuals
Add to My Manuals
Save this manual to your list of manuals |
Page 99 highlights
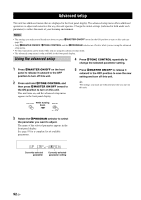
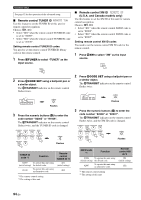
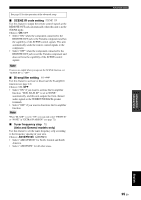
See page 92 for the operation of the advanced setup. ■ SCENE IR code setting SCENE IR Use this feature to output the remote control signals at the REMOTE OUT jack automatically when this unit is in the SCENE mode. Choices: ON, OFF • Select "ON" when the component connected to the REMOTE OUT jack is the Yamaha component and has the capability of the SCENE control signals. This unit automatically sends the remote control signals to the component. • Select "OFF" when the component connected to the REMOTE OUT jack is not the Yamaha component and does not have the capability of the SCENE control signals. Note If noises are output when you operate the SCENE function, set "SCENE IR" to "OFF". ■ Bi-amplifier setting BI-AMP Use this feature to activate or deactivate the bi-amplifier function (see page 14). Choices: ON, OFF • Select "ON" if you want to activate the bi-amplifier function. "SUR. B L/R SP" is set to NONE" automatically, and this unit outputs the front channel audio signals at the SURROUND BACK speaker terminals. • Select "OFF" if you want to deactivate the bi-amplifier function. Note When "BI-AMP" is set to "ON", you can only select "FRONT B" or "NONE" in "EXTRA SP ASSIGN" (see page 72). ■ Tuner frequency step TU (Asia and General models only) Use this feature to set the tuner frequency step according to the frequency spacing in your area. Choices: AM10/FM100, AM9/FM50 • Select "AM10/FM100" for North, Central and South America. • Select "AM9/FM50" for all other areas. Advanced setup 95 En English ADVANCED OPERATION
-
 1
1 -
2
-
3
-
4
-
5
-
6
-
7
-
8
-
9
-
10
-
11
-
12
-
13
-
14
-
15
-
16
-
17
-
18
-
19
-
20
-
21
-
22
-
23
-
24
-
25
-
26
-
27
-
28
-
29
-
30
-
31
-
32
-
33
-
34
-
35
-
36
-
37
-
38
-
39
-
40
-
41
-
42
-
43
-
44
-
45
-
46
-
47
-
48
-
49
-
50
-
51
-
52
-
53
-
54
-
55
-
56
-
57
-
58
-
59
-
60
-
61
-
62
-
63
-
64
-
65
-
66
-
67
-
68
-
69
-
70
-
71
-
72
-
73
-
74
-
75
-
76
-
77
-
78
-
79
-
80
-
81
-
82
-
83
-
84
-
85
-
86
-
87
-
88
-
89
-
90
-
91
-
92
-
93
-
 94
94 -
 95
95 -
 96
96 -
 97
97 -
 98
98 -
 99
99 -
 100
100 -
 101
101 -
 102
102 -
 103
103 -
 104
104 -
105
-
106
-
107
-
108
-
109
-
110
-
111
-
112
-
113
-
114
-
115
-
116
-
117
-
118
-
119
-
120
-
121
-
122
-
123
-
124
-
125
-
126
-
127
-
128
-
129
-
130
 |
 |
