Canon DC220 DC220 DC230 Instruction Manual - Page 57
Adjusting the Picture: Exposure, Focus and Color
 |
UPC - 013803079500
View all Canon DC220 manuals
Add to My Manuals
Save this manual to your list of manuals |
Page 57 highlights
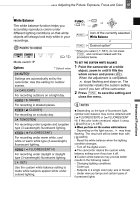
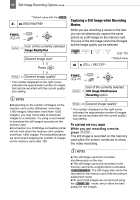
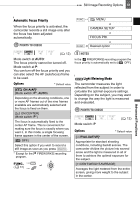
Adjusting the Picture: Exposure, Focus and Color 57 White Balance The white balance function helps you accurately reproduce colors under different lighting conditions so that white objects will always look truly white in your recordings. POINTS TO CHECK ( 12) Mode switch: P Options Default value [ AUTO] Settings are automatically set by the camcorder. Use this setting for outdoor scenes. [ DAYLIGHT] For recording outdoors on a bright day. [ SHADE] For recording in shaded places. [ CLOUDY] For recording on a cloudy day. [ TUNGSTEN] For recording under tungsten and tungsten type (3-wavelength) fluorescent lighting. [ FLUORESCENT] For recording under warm white, cool white or warm white type (3-wavelength) fluorescent lighting. [ FLUORESCENT H] For recording under daylight or daylight type (3-wavelength) fluorescent lighting. [ SET] Use the custom white balance setting to make white subjects appear white under colored lighting. FUNC. ( 31) FUNC. Icon of the currently selected White Balance FUNC. Desired option* * When you select [ SET], do not press FUNC. and continue instead with the procedure below. TO SET THE CUSTOM WHITE BALANCE 1 Point the camcorder at a white object, zoom in until it fills the whole screen and press ( ). When the adjustment is completed, stops flashing and stays on. The camcorder retains the custom setting even if you turn off the camcorder. 2 Press FUNC. to save the setting and close the menu. NOTES Depending on the type of fluorescent light, optimal color balance may not be obtained with [ FLUORESCENT] or [ FLUORESCENT H]. If the color looks unnatural, adjust it using [ AUTO] or [ SET]. When you have set the custom white balance: - Depending on the light source, may keep flashing. The result will still be better than with [ AUTO]. - Reset the white balance when the lighting condition changes. - Turn off the digital zoom. The camcorder retains the custom white balance setting even if you turn it off. Custom white balance may provide better results in the following cases: - Changing lighting conditions - Close-ups - Subjects in a single color (sky, sea or forest) - Under mercury lamps and certain types of fluorescent lights Advanced Functions
-
 1
1 -
2
-
3
-
4
-
5
-
6
-
7
-
8
-
9
-
10
-
11
-
12
-
13
-
14
-
15
-
16
-
17
-
18
-
19
-
20
-
21
-
22
-
23
-
24
-
25
-
26
-
27
-
28
-
29
-
30
-
31
-
32
-
33
-
34
-
35
-
36
-
37
-
38
-
39
-
40
-
41
-
42
-
43
-
44
-
45
-
46
-
47
-
48
-
49
-
50
-
51
-
 52
52 -
 53
53 -
 54
54 -
 55
55 -
 56
56 -
 57
57 -
 58
58 -
 59
59 -
 60
60 -
 61
61 -
 62
62 -
63
-
64
-
65
-
66
-
67
-
68
-
69
-
70
-
71
-
72
-
73
-
74
-
75
-
76
-
77
-
78
-
79
-
80
-
81
-
82
-
83
-
84
-
85
-
86
-
87
-
88
-
89
-
90
-
91
-
92
-
93
-
94
-
95
-
96
-
97
-
98
-
99
-
100
-
101
-
102
-
103
-
104
-
105
-
106
-
107
-
108
-
109
-
110
-
111
-
112
-
113
-
114
-
115
-
116
-
117
-
118
-
119
-
120
-
121
-
122
-
123
 |
 |