Canon DC220 DC220 DC230 Instruction Manual - Page 90
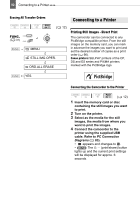
Select, a transfer option and, press, press, In the confirmation screen, select, OK] and press - software download
 |
UPC - 013803079500
View all Canon DC220 manuals
Add to My Manuals
Save this manual to your list of manuals |
Page 90 highlights
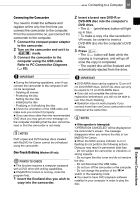
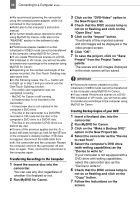
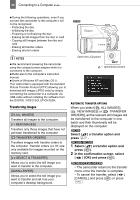
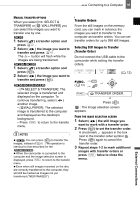
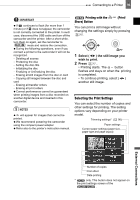
90 Connecting to a Computer During the following operations, even if you connect the camcorder to the computer it will not be recognized. - Protecting the disc - Initializing the disc - Finalizing or Unfinalizing the disc - Erasing all still images from the disc or card - Copying still images between the disc and card - Erasing all transfer orders - Erasing all print orders NOTES We recommend powering the camcorder using the compact power adapter while it is connected to the computer. Refer also to the computer's instruction manual. Users of Windows XP and Mac OS X: Your camcorder is equipped with the standard Picture Transfer Protocol (PTP) allowing you to download still images (JPEG only) by simply connecting the camcorder to a computer via USB cable without installing the software from the DIGITAL VIDEO SOLUTION DISK. Transferring Images [ ALL IMAGES] Transfers all images to the computer. [ NEW IMAGES] Transfers only those images that have not yet been transferred to the computer. [ TRANSFER ORDERS] Transfers images with transfer orders to the computer. Transfer orders ( 91) are only available for images recorded on the memory card. [ SELECT & TRANSFER] Allows you to select the still image you want to transfer to the computer. [ WALLPAPER] Allows you to select the still image you want to transfer and set it as your computer's desktop background. Open the LCD panel (print/share) button AUTOMATIC TRANSFER OPTIONS When you select [ ALL IMAGES], [ NEW IMAGES] or [ TRANSFER ORDERS], all the relevant still images will be transferred to the computer in one batch and their thumbnails will be displayed on the computer. Select ( ) a transfer option and press . 1 Select ( ) a transfer option and press ( ). 2 In the confirmation screen, select ( ) [OK] and press ( ). • The camcorder returns to the transfer menu once the transfer is complete. • To cancel the transfer, select ( ) [CANCEL] and press ( ) or press FUNC. .
-
 1
1 -
2
-
3
-
4
-
5
-
6
-
7
-
8
-
9
-
10
-
11
-
12
-
13
-
14
-
15
-
16
-
17
-
18
-
19
-
20
-
21
-
22
-
23
-
24
-
25
-
26
-
27
-
28
-
29
-
30
-
31
-
32
-
33
-
34
-
35
-
36
-
37
-
38
-
39
-
40
-
41
-
42
-
43
-
44
-
45
-
46
-
47
-
48
-
49
-
50
-
51
-
52
-
53
-
54
-
55
-
56
-
57
-
58
-
59
-
60
-
61
-
62
-
63
-
64
-
65
-
66
-
67
-
68
-
69
-
70
-
71
-
72
-
73
-
74
-
75
-
76
-
77
-
78
-
79
-
80
-
81
-
82
-
83
-
84
-
 85
85 -
 86
86 -
 87
87 -
 88
88 -
 89
89 -
 90
90 -
 91
91 -
 92
92 -
 93
93 -
 94
94 -
 95
95 -
96
-
97
-
98
-
99
-
100
-
101
-
102
-
103
-
104
-
105
-
106
-
107
-
108
-
109
-
110
-
111
-
112
-
113
-
114
-
115
-
116
-
117
-
118
-
119
-
120
-
121
-
122
-
123
 |
 |
