Canon EOS-1Ds Software Instructions EOS DIGITAL SOLUTION DISK Ver.4 for Window - Page 103
Using RemoteCapture
 |
UPC - 013803079265
View all Canon EOS-1Ds manuals
Add to My Manuals
Save this manual to your list of manuals |
Page 103 highlights
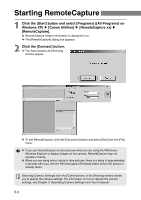
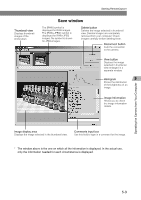
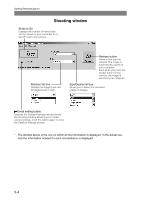
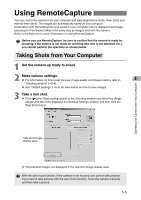
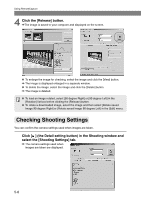
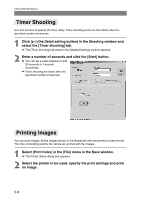
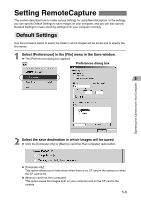
Operating the Camera from Your Computer Using RemoteCapture You can control the camera from your computer and take single-frame shots, timer shots and interval timer shots. The images are automatically saved on your computer. Shots taken with RemoteCapture and saved on your computer can be displayed and imageprocessed in File Viewer Utility in the same way as images shot with the camera. Refer to the Help file for more information on using RemoteCapture. Before you use RemoteCapture, be sure to confirm that the camera is ready for shooting. If the camera is not ready for shooting (the lens is not attached, etc.), you cannot perform the operation as shown below. Taking Shots from Your Computer 1 Set the camera up ready to shoot. 2 Make various settings. ● For information on how to set the size, image quality and image rotation, refer to "Shooting window" (➞5-4). ● See "Default Settings" (➞5-9) for information on how to save images. 3 Take a test shot. ● Click [ ] (the Detail setting button) in the Shooting window and select the [Angle adjustment] tab in the displayed the Detailed Settings window, and then click the [Test Shot] button. Test-shot image display area \ The test-shot images are displayed in the test-shot image display area. With the auto focus function, if the camera is not focused, you cannot take pictures. If you cannot take pictures with the auto focus function, focus the camera manually and then take a picture. 5-5
-
 1
1 -
2
-
3
-
4
-
5
-
6
-
7
-
8
-
9
-
10
-
11
-
12
-
13
-
14
-
15
-
16
-
17
-
18
-
19
-
20
-
21
-
22
-
23
-
24
-
25
-
26
-
27
-
28
-
29
-
30
-
31
-
32
-
33
-
34
-
35
-
36
-
37
-
38
-
39
-
40
-
41
-
42
-
43
-
44
-
45
-
46
-
47
-
48
-
49
-
50
-
51
-
52
-
53
-
54
-
55
-
56
-
57
-
58
-
59
-
60
-
61
-
62
-
63
-
64
-
65
-
66
-
67
-
68
-
69
-
70
-
71
-
72
-
73
-
74
-
75
-
76
-
77
-
78
-
79
-
80
-
81
-
82
-
83
-
84
-
85
-
86
-
87
-
88
-
89
-
90
-
91
-
92
-
93
-
94
-
95
-
96
-
97
-
 98
98 -
 99
99 -
 100
100 -
 101
101 -
 102
102 -
 103
103 -
 104
104 -
 105
105 -
 106
106 -
 107
107 -
 108
108 -
109
-
110
-
111
-
112
-
113
-
114
-
115
-
116
-
117
-
118
-
119
-
120
-
121
-
122
-
123
-
124
-
125
-
126
-
127
-
128
-
129
-
130
-
131
-
132
-
133
-
134
-
135
-
136
-
137
-
138
-
139
-
140
-
141
-
142
-
143
-
144
-
145
-
146
-
147
-
148
-
149
-
150
-
151
-
152
-
153
-
154
-
155
-
156
-
157
 |
 |
