Canon EOS-1Ds Software Instructions EOS DIGITAL SOLUTION DISK Ver.4 for Window - Page 18
Connecting the Camera to Your Computer
 |
UPC - 013803079265
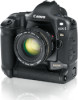
View all Canon EOS-1Ds manuals
Add to My Manuals
Save this manual to your list of manuals |
Page 18 highlights
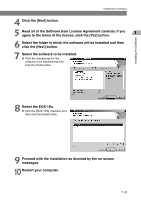
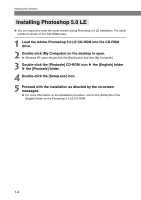
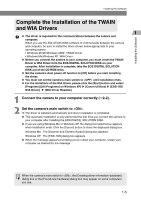
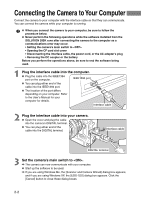
Connecting the Camera to Your Computer Connect the camera to your computer with the interface cable so that they can communicate. You can connect the camera while your computer is running. ● When you connect the camera to your computer, be sure to follow the procedure below. ● Never perform the following operations while the software installed from the SOLUTION DISK runs after connecting the camera to the computer as a communications error may occur. • Setting the camera's main switch to • Opening the CF card slot cover • Disconnecting the interface cable, the power cord, or the AC adapter's plug • Removing the DC coupler or the battery Before you perform the operations above, be sure to end the software being used. 1 Plug the interface cable into the computer. ● Plug the cable into the IEEE1394 port on the computer. IEEE1394 port ● You can plug either end of the cable into the IEEE1394 port. ● The location of the port differs depending on your computer. Refer to the User's Manual for your computer for details. Interface cable 2 Plug the interface cable into your camera. ● Open the cover and plug the cable into the camera's DIGITAL terminal. ● You can plug either end of the cable into the DIGITAL terminal. Interface cable DIGITAL terminal 3 Set the camera's main switch to . \ The camera can now communicate with your computer. ● Start up the software to be used. \ If you are using Windows Me, the [Scanner and Camera Wizard] dialog box appears, and if you are using Windows XP, the [EOS-1DS] dialog box appears. Click the [Cancel] button to close these dialog boxes. 2-2
-
 1
1 -
2
-
3
-
4
-
5
-
6
-
7
-
8
-
9
-
10
-
11
-
12
-
 13
13 -
 14
14 -
 15
15 -
 16
16 -
 17
17 -
 18
18 -
 19
19 -
 20
20 -
 21
21 -
 22
22 -
 23
23 -
24
-
25
-
26
-
27
-
28
-
29
-
30
-
31
-
32
-
33
-
34
-
35
-
36
-
37
-
38
-
39
-
40
-
41
-
42
-
43
-
44
-
45
-
46
-
47
-
48
-
49
-
50
-
51
-
52
-
53
-
54
-
55
-
56
-
57
-
58
-
59
-
60
-
61
-
62
-
63
-
64
-
65
-
66
-
67
-
68
-
69
-
70
-
71
-
72
-
73
-
74
-
75
-
76
-
77
-
78
-
79
-
80
-
81
-
82
-
83
-
84
-
85
-
86
-
87
-
88
-
89
-
90
-
91
-
92
-
93
-
94
-
95
-
96
-
97
-
98
-
99
-
100
-
101
-
102
-
103
-
104
-
105
-
106
-
107
-
108
-
109
-
110
-
111
-
112
-
113
-
114
-
115
-
116
-
117
-
118
-
119
-
120
-
121
-
122
-
123
-
124
-
125
-
126
-
127
-
128
-
129
-
130
-
131
-
132
-
133
-
134
-
135
-
136
-
137
-
138
-
139
-
140
-
141
-
142
-
143
-
144
-
145
-
146
-
147
-
148
-
149
-
150
-
151
-
152
-
153
-
154
-
155
-
156
-
157
 |
 |
