Canon EOS-1Ds Software Instructions EOS DIGITAL SOLUTION DISK Ver.4 for Window - Page 118
Processing RAW Images with Windows Explorer
 |
UPC - 013803079265
View all Canon EOS-1Ds manuals
Add to My Manuals
Save this manual to your list of manuals |
Page 118 highlights
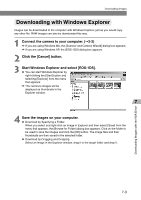
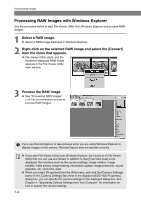
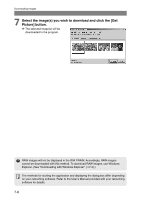
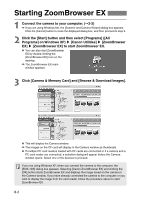
Downloading Images Processing RAW Images with Windows Explorer Use the procedure below to start File Viewer Utility from Windows Explorer and process RAW images. 1 Select a RAW image. ● Select a RAW image displayed in Windows Explorer. 2 Right-click on the selected RAW image and select the [Convert] from the menu that appears. \ File Viewer Utility starts, and the thumbnail-displayed RAW image appears in the File Viewer Utility main window. 3 Process the RAW image. ● See "Processing RAW Images" (➞3-18) for information on how to process RAW images. If you use RemoteCapture to take pictures while you are using Windows Explorer to display images on the camera, RemoteCapture may not operate correctly. ● If you start File Viewer Utility from Windows Explorer, the functions of File Viewer Utility that you can use are limited. In addition to that [Tree View Area] is not displayed, the functions such as the camera settings, image rotation, image transfer, index saving, image erasing, information update, image protection, sound playback, etc. cannot be used. ● When you select [Properties] from the [File] menu, and click the [Camera Settings] button in the [Camera Settings] tab sheet in the displayed [EOS-1DS Properties] dialog box, you can specify the camera settings on the displayed dialog box. See Chapter 4, "Specifying Camera Settings from Your Computer" for information on how to specify the camera settings. 7-4
-
 1
1 -
2
-
3
-
4
-
5
-
6
-
7
-
8
-
9
-
10
-
11
-
12
-
13
-
14
-
15
-
16
-
17
-
18
-
19
-
20
-
21
-
22
-
23
-
24
-
25
-
26
-
27
-
28
-
29
-
30
-
31
-
32
-
33
-
34
-
35
-
36
-
37
-
38
-
39
-
40
-
41
-
42
-
43
-
44
-
45
-
46
-
47
-
48
-
49
-
50
-
51
-
52
-
53
-
54
-
55
-
56
-
57
-
58
-
59
-
60
-
61
-
62
-
63
-
64
-
65
-
66
-
67
-
68
-
69
-
70
-
71
-
72
-
73
-
74
-
75
-
76
-
77
-
78
-
79
-
80
-
81
-
82
-
83
-
84
-
85
-
86
-
87
-
88
-
89
-
90
-
91
-
92
-
93
-
94
-
95
-
96
-
97
-
98
-
99
-
100
-
101
-
102
-
103
-
104
-
105
-
106
-
107
-
108
-
109
-
110
-
111
-
112
-
 113
113 -
 114
114 -
 115
115 -
 116
116 -
 117
117 -
 118
118 -
 119
119 -
 120
120 -
 121
121 -
 122
122 -
 123
123 -
124
-
125
-
126
-
127
-
128
-
129
-
130
-
131
-
132
-
133
-
134
-
135
-
136
-
137
-
138
-
139
-
140
-
141
-
142
-
143
-
144
-
145
-
146
-
147
-
148
-
149
-
150
-
151
-
152
-
153
-
154
-
155
-
156
-
157
 |
 |
