Canon EOS-1Ds Software Instructions EOS DIGITAL SOLUTION DISK Ver.4 for Window - Page 38
Processing RAW Images
 |
UPC - 013803079265
View all Canon EOS-1Ds manuals
Add to My Manuals
Save this manual to your list of manuals |
Page 38 highlights
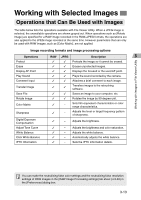
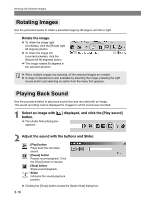
Processing RAW Images RAW images are processed so that they are optimized for their intended purpose. As well as providing the same color matrix and white balance settings, etc. as the camera, File Viewer Utility allows you to specify digital exposure compensation, tone curve adjustment and white balance adjustment using click white balance as additional processing parameters. This processing does not involve working with the original RAW images. It applies virtual parameters to RAW images temporarily downloaded to the computer. Accordingly, you can redo the processing repeatedly with different parameters. You can also change the modified parameters back to the settings used when the shot was taken. 1 Process the RAW image. ● Select [EOS-1DS] from the [Model-specific processing mode] list box. (➞3-7) ● Select the RAW image to be processed. (➞3-12) ● It is recommended that you use the Preview mode to check the processed image. (➞3-9) 2 Change the parameter settings. ● Change parameter settings. See the pages that follow for information on how to set the parameters. \ The image is reprocessed using the modified parameters and the result is shown. ● Because the parameters set during shooting and the modified parameters for the original RAW image are updated in realtime. 3 Save or transfer the image in a commonly used format. ● You can save an image as a JPEG or TIFF format by clicking the [Save File] button and selecting [Convert and save in file] from the menu that appears (➞3-34). If you select [Save Index], multiple images can be saved as an index. (➞3-37) ● Clicking the [Transfer Images] button transfers the image to the retouching software that you have set. (➞3-44) You can specify the number of bits for colors when the image is transferred in the [RAW Image Processing settings] tab sheet in the [Preferences] dialog box (➞3-40). When multiple images are selected, the specified processing is applied to all the RAW images selected. 3-18
-
 1
1 -
2
-
3
-
4
-
5
-
6
-
7
-
8
-
9
-
10
-
11
-
12
-
13
-
14
-
15
-
16
-
17
-
18
-
19
-
20
-
21
-
22
-
23
-
24
-
25
-
26
-
27
-
28
-
29
-
30
-
31
-
32
-
 33
33 -
 34
34 -
 35
35 -
 36
36 -
 37
37 -
 38
38 -
 39
39 -
 40
40 -
 41
41 -
 42
42 -
 43
43 -
44
-
45
-
46
-
47
-
48
-
49
-
50
-
51
-
52
-
53
-
54
-
55
-
56
-
57
-
58
-
59
-
60
-
61
-
62
-
63
-
64
-
65
-
66
-
67
-
68
-
69
-
70
-
71
-
72
-
73
-
74
-
75
-
76
-
77
-
78
-
79
-
80
-
81
-
82
-
83
-
84
-
85
-
86
-
87
-
88
-
89
-
90
-
91
-
92
-
93
-
94
-
95
-
96
-
97
-
98
-
99
-
100
-
101
-
102
-
103
-
104
-
105
-
106
-
107
-
108
-
109
-
110
-
111
-
112
-
113
-
114
-
115
-
116
-
117
-
118
-
119
-
120
-
121
-
122
-
123
-
124
-
125
-
126
-
127
-
128
-
129
-
130
-
131
-
132
-
133
-
134
-
135
-
136
-
137
-
138
-
139
-
140
-
141
-
142
-
143
-
144
-
145
-
146
-
147
-
148
-
149
-
150
-
151
-
152
-
153
-
154
-
155
-
156
-
157
 |
 |
