Canon EOS-1Ds Software Instructions EOS DIGITAL SOLUTION DISK Ver.4 for Window - Page 63
Click the [Browse] button of [Image transfer folder].
 |
UPC - 013803079265
View all Canon EOS-1Ds manuals
Add to My Manuals
Save this manual to your list of manuals |
Page 63 highlights
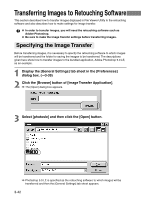
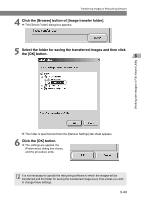
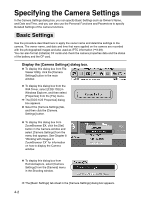
Working with Images in File Viewer Utility Transferring Images to Retouching Software 4 Click the [Browse] button of [Image transfer folder]. \ The [Select Folder] dialog box appears. 5 Select the folder for saving the transferred images and then click the [OK] button. \ The folder is specified and then the [General Settings] tab sheet appears. 6 Click the [OK] button. \ The settings are applied, the [Preferences] dialog box closes, and the procedure ends. It is not necessary to specify the retouching software to which the images will be transferred and the folder for saving the transferred image every time unless you wish to change those settings. 3-43
-
 1
1 -
2
-
3
-
4
-
5
-
6
-
7
-
8
-
9
-
10
-
11
-
12
-
13
-
14
-
15
-
16
-
17
-
18
-
19
-
20
-
21
-
22
-
23
-
24
-
25
-
26
-
27
-
28
-
29
-
30
-
31
-
32
-
33
-
34
-
35
-
36
-
37
-
38
-
39
-
40
-
41
-
42
-
43
-
44
-
45
-
46
-
47
-
48
-
49
-
50
-
51
-
52
-
53
-
54
-
55
-
56
-
57
-
 58
58 -
 59
59 -
 60
60 -
 61
61 -
 62
62 -
 63
63 -
 64
64 -
 65
65 -
 66
66 -
 67
67 -
 68
68 -
69
-
70
-
71
-
72
-
73
-
74
-
75
-
76
-
77
-
78
-
79
-
80
-
81
-
82
-
83
-
84
-
85
-
86
-
87
-
88
-
89
-
90
-
91
-
92
-
93
-
94
-
95
-
96
-
97
-
98
-
99
-
100
-
101
-
102
-
103
-
104
-
105
-
106
-
107
-
108
-
109
-
110
-
111
-
112
-
113
-
114
-
115
-
116
-
117
-
118
-
119
-
120
-
121
-
122
-
123
-
124
-
125
-
126
-
127
-
128
-
129
-
130
-
131
-
132
-
133
-
134
-
135
-
136
-
137
-
138
-
139
-
140
-
141
-
142
-
143
-
144
-
145
-
146
-
147
-
148
-
149
-
150
-
151
-
152
-
153
-
154
-
155
-
156
-
157
 |
 |

3-43
Working with Images in File V
iewer Utility
Transferring Images to Retouching Software
4
Click the [Browse] button of [Image transfer folder].
\
The [Select Folder] dialog box appears.
5
Select the folder for saving the transferred images and then click
the [OK] button.
\
The folder is specified and then the [General Settings] tab sheet appears.
6
Click the [OK] button.
\
The settings are applied, the
[Preferences] dialog box closes,
and the procedure ends.
It is not necessary to specify the retouching software to which the images will be
transferred and the folder for saving the transferred image every time unless you wish
to change those settings.