Canon EOS C300 Instruction Manual - Page 112
Using an Assignable Button, Other Functions]
 |
View all Canon EOS C300 manuals
Add to My Manuals
Save this manual to your list of manuals |
Page 112 highlights
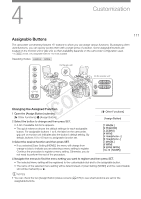
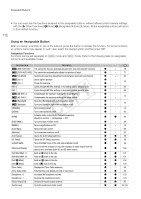
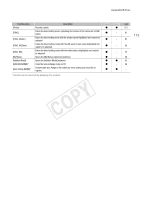
Assignable Buttons • You can reset only the functions assigned to the assignable buttons, without affecting other camera settings, with the [w Other Functions] >[Reset] > [Assignable Buttons] function. All the assignable buttons will return to their default function. 112 Using an Assignable Button After you assign a function to one of the buttons, press the button to activate the function. For some functions, an options menu may appear. In such case, select the desired option and then press SET. Assignable Functions Functions can be set separately in functions and available modes. mode and mode. Refer to the following table for assignable Function name Description # [ONE-SHOT AF]* The camcorder focuses automatically one time only (One-shot AF function). # [PUSH AUTO IRIS]* The camcorder automatically adjusts the aperture (f/stop). # [Iris Mode] Switches the aperture adjustment mode between automatic and manual. # [Iris +] Opens up the aperture. # [Iris -] Closes the aperture. [ND +] Cycles through ND filter settings in increasing (higher density) order. [ND -] Cycles through ND filter settings in decreasing (lower density) order. # [AE Shift +] Compensates the exposure making the image brighter. # [AE Shift -] Compensates the exposure making the image darker. # [Backlight] Turns the [Backlight] light metering option on/off. # [Spotlight] Turns the [Spotlight] light metering option on/off. [PEAKING] Turns peaking on/off. [ZEBRA] Turns zebra patterns on/off. [WFM] Activates video scopes in the following sequence: Waveform monitor J Vectorscope J Off [EDGE MON.] Turns the edge monitor on/off. [MAGN.] Turns magnification on/off. [Color Bars] Turns color bars on/off. [Markers] Turns onscreen markers on/off. [LCD Setup] Opens the [LCD Setup] submenu. [VF Setup] Opens the [VF Setup] submenu. [LCD/VF B&W] Turns the B&W mode of the LCD and viewfinder on/off. [Onscreen Display] Turns on/off the inclusion of onscreen displays on video output from the camcorder's terminals (both HD and SD video output). [Add Shot Mark 1] Adds an " mark to the clip. [Add Shot Mark 2]* Adds an # mark to the clip. [Add $ Mark] Adds an $ mark to the clip. [Add % Mark] Adds a % mark to the clip. [Time Code] Displays the [Time Code] submenu. [Time Code Hold]* Puts the time code display on hold or resumes it. [Headphone +] Increases the headphone volume. [Headphone -] Reduces the headphone volume. [Audio Output CH] Switches the audio output channel. [Audio Level] Turns the audio level meter on/off. A Ü - 79 Ü - 71 Ü - 69 Ü - 70 Ü - Ü - 68 Ü - 68 Ü - 72 Ü - Ü - 73 Ü - Ü - 78 Ü - 83 Ü Ü 99 Ü - 99 Ü - 79 Ü - 98 Ü - 82 Ü Ü 39 Ü Ü 39 Ü Ü 39 Ü Ü 142 Ü Ü 101 Ü Ü 101 Ü Ü 132 Ü Ü 132 Ü - 84 Ü Ü 86 Ü Ü 129 Ü Ü 129 Ü Ü 95 Ü Ü 93, 94
-
 1
1 -
2
-
3
-
4
-
5
-
6
-
7
-
8
-
9
-
10
-
11
-
12
-
13
-
14
-
15
-
16
-
17
-
18
-
19
-
20
-
21
-
22
-
23
-
24
-
25
-
26
-
27
-
28
-
29
-
30
-
31
-
32
-
33
-
34
-
35
-
36
-
37
-
38
-
39
-
40
-
41
-
42
-
43
-
44
-
45
-
46
-
47
-
48
-
49
-
50
-
51
-
52
-
53
-
54
-
55
-
56
-
57
-
58
-
59
-
60
-
61
-
62
-
63
-
64
-
65
-
66
-
67
-
68
-
69
-
70
-
71
-
72
-
73
-
74
-
75
-
76
-
77
-
78
-
79
-
80
-
81
-
82
-
83
-
84
-
85
-
86
-
87
-
88
-
89
-
90
-
91
-
92
-
93
-
94
-
95
-
96
-
97
-
98
-
99
-
100
-
101
-
102
-
103
-
104
-
105
-
106
-
 107
107 -
 108
108 -
 109
109 -
 110
110 -
 111
111 -
 112
112 -
 113
113 -
 114
114 -
 115
115 -
 116
116 -
 117
117 -
118
-
119
-
120
-
121
-
122
-
123
-
124
-
125
-
126
-
127
-
128
-
129
-
130
-
131
-
132
-
133
-
134
-
135
-
136
-
137
-
138
-
139
-
140
-
141
-
142
-
143
-
144
-
145
-
146
-
147
-
148
-
149
-
150
-
151
-
152
-
153
-
154
-
155
-
156
-
157
-
158
-
159
-
160
-
161
-
162
-
163
-
164
-
165
-
166
-
167
-
168
-
169
-
170
-
171
-
172
-
173
-
174
-
175
-
176
-
177
-
178
-
179
-
180
-
181
-
182
-
183
-
184
-
185
-
186
-
187
-
188
-
189
-
190
-
191
-
192
-
193
-
194
-
195
-
196
-
197
-
198
-
199
-
200
-
201
-
202
 |
 |