Canon EOS C300 Instruction Manual - Page 72
Automatic Aperture, Exposure Compensation - AE Shift, Camera Setup], Iris], Mode], Manual], AE Shift]
 |
View all Canon EOS C300 manuals
Add to My Manuals
Save this manual to your list of manuals |
Page 72 highlights
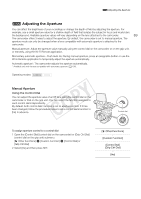
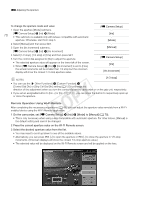
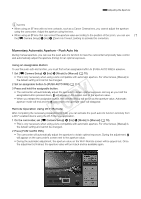
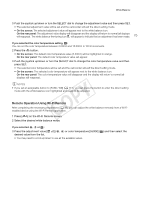
# Adjusting the Aperture Automatic Aperture When a lens compatible with automatic aperture is attached to the camcorder, you can have the camcorder automatically adjust the aperture (f/stop). 72 1 Open the aperture [Mode] submenu. [~ Camera Setup] > [Iris] > [Mode] [~ Camera Setup] 2 Select [Automatic] and then press SET. • When the camcorder is set to automatic aperture, the screen next to the aperture value. will appear on [Iris] [Mode] NOTES • If you set an assignable button to [Iris Mode] (A 111), you can press the button to toggle between the [Automatic] and [Manual] settings when a lens compatible with automatic aperture is attached to the camcorder. [Manual] Exposure Compensation - AE Shift Use AE shift to compensate the exposure that was set using automatic aperture, in order to darken or lighten the image. You can select from 15 available AE shift levels. You can compensate the exposure using the control dial on the camcorder or that on the grip unit. By default, both control dials' function is set to aperture control. If it has been changed, set a control dial's function to [Iris] in advance (A 69). Control dial 1 Open the [AE Shift] submenu. [~ Camera Setup] > [AE Shift] 2 Select an AE shift level and then press SET. • The selected AE shift level will be displayed above the exposure bar and the camcorder will attempt to adjust the exposure accordingly. Available AE Shift Levels +2.0 +1.5 +1.25 +1.0 +0.75 +0.5 +0.25 ±0 -0.25 -0.5 -0.75 -1.0 -1.25 -1.5 -2.0 [~ Camera Setup] [AE Shift] [±0] NOTES • During manual aperture, you can also set the AE shift level by turning a control dial assigned to [Iris] while holding the assignable button set to [PUSH AUTO IRIS] pressed down. • If you set an assignable button to [AE Shift +] or [AE Shift -] (A 111), you can press the button to adjust the AE shift level.
-
 1
1 -
2
-
3
-
4
-
5
-
6
-
7
-
8
-
9
-
10
-
11
-
12
-
13
-
14
-
15
-
16
-
17
-
18
-
19
-
20
-
21
-
22
-
23
-
24
-
25
-
26
-
27
-
28
-
29
-
30
-
31
-
32
-
33
-
34
-
35
-
36
-
37
-
38
-
39
-
40
-
41
-
42
-
43
-
44
-
45
-
46
-
47
-
48
-
49
-
50
-
51
-
52
-
53
-
54
-
55
-
56
-
57
-
58
-
59
-
60
-
61
-
62
-
63
-
64
-
65
-
66
-
 67
67 -
 68
68 -
 69
69 -
 70
70 -
 71
71 -
 72
72 -
 73
73 -
 74
74 -
 75
75 -
 76
76 -
 77
77 -
78
-
79
-
80
-
81
-
82
-
83
-
84
-
85
-
86
-
87
-
88
-
89
-
90
-
91
-
92
-
93
-
94
-
95
-
96
-
97
-
98
-
99
-
100
-
101
-
102
-
103
-
104
-
105
-
106
-
107
-
108
-
109
-
110
-
111
-
112
-
113
-
114
-
115
-
116
-
117
-
118
-
119
-
120
-
121
-
122
-
123
-
124
-
125
-
126
-
127
-
128
-
129
-
130
-
131
-
132
-
133
-
134
-
135
-
136
-
137
-
138
-
139
-
140
-
141
-
142
-
143
-
144
-
145
-
146
-
147
-
148
-
149
-
150
-
151
-
152
-
153
-
154
-
155
-
156
-
157
-
158
-
159
-
160
-
161
-
162
-
163
-
164
-
165
-
166
-
167
-
168
-
169
-
170
-
171
-
172
-
173
-
174
-
175
-
176
-
177
-
178
-
179
-
180
-
181
-
182
-
183
-
184
-
185
-
186
-
187
-
188
-
189
-
190
-
191
-
192
-
193
-
194
-
195
-
196
-
197
-
198
-
199
-
200
-
201
-
202
 |
 |