Canon EOS C300 Instruction Manual - Page 36
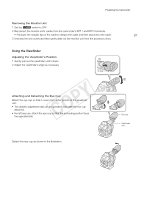
Attaching and Removing the Monitor Unit, Attaching a PL Lens, Removing a PL Lens
 |
View all Canon EOS C300 manuals
Add to My Manuals
Save this manual to your list of manuals |
Page 36 highlights
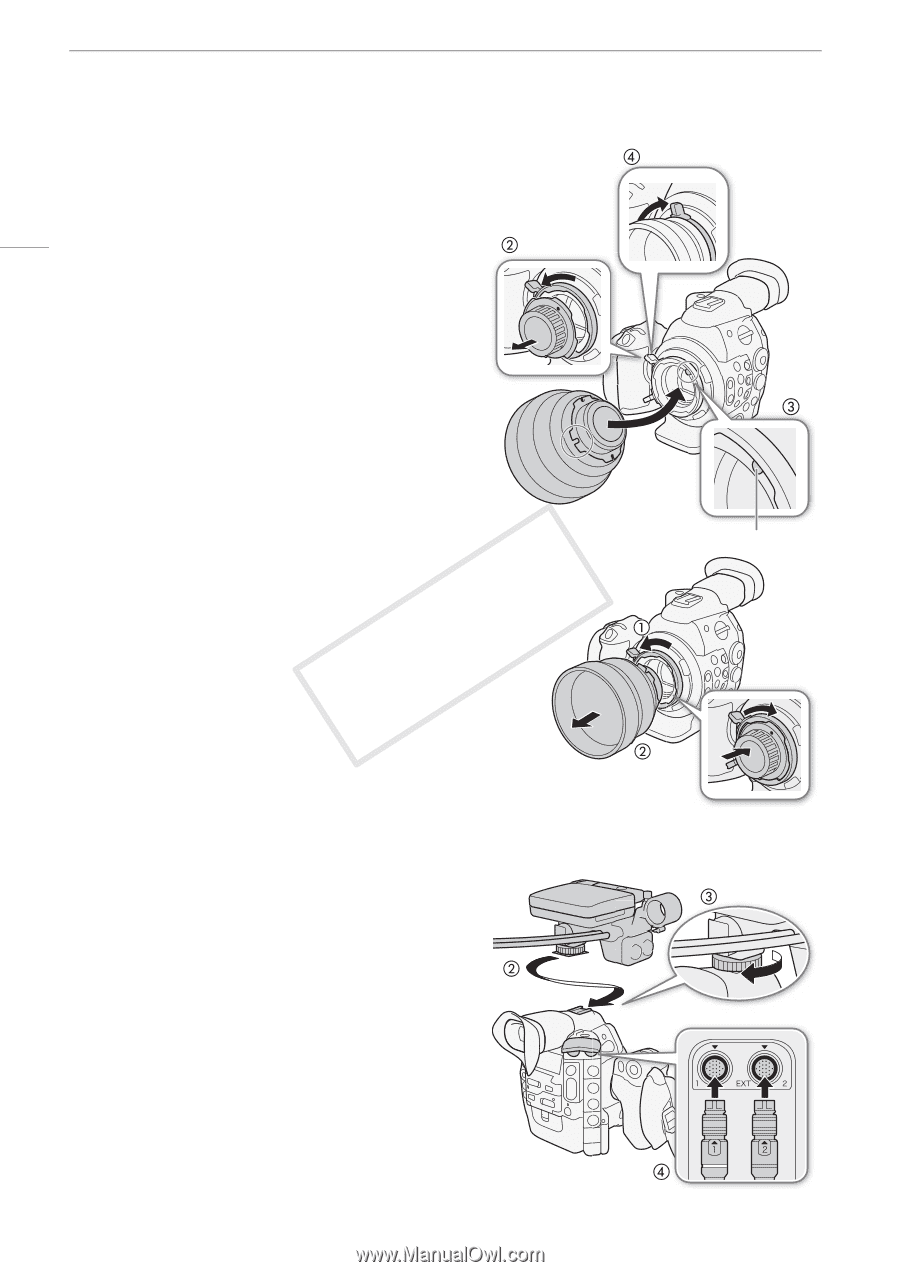
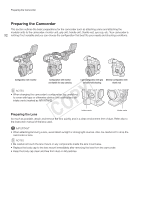
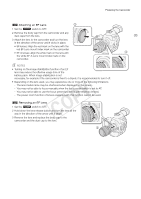
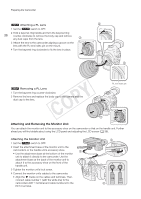
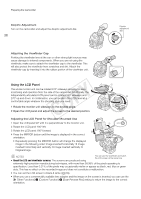
Preparing the Camcorder $ Attaching a PL Lens 1 Set the Q switch to OFF. 2 Hold a bayonet ring handle and turn the bayonet ring 36 counter-clockwise to remove the body cap and remove any dust caps from the lens. 3 Attach the lens to the camcorder aligning a groove on the lens with the PL lens index pin on the mount. 4 Turn the bayonet ring clockwise to fix the lens in place. $ Removing a PL Lens 1 Turn the bayonet ring counter-clockwise. 2 Remove the lens and replace the body cap to the camera and the dust cap to the lens. PL lens index pin Attaching and Removing the Monitor Unit You can attach the monitor unit to the accessory shoe on the camcorder or that on the handle unit. Further ahead you will find details about using the LCD panel and adjusting the LCD screen (A 38). Attaching the Monitor Unit 1 Set the Q switch to OFF. 2 Insert the attachment base of the monitor unit to the camcorder's or the handle unit's accessory shoe. • Use the attachment base at the bottom of the monitor unit to attach it directly to the camcorder. Use the attachment base at the back of the monitor unit to attach it to the accessory shoe on the front of the handle unit. 3 Tighten the monitor unit's lock screw. 4 Connect the monitor unit's cables to the camcorder. • Align the Î marks on the cables and terminals. Then, connect cable number 1 (with the white line) to the camcorder's EXT 1 terminal and cable number 2 to the EXT 2 terminal.
-
 1
1 -
2
-
3
-
4
-
5
-
6
-
7
-
8
-
9
-
10
-
11
-
12
-
13
-
14
-
15
-
16
-
17
-
18
-
19
-
20
-
21
-
22
-
23
-
24
-
25
-
26
-
27
-
28
-
29
-
30
-
 31
31 -
 32
32 -
 33
33 -
 34
34 -
 35
35 -
 36
36 -
 37
37 -
 38
38 -
 39
39 -
 40
40 -
 41
41 -
42
-
43
-
44
-
45
-
46
-
47
-
48
-
49
-
50
-
51
-
52
-
53
-
54
-
55
-
56
-
57
-
58
-
59
-
60
-
61
-
62
-
63
-
64
-
65
-
66
-
67
-
68
-
69
-
70
-
71
-
72
-
73
-
74
-
75
-
76
-
77
-
78
-
79
-
80
-
81
-
82
-
83
-
84
-
85
-
86
-
87
-
88
-
89
-
90
-
91
-
92
-
93
-
94
-
95
-
96
-
97
-
98
-
99
-
100
-
101
-
102
-
103
-
104
-
105
-
106
-
107
-
108
-
109
-
110
-
111
-
112
-
113
-
114
-
115
-
116
-
117
-
118
-
119
-
120
-
121
-
122
-
123
-
124
-
125
-
126
-
127
-
128
-
129
-
130
-
131
-
132
-
133
-
134
-
135
-
136
-
137
-
138
-
139
-
140
-
141
-
142
-
143
-
144
-
145
-
146
-
147
-
148
-
149
-
150
-
151
-
152
-
153
-
154
-
155
-
156
-
157
-
158
-
159
-
160
-
161
-
162
-
163
-
164
-
165
-
166
-
167
-
168
-
169
-
170
-
171
-
172
-
173
-
174
-
175
-
176
-
177
-
178
-
179
-
180
-
181
-
182
-
183
-
184
-
185
-
186
-
187
-
188
-
189
-
190
-
191
-
192
-
193
-
194
-
195
-
196
-
197
-
198
-
199
-
200
-
201
-
202
 |
 |