Canon PowerShot SX740 HS Camera User Guide - Page 109
Inserting and Charging the Battery
 |
View all Canon PowerShot SX740 HS manuals
Add to My Manuals
Save this manual to your list of manuals |
Page 109 highlights
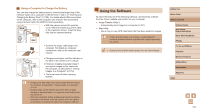
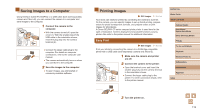
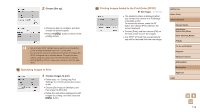
3 Turn the TV on and switch to external input. ●●Switch the TV input to the external input you connected the cable to in step 2. 4 Turn the camera on. ●●Press the on. button to turn the camera ●●Images from the camera are now displayed on the TV. (Nothing is displayed on the camera screen.) ●●When finished, turn off the camera and TV before disconnecting the cable. ●● During HDMI output, display of the next image may take some time if you switch between 4K and HD movies, or movies of different frame rates. ●● When the camera and TV are connected, you can also shoot while previewing shots on the larger screen of the TV. To shoot, follow the same steps as when using the camera screen. Inserting and Charging the Battery Pack Charge the battery pack by using the supplied battery pack with an optional Compact Power Adapter CA-DC30 Series and Interface Cable IFC-600PCU. 1 Insert the battery pack. ●●Follow step 1 in "Inserting the Battery Pack and Your Memory Card" (=15) to open the cover. ●●Insert the battery pack as described in step 2 of "Inserting the Battery Pack and Your Memory Card" (=15). ●●Follow step 4 in "Inserting the Battery Pack and Your Memory Card" (=16) to close the cover. 2 Connect the compact power adapter to the camera. (2) (1) ●●With the camera turned off, open the cover (1). Hold the smaller plug of the interface cable (sold separately) facing as shown and insert the plug fully into the camera terminal (2). ●●Insert the larger plug of the interface cable into the compact power adapter. Before Use Basic Guide Advanced Guide Camera Basics Auto Mode / Hybrid Auto Mode Other Shooting Modes P Mode Tv, Av, and M Mode Playback Wireless Features Setting Menu Accessories Appendix Index 109
-
 1
1 -
2
-
3
-
4
-
5
-
6
-
7
-
8
-
9
-
10
-
11
-
12
-
13
-
14
-
15
-
16
-
17
-
18
-
19
-
20
-
21
-
22
-
23
-
24
-
25
-
26
-
27
-
28
-
29
-
30
-
31
-
32
-
33
-
34
-
35
-
36
-
37
-
38
-
39
-
40
-
41
-
42
-
43
-
44
-
45
-
46
-
47
-
48
-
49
-
50
-
51
-
52
-
53
-
54
-
55
-
56
-
57
-
58
-
59
-
60
-
61
-
62
-
63
-
64
-
65
-
66
-
67
-
68
-
69
-
70
-
71
-
72
-
73
-
74
-
75
-
76
-
77
-
78
-
79
-
80
-
81
-
82
-
83
-
84
-
85
-
86
-
87
-
88
-
89
-
90
-
91
-
92
-
93
-
94
-
95
-
96
-
97
-
98
-
99
-
100
-
101
-
102
-
103
-
 104
104 -
 105
105 -
 106
106 -
 107
107 -
 108
108 -
 109
109 -
 110
110 -
 111
111 -
 112
112 -
 113
113 -
 114
114 -
115
-
116
-
117
-
118
-
119
-
120
-
121
-
122
-
123
-
124
-
125
-
126
-
127
-
128
-
129
-
130
 |
 |
