Canon PowerShot SX740 HS Camera User Guide - Page 96
Registering Other Web Services
 |
View all Canon PowerShot SX740 HS manuals
Add to My Manuals
Save this manual to your list of manuals |
Page 96 highlights
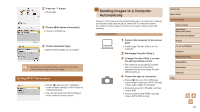
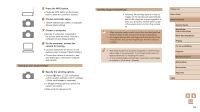
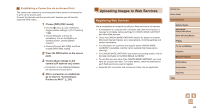
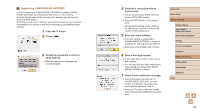
●●[ ] now changes to [ ]. 8 Access the page in the notification message and complete camera link settings. ●●From a computer or smartphone, access the page linked in the notification message. ●●Follow the instructions to complete the settings on the camera link settings page. 9 Complete CANON iMAGE GATEWAY settings on the camera. ●●Choose [ ]. ●●CANON iMAGE GATEWAY has now been added as a destination Web service. ●● Make sure initially that your computer or smartphone mail application is not configured to block email from relevant domains, which may prevent you from receiving the notification message. Registering Other Web Services You can also add Web services besides CANON iMAGE GATEWAY to the camera. 1 Log in to CANON iMAGE GATEWAY and access the camera link settings page. ●●From a computer or smartphone, access http://www.canon.com/cig/ to visit CANON iMAGE GATEWAY. 2 Configure the Web service you want to use. ●●Follow the instructions displayed on the smartphone or computer to set up the Web service. 3 Choose [ ]. ●●Press the button to choose [ ]. ●● If any configured settings change, follow these steps again to update the camera settings. Before Use Basic Guide Advanced Guide Camera Basics Auto Mode / Hybrid Auto Mode Other Shooting Modes P Mode Tv, Av, and M Mode Playback Wireless Features Setting Menu Accessories Appendix Index 96
-
 1
1 -
2
-
3
-
4
-
5
-
6
-
7
-
8
-
9
-
10
-
11
-
12
-
13
-
14
-
15
-
16
-
17
-
18
-
19
-
20
-
21
-
22
-
23
-
24
-
25
-
26
-
27
-
28
-
29
-
30
-
31
-
32
-
33
-
34
-
35
-
36
-
37
-
38
-
39
-
40
-
41
-
42
-
43
-
44
-
45
-
46
-
47
-
48
-
49
-
50
-
51
-
52
-
53
-
54
-
55
-
56
-
57
-
58
-
59
-
60
-
61
-
62
-
63
-
64
-
65
-
66
-
67
-
68
-
69
-
70
-
71
-
72
-
73
-
74
-
75
-
76
-
77
-
78
-
79
-
80
-
81
-
82
-
83
-
84
-
85
-
86
-
87
-
88
-
89
-
90
-
 91
91 -
 92
92 -
 93
93 -
 94
94 -
 95
95 -
 96
96 -
 97
97 -
 98
98 -
 99
99 -
 100
100 -
 101
101 -
102
-
103
-
104
-
105
-
106
-
107
-
108
-
109
-
110
-
111
-
112
-
113
-
114
-
115
-
116
-
117
-
118
-
119
-
120
-
121
-
122
-
123
-
124
-
125
-
126
-
127
-
128
-
129
-
130
 |
 |
