Canon PowerShot SX740 HS Camera User Guide - Page 87
Geotagging Images as You Shoot
 |
View all Canon PowerShot SX740 HS manuals
Add to My Manuals
Save this manual to your list of manuals |
Page 87 highlights
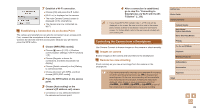
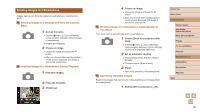
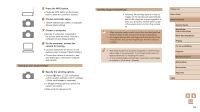
Geotagging Images as You Shoot Your shots can be geotagged using GPS information (such as latitude, longitude, and elevation) from a smartphone connected via Bluetooth. 1 Start Camera Connect. ●●Keep the smartphone running Camera Connect within arm's reach. 2 Turn on GPS. ●●Choose [ ] menu (=23) > [GPS settings]. ●●In [GPS via mobile], choose [Enable]. ●●On the smartphone, activate location services. 3 Shoot. ●●Before shooting, confirm that [ ] and [ ] icons are shown on the camera. If the icons are not shown, press the button repeatedly. ●●Your shots are now geotagged. ●●From now on, shots you take with Camera Connect running will be geotagged. Checking Location Information ●● Switch to "Detailed Information Display 2" (=68) to view GPS information in geotagged images. ●● The date and time of UTC is essentially the same as Greenwich Mean Time. ●● Using the Map Utility program, you can display the location information on a map. ●● The GPS information added to your movie is acquired initially, when you start recording. ●● Shots may not be geotagged immediately after the camera is turned on. ●● Others may be able to locate or identify you by using location data in your geotagged still images or movies. Be careful when sharing these images with others, as when posting images online where many others can view them. Before Use Basic Guide Advanced Guide Camera Basics Auto Mode / Hybrid Auto Mode Other Shooting Modes P Mode Tv, Av, and M Mode Playback Wireless Features Setting Menu Accessories Appendix Index 87
-
 1
1 -
2
-
3
-
4
-
5
-
6
-
7
-
8
-
9
-
10
-
11
-
12
-
13
-
14
-
15
-
16
-
17
-
18
-
19
-
20
-
21
-
22
-
23
-
24
-
25
-
26
-
27
-
28
-
29
-
30
-
31
-
32
-
33
-
34
-
35
-
36
-
37
-
38
-
39
-
40
-
41
-
42
-
43
-
44
-
45
-
46
-
47
-
48
-
49
-
50
-
51
-
52
-
53
-
54
-
55
-
56
-
57
-
58
-
59
-
60
-
61
-
62
-
63
-
64
-
65
-
66
-
67
-
68
-
69
-
70
-
71
-
72
-
73
-
74
-
75
-
76
-
77
-
78
-
79
-
80
-
81
-
 82
82 -
 83
83 -
 84
84 -
 85
85 -
 86
86 -
 87
87 -
 88
88 -
 89
89 -
 90
90 -
 91
91 -
 92
92 -
93
-
94
-
95
-
96
-
97
-
98
-
99
-
100
-
101
-
102
-
103
-
104
-
105
-
106
-
107
-
108
-
109
-
110
-
111
-
112
-
113
-
114
-
115
-
116
-
117
-
118
-
119
-
120
-
121
-
122
-
123
-
124
-
125
-
126
-
127
-
128
-
129
-
130
 |
 |
