Canon PowerShot SX740 HS Camera User Guide - Page 111
Using the Software
 |
View all Canon PowerShot SX740 HS manuals
Add to My Manuals
Save this manual to your list of manuals |
Page 111 highlights
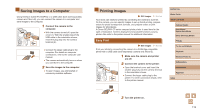
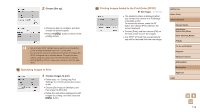
Using a Computer to Charge the Battery You can also charge the battery pack by inserting the larger plug of the interface cable into a computer's USB terminal in step 2 of "Inserting and Charging the Battery Pack" (=109). For details about USB connections on the computer, refer to the computer user manual. We recommend using Interface Cable IFC-600PCU (sold separately). ●●With the camera turned off, open the cover. With the smaller plug of the cable in the orientation shown, insert the plug fully into the camera terminal. ●●Connect the larger cable plug to the computer. For details on computer connections, refer to the computer user manual. ●●Charging now begins, and the indicator on the back of the camera is lit in orange. ●●However, charging may take longer if you import images on the camera to the computer, as described in "Saving Images to a Computer" (= 112). ●●The lamp turns off when charging finishes. ●● Charging may take longer if you import images from the camera to a computer, as described in "Saving Images to a Computer" (= 112). ●● Charging stops and the indicator goes off if, after you begin charging as described above, you press the power button to turn the camera off. ●● With some computers, battery charging may require the memory card to be in the camera. Insert the memory card in the camera (=15) before connecting the cable to the computer's USB port. Using the Software To utilize the features of the following software, download the software from the Canon website and install it on your computer. ●● Image Transfer Utility 2 -- Automatically send images to a computer (=91) ●● Map Utility -- Use a map to view GPS information that has been added to images ●● To view and edit images on a computer, use preinstalled or commonly available software compatible with images captured by the camera. ●● Download and install the latest software from the Canon website. Before Use Basic Guide Advanced Guide Camera Basics Auto Mode / Hybrid Auto Mode Other Shooting Modes P Mode Tv, Av, and M Mode Playback Wireless Features Setting Menu Accessories Appendix Index 111
-
 1
1 -
2
-
3
-
4
-
5
-
6
-
7
-
8
-
9
-
10
-
11
-
12
-
13
-
14
-
15
-
16
-
17
-
18
-
19
-
20
-
21
-
22
-
23
-
24
-
25
-
26
-
27
-
28
-
29
-
30
-
31
-
32
-
33
-
34
-
35
-
36
-
37
-
38
-
39
-
40
-
41
-
42
-
43
-
44
-
45
-
46
-
47
-
48
-
49
-
50
-
51
-
52
-
53
-
54
-
55
-
56
-
57
-
58
-
59
-
60
-
61
-
62
-
63
-
64
-
65
-
66
-
67
-
68
-
69
-
70
-
71
-
72
-
73
-
74
-
75
-
76
-
77
-
78
-
79
-
80
-
81
-
82
-
83
-
84
-
85
-
86
-
87
-
88
-
89
-
90
-
91
-
92
-
93
-
94
-
95
-
96
-
97
-
98
-
99
-
100
-
101
-
102
-
103
-
104
-
105
-
 106
106 -
 107
107 -
 108
108 -
 109
109 -
 110
110 -
 111
111 -
 112
112 -
 113
113 -
 114
114 -
 115
115 -
 116
116 -
117
-
118
-
119
-
120
-
121
-
122
-
123
-
124
-
125
-
126
-
127
-
128
-
129
-
130
 |
 |
