Canon REALiS LCOS WUX10 Mark II D Multimedia Projector WUX10 MarkII Users Manu - Page 129
When Projecting an Image from Image Software, ing [Zoom] in [Aspect].
 |
View all Canon REALiS LCOS WUX10 Mark II D manuals
Add to My Manuals
Save this manual to your list of manuals |
Page 129 highlights
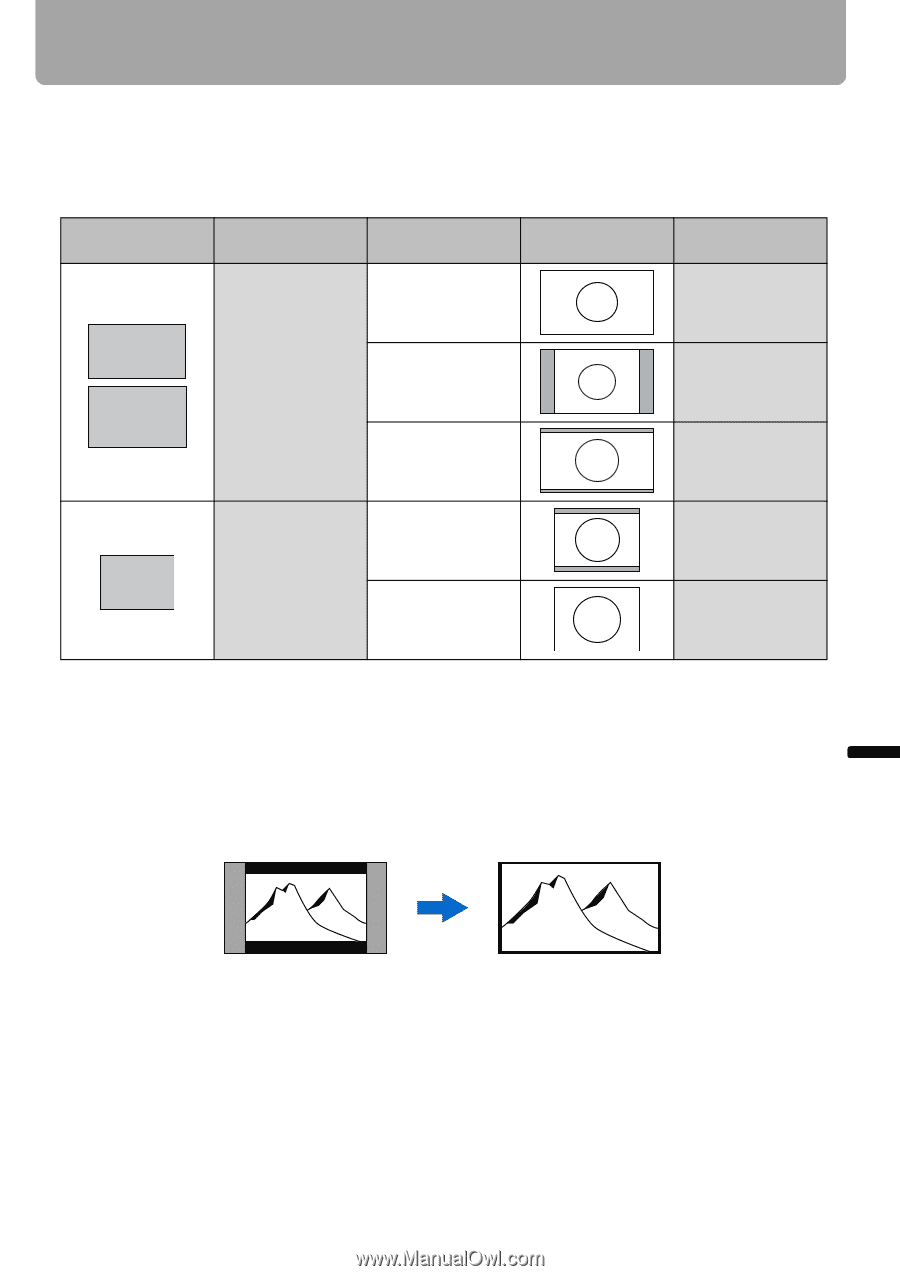
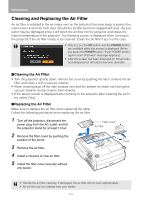
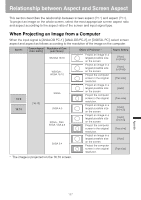
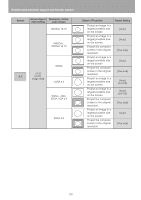
Relationship between Aspect and Screen Aspect When Projecting an Image from Image Software To project an image such as an image shot by a TV set, commercially available DVD software, or video camcorder (input signal [HDMI], [VIDEO], [COMPONENT]), select an aspect ratio according to the image software format as follows. Screen Screen Aspect Ratio Setting Projection Result Aspect Setting * Screen 16:9 [Auto] (or [16:9]) 16:9 16:10 [16:9] [16:9 D. image shift] 4:3 16:9 image in 4:3 screen [Auto] [Zoom] 16:9 [4:3] 4:3 [4:3 D. image shift] 4:3 [Auto] (or [16:9]) [Auto] (or [4:3]) * The image is projected on the 16:9 or 4:3 screen. • [Auto] cannot be selected for the aspect setting if the input signal type is [VIDEO]. • If an image from image software with aspect ratio of 16:9 is not projected correctly, select [16:9] as screen aspect. • If you project the 16:9 image with black borders at top and bottom such as in the terres- trial movie broadcasting, you can project the 16:9 image fully on the screen by selecting [Zoom] in [Aspect]. [Zoom] is available when [16:10], [16:9] or [16:9 D. image shift] is selected for the screen aspect and [HDMI (480p)], [COMPONENT (480p, 480i)], or [VIDEO] is selected for the input signal. • To perform keystone adjustment (P55), select [4:3] or [16:9] for [Screen aspect]. Appendix 129
-
 1
1 -
2
-
3
-
4
-
5
-
6
-
7
-
8
-
9
-
10
-
11
-
12
-
13
-
14
-
15
-
16
-
17
-
18
-
19
-
20
-
21
-
22
-
23
-
24
-
25
-
26
-
27
-
28
-
29
-
30
-
31
-
32
-
33
-
34
-
35
-
36
-
37
-
38
-
39
-
40
-
41
-
42
-
43
-
44
-
45
-
46
-
47
-
48
-
49
-
50
-
51
-
52
-
53
-
54
-
55
-
56
-
57
-
58
-
59
-
60
-
61
-
62
-
63
-
64
-
65
-
66
-
67
-
68
-
69
-
70
-
71
-
72
-
73
-
74
-
75
-
76
-
77
-
78
-
79
-
80
-
81
-
82
-
83
-
84
-
85
-
86
-
87
-
88
-
89
-
90
-
91
-
92
-
93
-
94
-
95
-
96
-
97
-
98
-
99
-
100
-
101
-
102
-
103
-
104
-
105
-
106
-
107
-
108
-
109
-
110
-
111
-
112
-
113
-
114
-
115
-
116
-
117
-
118
-
119
-
120
-
121
-
122
-
123
-
 124
124 -
 125
125 -
 126
126 -
 127
127 -
 128
128 -
 129
129 -
 130
130 -
 131
131 -
 132
132 -
 133
133 -
 134
134 -
135
-
136
-
137
-
138
-
139
-
140
-
141
-
142
-
143
-
144
-
145
-
146
 |
 |