Canon REALiS LCOS WUX10 Mark II D Multimedia Projector WUX10 MarkII Users Manu - Page 46
When the Password Input Screen Appears, When \, When Notebook Computer Screen Does Not Appear
 |
View all Canon REALiS LCOS WUX10 Mark II D manuals
Add to My Manuals
Save this manual to your list of manuals |
Page 46 highlights
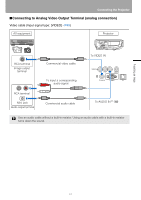
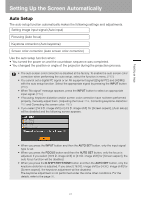
Starting Projection ■When the Password Input Screen Appears If you have set a password, the Password input screen appears. Enter your password. (P100) ■When "No signal" Appears A notebook computer requires to turn on the external monitor output. (P46) Press the INPUT button to select an appropriate input signal. (P50) ■When Notebook Computer Screen Does Not Appear Set your notebook computer to output signals to an external monitor. For more details, refer to "Changing Notebook Computer Screen Output" below. ■Adjusting Image • For the display resolution of the computer, select "1920 x 1200 pixels" or a resolution closest to the output signal resolution of the computer. (P51) • Use the auto PC function to adjust shift in computer image or the flickering of the screen. (P52) • Use the ZOOM button to adjust the size of the projecting image. (P53) • Use the FOCUS button to correct the focus adjustment if necessary. (P54) • Use the D.SHIFT/KEYSTONE button to adjust keystone correction if necessary. (P55) • Select the aspect ratio of the projecting image (screen aspect) or a screen mode (aspect) according to the aspect ratio of the screen, type of input image signal and so on. (P57 - P62) • Select an image mode depending on the projecting image. (P63) Changing Notebook Computer Screen Output To use a notebook computer, you need to change the screen output on the notebook computer. This operation is not required for a desktop computer. ■Turning On External Monitor Output You can turn on the external monitor output via keyboard operation. To turn on the external monitor output, press an icon for an external monitor or a function key ([F1] to [F12]) while holding [Fn] key down. While holding key Press a key such as or The function keys you use and the method used to turn on the external monitor output vary depending on the model. For details, see the instructions of your notebook computer. 46
-
 1
1 -
2
-
3
-
4
-
5
-
6
-
7
-
8
-
9
-
10
-
11
-
12
-
13
-
14
-
15
-
16
-
17
-
18
-
19
-
20
-
21
-
22
-
23
-
24
-
25
-
26
-
27
-
28
-
29
-
30
-
31
-
32
-
33
-
34
-
35
-
36
-
37
-
38
-
39
-
40
-
 41
41 -
 42
42 -
 43
43 -
 44
44 -
 45
45 -
 46
46 -
 47
47 -
 48
48 -
 49
49 -
 50
50 -
 51
51 -
52
-
53
-
54
-
55
-
56
-
57
-
58
-
59
-
60
-
61
-
62
-
63
-
64
-
65
-
66
-
67
-
68
-
69
-
70
-
71
-
72
-
73
-
74
-
75
-
76
-
77
-
78
-
79
-
80
-
81
-
82
-
83
-
84
-
85
-
86
-
87
-
88
-
89
-
90
-
91
-
92
-
93
-
94
-
95
-
96
-
97
-
98
-
99
-
100
-
101
-
102
-
103
-
104
-
105
-
106
-
107
-
108
-
109
-
110
-
111
-
112
-
113
-
114
-
115
-
116
-
117
-
118
-
119
-
120
-
121
-
122
-
123
-
124
-
125
-
126
-
127
-
128
-
129
-
130
-
131
-
132
-
133
-
134
-
135
-
136
-
137
-
138
-
139
-
140
-
141
-
142
-
143
-
144
-
145
-
146
 |
 |